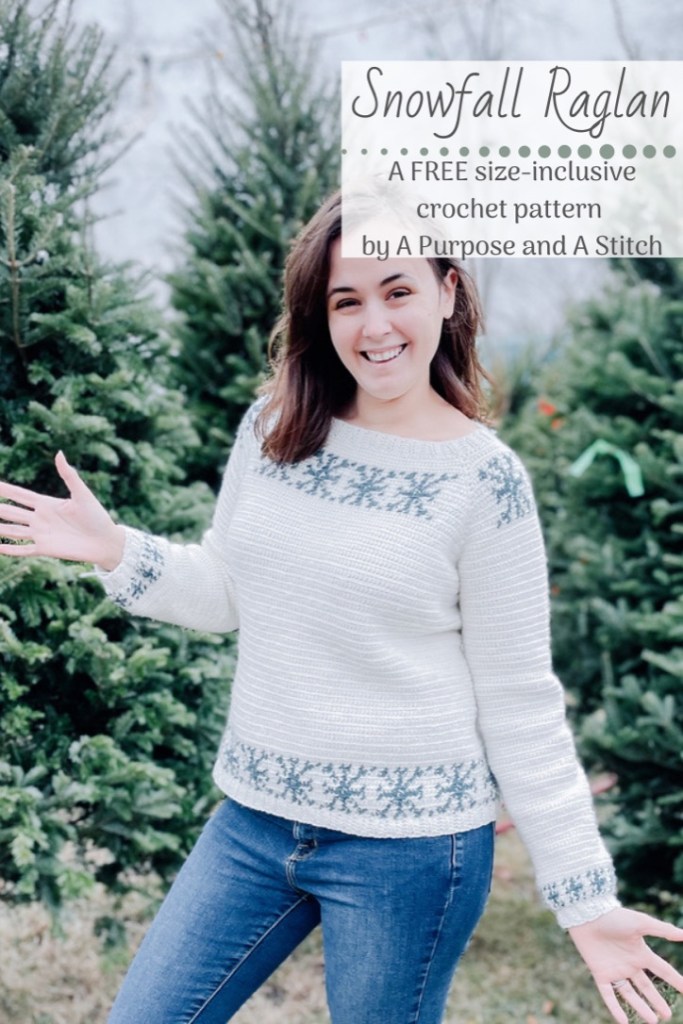
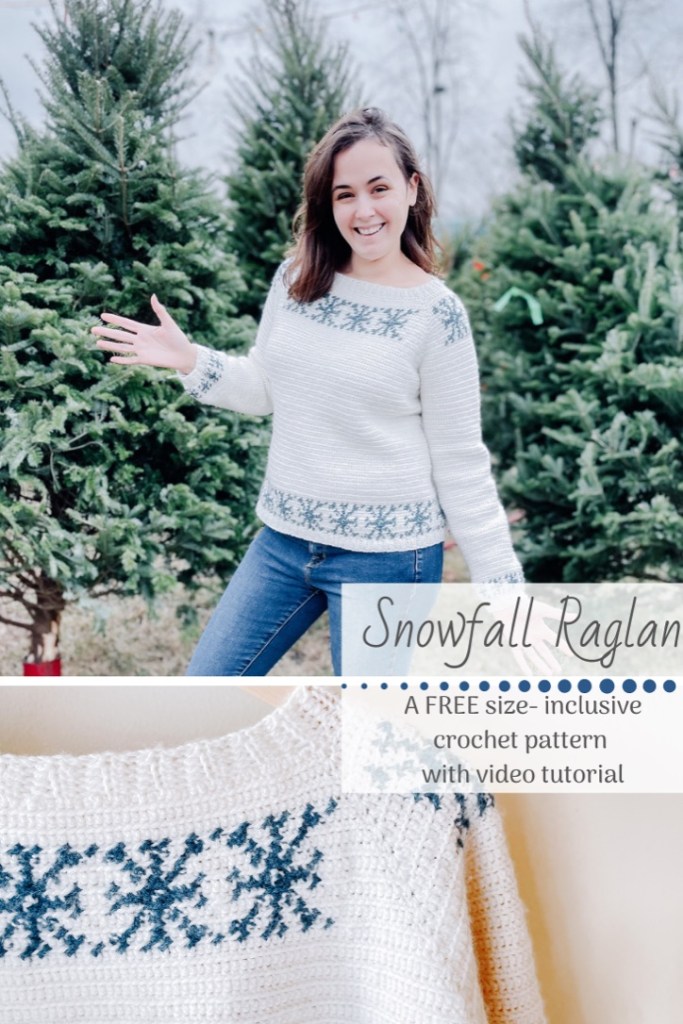
Snowfall Raglan- Free Crochet Pattern
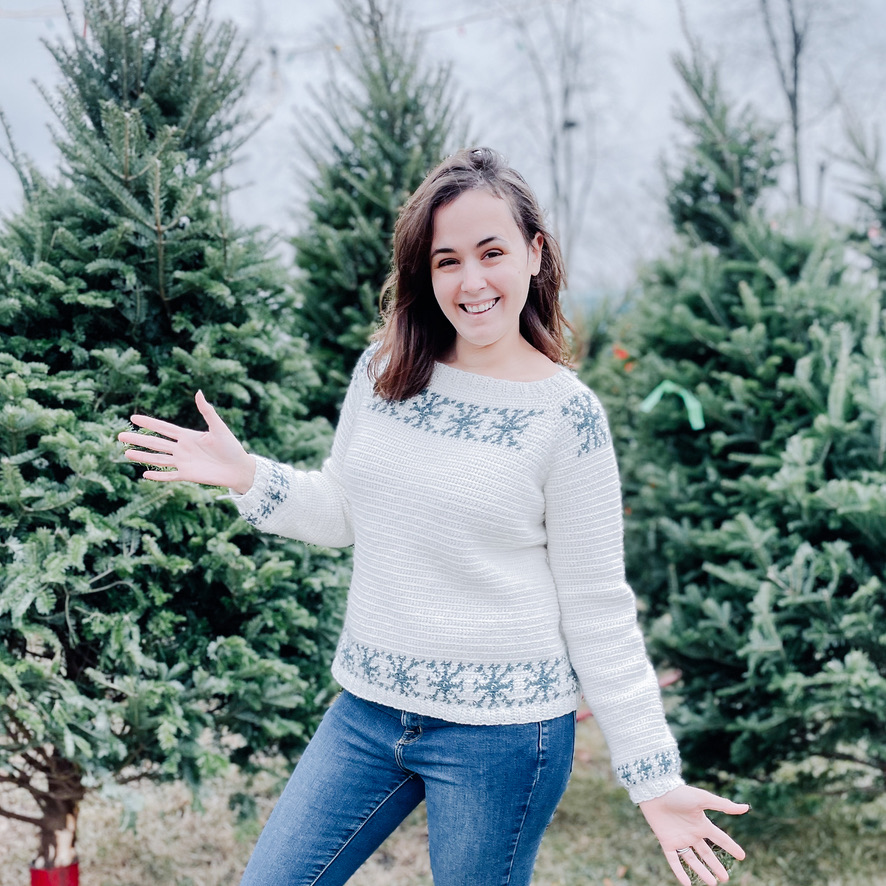
About The Design
895. That’s how many of you liked the first sneak peek of this sweater on our Instagram page! Now, that may or may not seem like a lot for you, but I rather felt like a viral sensation every time I hopped on my account and saw that our post had another 100 likes. 🥰
Whether or not you were one of the first to like that picture, it gave me a whole new level of excitement to share this pattern with you. This pattern has challenged me and pushed me on every level. It has taken everything I thought I knew about pattern designing and writing a flipped it on it’s head. I’m venturing into uncharted waters here (at least for me) and in a word, it has been adventurous.
I’ve been wanting to design a fair-isle style crochet sweater FOREVER, but really wanted to feel confident in designing with fair-isle stranded color work and designing top-down sweaters before marrying the two together. After making a few color work patterns (like our Andes Mittens, Arroway Glittens, and our Bobbles Up scarf, it was off to making top-down garments. El’s Top Down was a huge success, and after releasing the New Bloom Crop, Summer’s Breeze Halter and our Cobblestone Cardigan, I was feeling pretty confident in top-down raglans. Cue the idea to make a snowflake top-down raglan. I might forgive myself one day….
I kid, I kid. 😅 Every time a tester shared a progress shot, I forgave myself a bit more. And now that I’ve tackled one, I might just try another… who am I kidding. I’ve already got another in the pipelines for next fall. 🤫
Okay so now that you’ve had a small insight into the drama behind this pattern, on to the good stuff…
About The Pattern
We’ve established that this was a complex pattern to design. Please know before you start, that this is an intermediate- advanced level pattern, and experience with crochet color work is recommended. And while it’s a doozy to crochet, it was even more complex to write up and grade.😬 I’ve done the best I can, and let me quickly reiterate; this is new territory. I’ve never seen a crochet pattern like this before, let alone designed one, so I have pulled out all the stops to try and help you through it. I’ve got graphs, I’ve got links AND I’ve got a full fledged video tutorial. On the PDF I also have comprehensive sizing notes, a stitch graph and detailed color work instructions for working the yoke color work. This PDF is going to be well worth it’s weight in gold, but I felt very strongly going into this pattern that I wanted to stick to our business model of offering all of our patterns for free on this blog.
All that to say, I’m fairly confident that this 11 page pattern will be much easier to follow printed and color coded for size, so I recommend purchasing the inexpensive PDF before you start. But if you’re up for the challenge, it is available for FREE below. And I’ve even included the color work graphs as free printables, to make following the free version easier to do.
Want to know more about the printable and inexpensive PDF? You can purchase it from our our Ravelry shop here or our site shop here. Due to the restrictions of Etsy, we have not been able to list this pattern there, but are working on getting it listed shortly. The pattern is color coded per size, has the detailed instructions for working the yoke color work, mentioned above, and best of all 50% of all pattern sale proceeds are donated to ended modern day slavery.
Want to make a mommy and me set? You can now get the child sized pattern here. Or if you purchase both PDFs from Ravelry, you will automatically get the child sizes for 50% off.
Some Extra Help
Need some extra help making this sweater? I have a full video tutorial of making this sweater from start to finish. The video has been attached to both this post, as well as on our blog post where you will also find a breakdown of key parts of the video to help you more easily jump to an area you might be stuck on while making this sweater.
That with the extra tools in the PDF of the exact color changes per stitch on the yoke written out for each size, should help even the most novice crocheter get a leg up on making this sweater. 😀
And please, please, please for the love of all that is holy- read through the pattern notes BEFORE you begin. 😂 I know it seems like a lot and you’re excited to being, but these notes are there to help head off any issues or questions you may have as you work the pattern. I also recommend referencing back to the pattern notes if at any point you find yourself stuck while working.
About The Yarn
For my sweaters I used Capra yarn from WeCrochet. It’s a cashmere, merino wool blend and perfectly soft. It’s a DK weight yarn, and I cannot recommend it enough! It is on the pricier side though, so if you’re looking for a good substitute, I would start with recommending an alternate wool DK weight (category 3) yarn, such as WeCrochet’s Swish DK, Lion Brand’s Touch of Merino or Lion Brand’s Wool Ease DK. Allergic to wool or can’t get your hands on any of those? I would recommend a different natural fiber to start with. Natural fibers block differently than man made fibers (like acrylic or polyester), and while blocking is not required for this top, I do recommend it if you’re having any issues with the fit of the yoke or completed sweater.
Really just want to use something from your stash, the most important thing is to meet gauge. You could use whatever yarn you have enough of, as long as you can meet gauge. Just keep in mind that different yarns will offer a different drape effect. Some other yarns that our testers used with great success included: hand dyed merino (check out our shop for some great options), Lion Brand’s Baby Soft, Lion Brand’s Coboo, Berroco Vintage, Prairie Spun DK, and Lion Brand’s Basic Stitch.
The Pattern
| What You Need |
| 4.5 mm (US 7) crochet hook (or hook to meet gauge) A hook .5mm larger than hook to meet gauge with (if making XS or Small) 7 (9,10,11,13,14,16,18,19) balls of WeCrochet’s Capra Yarn or comparable DK weight yarn in A (approximately 990, 1020, 1150, 1330, 1700, 1815, 1920, 2110, 2330 yards) 1 (1,1,1,2,2,2,2,2) balls of WeCrochet’s or comparable DK weight yarn in B (approximately 90, 95, 110, 115, 140, 160, 180, 200, 210 yards) Embroidery or darning needle Scissors |
| Gauge Used |
| 20 sc flo sts= 4” 16 rows= 4” |
| Collar Gauge Used |
| 18 hdc in blo sts= 4” 10 rows of hdc in blo= 4” |
| Abbreviations Used |
| A= Main color yarn (I used white) B= Secondary color yarn (I used blue) C= column (of graph) ch= chain dec= decrease (sc 2 together in flo) hdc= half double crochet blo= back loop only flo= front loop only fo= fasten off p/u= pick up RS= right side [of work] WS= wrong side [of work] sc= single crochet sk= skip [stitch] sl st= slip stitch Ch 2 sp= chain 2 space sm= stitch marker |
| Pattern Notes |
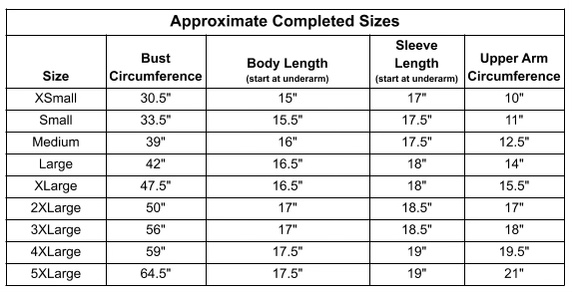
| This pattern is written in US standard size and abbreviations This top is written to fit, with a 0- 2” positive ease on the bust, and 0-1” positive ease on the sleeves. Please reference the size chart above to choose which size will work best for you. The pattern is written in x-small size with (small, medium, large, x-large, 2x-large, 3x-large, 4x-large and 5x-large) sizes to follow in parentheses. The yoke, body, and sleeve patterns are all worked in joined turning rounds. The ribbing is worked back and forth in rows. Turning chs at the beginning of each round/row do not count as a stitch. All rounds will be worked in joined turning rounds. When turning your work, make sure you don’t work into your sl st which may look like the first st, if you do not pull it tight. If you work into the sl st as your first stitch, the color work graphs will be off by one stitch on the WS rounds. The final stitch count for each row/round are listed in parentheses following the instructions. These do not include the ch-2 sps in the yoke rounds. When changing colors, we will change to the new color (and drop the working color) in the last yarn over of the stitch before the new color begins. For a helpful video tutorial on how to crochet color work, I recommend this video by Whistle and Ivy found here. Please note that she is working into the blo for her color work, while we will be working into the flo. To work the fair isle method flat (as we will since we are working in turning rounds), I recommend this helpful video tutorial: https://youtu.be/g8jHzQN-WU0 To work the color changes on this pattern, we will use a fair-isle style color work, where we will carry the unused color behind our work when working the RS and in front of our work when working the WS. I recommend picking up a float when working more than 5 stitches in the same color by working the unused color behind the working stitch. If you are unfamiliar with fair-isle style crochet, I recommend this helpful video tutorial found here. Bethany shows the fair-isle method at 4:30 in and ends at 5:20. The ribbing on the sleeves and body is added as you go, rather than being a separate piece attached later. For an example of how to work this technique, I recommend this tutorial by TL Yarn Crafts found here. Please note that this video is meant to only serve as a guide (for example, we will not go down a hook size in this pattern as she does in the video). Follow the pattern as written below. |
| Pattern Composition |
| This is a seamless, top-down style pattern. You will work in the following order: You will start with the collar which will be joined to create a cylinder that will be located at the center back of your top. You will pick up the foundation for the yoke directly onto the collar. For “Splitting the Yoke”, you will start by adding the body and body ribbing. From here you will add one sleeve with cuff. Last is adding the other sleeve with a cuff. |
Collar Pattern
Foundation: In A, ch 7 (7, 7, 7, 7, 9, 9, 9,9)
Row 1: starting in 3rd ch from hook, hdc in blo across st, turn. (5, 5, 5, 5, 5, 7, 7, 7, 7)
Row 2: ch 2, hdc in blo 4 (4, 4, 4, 4, 6, 6, 6, 6), hdc in last, turn. (5, 5, 5, 5, 5, 7, 7, 7, 7)
Row 3: ch 2, hdc in 1st, hdc in blo 4 (4, 4, 4, 4, 6, 6, 6, 6), turn. (5, 5, 5, 5, 5, 7, 7, 7, 7)
Row 4- 47(47,49,53, 55, 61, 63,69, 73): repeat rows 2 & 3. (5, 5, 5, 5, 5, 7, 7, 7, 7)
Row 48 (48, 50, 54, 56, 62, 64, 70, 74): join last row to foundation to form a circle, sl st in each of both rows across. (5, 5, 5, 5, 5, 7, 7, 7, 7)
DO NOT FASTEN OFF continue to “Yoke Pattern”
| Yoke Pattern Notes |
| I recommend placing stitch markers in the 4 “ch 2” corners of the yoke and moving down each row. The pattern below is worked in combination with color work graphs. For the color work; there is a separate graph page for each size. Each size will follow 2 different color work graphs for the color work on the yoke and a uniform graph on repeat around the bottom of the body and one for the bottom of the sleeves. The longer sides of your yoke will follow graph 1 and the shorter sides will follow graph 2. Each round of the yoke is broken up into 5 steps, following half of graph 1, graph 2, all of graph 1, graph 2 again and then finally the other half of graph 1. Since this pattern is worked in turning rounds, you will be reading the color work graphs back and forth in rows, starting at the center of graph 1, moving towards the left for round 7. Round 8 will also start at the center of graph 1, but you will follow it towards the right. |

Yoke Pattern
Foundation: [continuing in A] ch 1, and sc into each row of the collar around, adding an additional 28(40, 48, 56,80, 87, 110, 116, 138) sts as evenly around as possible, ending with a total of 76 (88, 98, 110, 136, 148, 174, 186, 212) sc sts, sl st to join to starting st.
Place sm in the 16th (17th, 20th, 22nd, 27th, 28th, 33rd, 35th, 40th) st from the sl st, place another sm in the 5th (8th, 7th, 10th, 13st, 16th, 19th, 22nd, 25th) st away from that, place another sm in the 33rd (36th, 42nd, 45th, 55th, 58th, 68th, 71st, 81st) st away from that and place another sm in the 5th (8th, 7th, 10th, 13th, 16th, 19th, 22nd, 25th) away from that.
((sm placed in the: 16th (17th, 20th, 22nd, 27th, 28th, 33rd, 35th, 40th), 21st (25th, 27th, 32nd, 40th, 44th, 52nd, 57th, 65th), 54th (61st, 69th, 77th, 95th, 102nd, 120th, 128th, 146th), 59th (69th, 76th, 87th, 108th, 118th, 139th, 150th, 171st) sts))
Round 1[RS]: ch 1, turn, sc flo to 1st sm, *(sc, ch 2, sc) in st with sm, sc flo to next sm*, repeat from * to * around, sl st to starting st. (80, 92,102, 114, 140, 152, 178, 190, 216)
Round 2-6: ch 1, turn, sc flo to ch-2 sp. *(sc, ch 2, sc) in ch-2sp, sc flo to next ch-2 sp, repeat from * around, sl st into starting sc. (end round 6 with 120, 132, 142, 154, 180, 192, 218, 230, 256)
Round 7 [RS]:
- ch 1, turn, p/u B, sc flo starting graph 1 at C33 (C34, C37, C39, C44, C45, C50, C52, C57) and continue to sc flo, following graph 1 towards ch-2 sp, changing colors as indicated to end of graph,
- In A, (sc, ch 2, sc) in ch-2 sp, sc flo following graph 2, starting at start of graph, changing colors as indicated to end of graph and working towards next ch-2 sp,
- In A, (sc, ch 2, sc) in ch-2 sp, sc flo following graph 1, starting at start of graph, changing colors as indicated to end of graph and working towards ch-2 sp,
- Repeat step 2,
- In A, (sc, ch 2, sc) in ch-2 sp, sc flo following graph 1, starting at start of graph, changing colors as indicated, towards ch-2 sp, ending at C32 (C33, C36, C38, C43, C44, C49, C51, C56), sl st to starting st.
(128, 140, 150, 162, 188, 200, 226, 238, 264)
Round 8:
- ch 1, turn, start graph 1 at C32 (C33, C36, C38, C43, C44, C49, C51, C56) and continue to sc flo, following graph 1 towards ch-2 sp, changing colors as indicated to start of graph,
- In A (sc, ch 2, sc) in ch-2 sp, begin following graph 2 working sc flo, starting at C36 (C39, C38, C41, C44, C47, C50, C53, C56) changing colors as indicated to start of graph and working towards ch-2 sp,
- In A (sc, ch 2, sc) in ch-2 sp, begin following graph 1 working sc flo, starting at C64 (C67, C73, C76, C86, C89, C99, C102, C112), changing colors as indicated to start of graph and working towards ch-2 sp,
- Repeat step 2,
- In A, (sc, ch 2, sc) in ch-2 sp, begin following graph 1 working sc flo, starting at C64 (C67, C73, C76, C76, C89, C89, C102, C112), changing colors as indicated, towards ch-2 sp, ending at C33 (C34, C37, C39, C44, C45, C50, C52, C57), sl st to starting st.
(136, 148, 158, 170, 196, 208, 234, 246, 272)
Round 9-17: repeat rounds 7 & 8 working the next row of each graph through completion.
Cut B and weave in ends.
Round 18-22 (24, 28, 30, 32, 34, 36, 38, 40): [In A] ch 1, turn, sc flo to ch-2 sp, *(sc, ch 2, sc) in ch-2 sp, sc flo to next ch-2 sp, repeat from * around, sl st into last sc (248, 276, 318, 346, 388, 416, 458, 486, 528)
Yoke Graphs By size
*All color work graphs found here are copyright of Bernadette Saad at A Purpose and A Stitch. Please do not repost or claim these graphs as your own.*
Splitting The Yoke

Round 1[RS]: ch 1, turn, sc flo towards ch-2sp, sc in the ch-2 sp and ch-2 sp opposite to join ((sk 48 (55, 62, 69, 76, 83, 90, 97, 104) sts between ch-2 sps), sc flo towards the next ch-2 sp, sc in the next ch-2 sp and ch-2 sp opposite to join ((sk 48 (55, 62, 69, 76, 83, 90, 97, 104) sts between ch-2 sps), sc flo to end, sl st to starting st. (154, 168, 196, 210, 238, 252, 280, 294, 322)
Body Pattern (continued from “Splitting the Yoke”)
Round 1-50 (52,54, 56, 56, 58, 58, 60, 60): [In A] ch 1, turn, sc flo around, sl st to join to starting st. (154, 168, 196, 210, 238, 252, 280, 294, 322)
Round 51 (53, 55, 57, 57, 59, 59, 61, 61): ch 1, turn, sc flo, following stitch graph 3 repeating C1- C14 around, sl st to join to starting st. (154, 168, 196, 210, 238, 252, 280, 294, 322)
Round 52 (54, 56, 58, 58, 60, 60, 62, 62): ch 1, turn, sc flo, following stitch graph 3 repeating C14- C1 around, sl st to join to starting st. (154, 168, 196, 210, 238, 252, 280, 294, 322)
Round 53 (55, 57, 59, 59, 61, 61, 63, 63): ch 1, turn, sc flo, following stitch graph 3 repeating C1- C14 around, sl st to join to starting st. (154, 168, 196, 210, 238, 252, 280, 294, 322)
Round 54 (56, 58, 60, 60, 62, 62, 64, 64)- 61 (63, 65, 67, 67, 69, 69, 71, 71):repeat previous 2 rounds to complete graph 3. Cut B and weave in ends.(154, 168, 196, 210, 238, 252, 280, 294, 322)
Do NOT fasten off A and proceed to “Body Ribbing Pattern”
Body Ribbing Pattern
Foundation: [In A] ch 7 (7, 7, 7, 7, 9, 9, 9,9)
Row 1[RS]: starting in 3rd ch from hook, hdc in blo across st, *sk 1 st on body, sl st to next st on body*, repeat from * to * once. (5, 5, 5, 5, 5, 7, 7, 7, 7)
Row 2: turn, hdc blo 4 (4, 4, 4, 4, 6, 6, 6, 6), hdc in last, turn (5, 5, 5, 5, 5, 7, 7, 7, 7)
Row 3: ch 2, turn, hdc in 1st, hdc in blo 4 (4, 4, 4, 4, 6, 6, 6, 6) towards the body, *sk 1 st on body, sl st to next st on body*, repeat from * to * once. (5, 5, 5, 5, 5, 7, 7, 7, 7)
Row 4-77 (84, 98, 105, 119, 125, 139, 146, 161): repeat rows 2&3 around the entirety of the body opening. (5, 5, 5, 5, 5, 7, 7, 7, 7)
Row 78 (85, 99, 106, 120, 126, 140, 147, 162): join foundation to row 77 (84, 98, 105, 119, 125, 139, 146, 161), sl st into each stitch across st, joining both rows together. Fo and weave in ends. (5, 5, 5, 5, 5, 7, 7, 7, 7)
Sleeve Pattern (repeat on both armholes)
Round 1[RS]: p/u A in ch-2 sp to the right of the armhole opening, ch 1, sc into both ch-2 sps to join, sc flo in each remaining st around, sl st to starting st. (49, 56, 63, 70, 77, 84, 91, 98, 105)
Round 2- 37 (39, 39, 41, 41, 43, 43, 45, 45): ch 1, turn, sc flo around, sl st to join to starting st. (49, 56, 63, 70, 77, 84, 91, 98, 105)
Round 38 (40, 40, 42, 42, 44, 44, 46, 46): ch 1, turn, dec, sc flo around, sl st to join to starting st. (48, 55, 62, 69, 76, 83, 90, 97, 104)
Round 39 (41, 41, 43, 43, 45, 45, 47, 47)-40 (42, 42, 44, 44, 46, 46, 48, 48): ch 1, turn, sc flo around, sl st to join to starting st. (48, 55, 62, 69, 76, 83, 90, 97, 104)
Round 41 (43, 43, 45, 45, 47, 47, 49, 49)-58 (60, 60, 62, 62, 64, 64, 66, 66): repeat last 3 rounds (42, 49, 56, 63, 70, 77, 84, 91, 98)
Round 59 (61, 61, 63, 63, 65, 65, 67,67): ch 1, turn, p/u B, sc flo, following stitch graph 4, repeating C1-C7 around, sl st to join to starting st. (42, 49, 56, 63, 70, 77, 84, 91, 98)
Round 60 (62, 62, 64, 64, 66, 66, 68,68): ch 1, turn, sc flo, following stitch graph 4, repeating C7-C1 around, sl st to join to starting st. (42, 49, 56, 63, 70, 77, 84, 91, 98)
Round 61 (63, 63, 65, 65, 67, 67, 69,69): ch 1, turn, sc flo, following stitch graph 4, repeating C1-C7 around, sl st to join to starting st. (42, 49, 56, 63, 70, 77, 84, 91, 98)
Round 62 (64, 64, 66, 66, 68, 68, 70,70) – 63 (65, 65, 67, 67, 69, 69, 71, 71): repeat previous 2 rounds to complete graph 4. Cut B and weave in ends. (42, 49, 56, 63, 70, 77, 84, 91, 98)
Round 64 (66, 66, 68, 68, 70, 70, 72,72): in A, ch 1, turn, *sc flo, dec in next*, repeat from *to * around, if a st remains; sc flo, sl st to join to starting st. (27, 32, 37, 41, 46, 51, 55, 60,65)
Do NOT fasten off and proceed to “Sleeve Cuff Pattern”
Sleeve Cuff Pattern
Foundation: [In A] ch 7 (7, 7, 7, 7, 9, 9, 9,9)
Row 1: starting in 3rd ch from hook, hdc in blo across st, *sk 1 st on sleeve, sl st to next st on sleeve*, repeat from * to * once. (5, 5, 5, 5, 5, 7, 7, 7, 7)
Row 2: turn, hdc blo 4 (4, 4, 4, 4, 6, 6, 6, 6), hdc in last, turn (5, 5, 5, 5, 5, 7, 7, 7, 7)
Row 3: ch 2, turn, hdc in 1st, hdc in blo 4 (4, 4, 4, 4, 6, 6, 6, 6) towards the sleeve, *sk 1 st on sleeve, sl st to next st on body*, repeat from * to * once. (5, 5, 5, 5, 5, 7, 7, 7, 7)
Row 4-14 (17, 19, 21, 24, 26, 28, 31, 33): repeat rows 2&3 around the entirety of the sleeve opening (5, 5, 5, 5, 5, 7, 7, 7, 7) Row 15 (18, 20, 22, 25, 27, 29, 32, 34): join foundation to row 14 (17, 19, 21, 24, 26, 28, 31, 33), sl st into each stitch across st, joining both rows together. Fo and weave in ends. (5, 5, 5, 5, 5, 7, 7, 7, 7)


Why is the text so light? I have trouble reading it.
That’s just the design for our site. If you ever have an issue seeing the design aspects of a site, you can always try Reader Mode on your browser. 😉