Cozy Cables Blanket Square- Free Pattern
So I’ve teamed up with Claire of Bear Rye Crochet, as well as several other talented makers to bring you an 8X8″ square each day this month. The idea being, that if you make all the squares, you will be able to stitch them together for a fabulous winter themed blanket!
Each day in December, a new square will be released, and the release date for each square will also mean that you can snag the PDF for free.
**If you’re joining us late, fret not, you can still grab the inexpensive PDF on Ravelry AND, most of us will still have patterns available on our blogs for free indefinitely.**
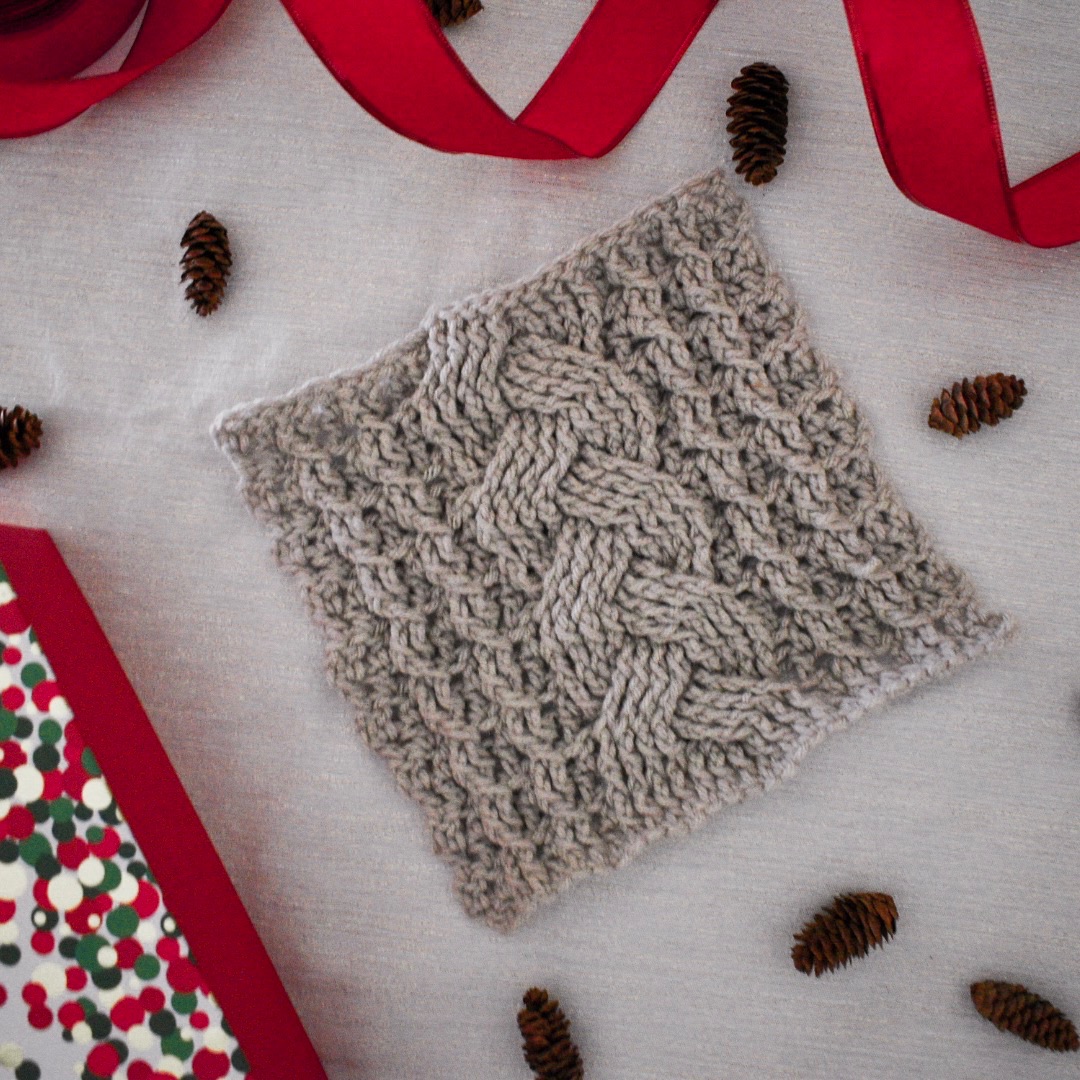
For my square, I went with my all-time favorite crochet technique- CABLES. I especially love cables during the winter, as they just scream cozy to me. Oh, you too? So glad I’m not alone! 😀
If you have any reservations about crocheting cables, I assure you, you can do it! If you can identify the post of a double crochet stitch, you can crochet cables. AND since I have worked cables in to so many of my patterns, you better believe I’ve got posts, upon posts just bursting with pictures to help you along the way.
That being said, the star of this square is the braided cable in the center. If you would like to see some step-by-step pictures on how to work braided cables, I recommend starting with the blog post about our Brilliant Cables Beanie. You can also check out the blog post on our Cozy Cabled Cowl, our Easy Cabled Mug Cozy, and the Murphy Slouchy Beanie (I told you I love this technique ;-P ).
The co-stars are the simple twisted cables on either side, which are also featured in our Cozy Cabled Cowl, our Easy Cabled Mug Cozy, the Murphy Slouchy Beanie, and Andy’s Stocking .
**And, if you’re still feeling lost, we just launched our FIRST EVER video tutorial on how to make this square. You can find a higher quality video of the one shown here on YouTube. **
I’ve tried to keep things simple, and easy to follow along, and I hope that if you have been dying to try cabling for a while, this is the perfect pattern to get your feet wet! So without further ado… on to the pattern.What You’ll Need
Medium weight (4) soft Acrylic yarn- I used approximately 87 yards
6.0 MM crochet hook
embroidery/ darning needle (for weaving in ends)
scissors
Completed Measurements
8″ wide
8″ tall
Gauge Used
14 fpdc sts= 4″
9 rows= 4″
Abbreviations Used
ch= chain
dc= double crochet
WS= wrong side [of square]
RS= right side [of square]
bpdc= back post double crochet
sk= skip
fpdc= front post double crochet
fptc= front post treble crochet
st= stitch
fo= fasten off
yo= yarn over
pu= pull up
Special Stitches
Back Post Double Crochet: yo, insert hook in front of post (from back to front) yo, pull through 2 loops on hook, yo and pull through 2 remaining loops
front post double crochet: yo, insert hook behind post (from front to back), yo, pull through 2 loops, yarn over, pull through 2 remaining loops
front post treble crochet: yarn over twice, insert hook behind post (from front to back), yarn over, pull through 2 loops, yarn over, pull through 2 loops, yarn over, pull through remaining 2 loops
Pattern Notes
- This Pattern uses US standards
- This pattern was designed to be a part of the Winter Wonder Square Blanket CAL hosted by Bear Rye. For a link to all the squares, please visit her blog here.
- I used a turning chain of 2 at the start of each row because it gives me straighter edges with the cabling, if you find that your square is cinching on the edges, you may choose to increase to a turning chain of 3.
- Pay special attention to when you are working behind your stitches in row 5. If you accidentally work in front the whole time, you will not get the braided look.
Pattern
Row 1 (RS): ch 31, starting in 4th ch from hook, dc across, turn (28)
Row 2 (WS): ch 2, dc2 , bpdc 2, dc, bpdc 2, dc, bpdc 12, dc, bpdc 2, dc, bpdc 2, dc 2, turn (28)
Row 3 (RS): ch 2, dc 2, sk 1, fpdc in next, fpdc in front into sk st, dc, sk 1, fpdc in next, fpdc in front into sk st, dc, sk 4, fptc 4 in next 4, fptc in front into 4 sk sts, fpdc 4, dc, sk 1, fpdc in next, fpdc in front into sk st, dc, sk 1, fpdc in next, fpdc in front into sk st, dc 2, turn (28)
Row 4 (WS): ch 2, dc 2 , bpdc 2, dc, bpdc 2, dc, bpdc 12, dc, bpdc 2, dc, bpdc 2, dc 2, turn (28)
Row 5 (RS): ch 2, dc 2, sk 1, fpdc in next, fpdc in front into sk st, dc, sk 1, fpdc in next, fpdc in front into sk st, dc, fpdc 4, sk 4 sts, fptc 4 in next 4, fptc behind into the 4 sk sts, dc, sk 1, fpdc in next, fpdc in front into sk st, dc, sk 1, fpdc in next, fpdc in front into sk st, dc 2, turn (28)
Row 6- 17: repeat rows 2-5 (3 more times)
Row 18 (WS): repeat row 2, fo and weave in ends. Wet block for best square shape and softness on your blanket.
Once all your squares are complete, you will whip stitch together to form the blanket.

I was quite confused on how to repeat the pattern
Sorry there was confusion on the pattern, please let me know if you had any specific questions. Happy to help!
I’m new at crocheting cables and I’m having a hard time every other row. The blanket pattern uses single crochet very other row. In your pattern it does not. If I wanted to use this pattern for a blanket how many chains would I do? I have 141 for a blanket I’m doing now.
Hi Anita,
Thanks for reaching out. I apologize, but think I’m having a hard time following along with that your question is. This blanket square was designed as part of a Crochet-A-Long where multiple squares came together to make a full blanket (there’s a link in the post if you’re wanting to follow along with that design).
If you’re simply wanting to make this square larger, you could repeat the pattern written across by however many times you want for your blanket and then continue working the row repeats until it’s as long as you want it.
As for the struggle following the every other row- we recently released a video tutorial on how to make this square, that you might find helpful. You can find it on YouTube here: https://m.youtube.com/watch?v=h5yd_gjybuk&t=321s