Easy Cabled Mug Cozy- Free Pattern

I love mugs accessorized with cozies! They are so cute and when I see them, I just want to curl up with a blanket and a warm cup of coffee, tea or cocoa.
While brainstorming this pattern I realized that Valentine’s Day is right around the corner and thought it would be perfect to make these in some red and pink yarn. Add some chocolates or cocoa packets to the inside of a mug wrapped in this cozy and you’ve got yourself a perfect, quick and inexpensive Valentine’s Day gift. #winning!
 This pattern is also a great way to learn how to cable crochet. If you have never cable crocheted before, fret not, its actually WAY easier then you might think.
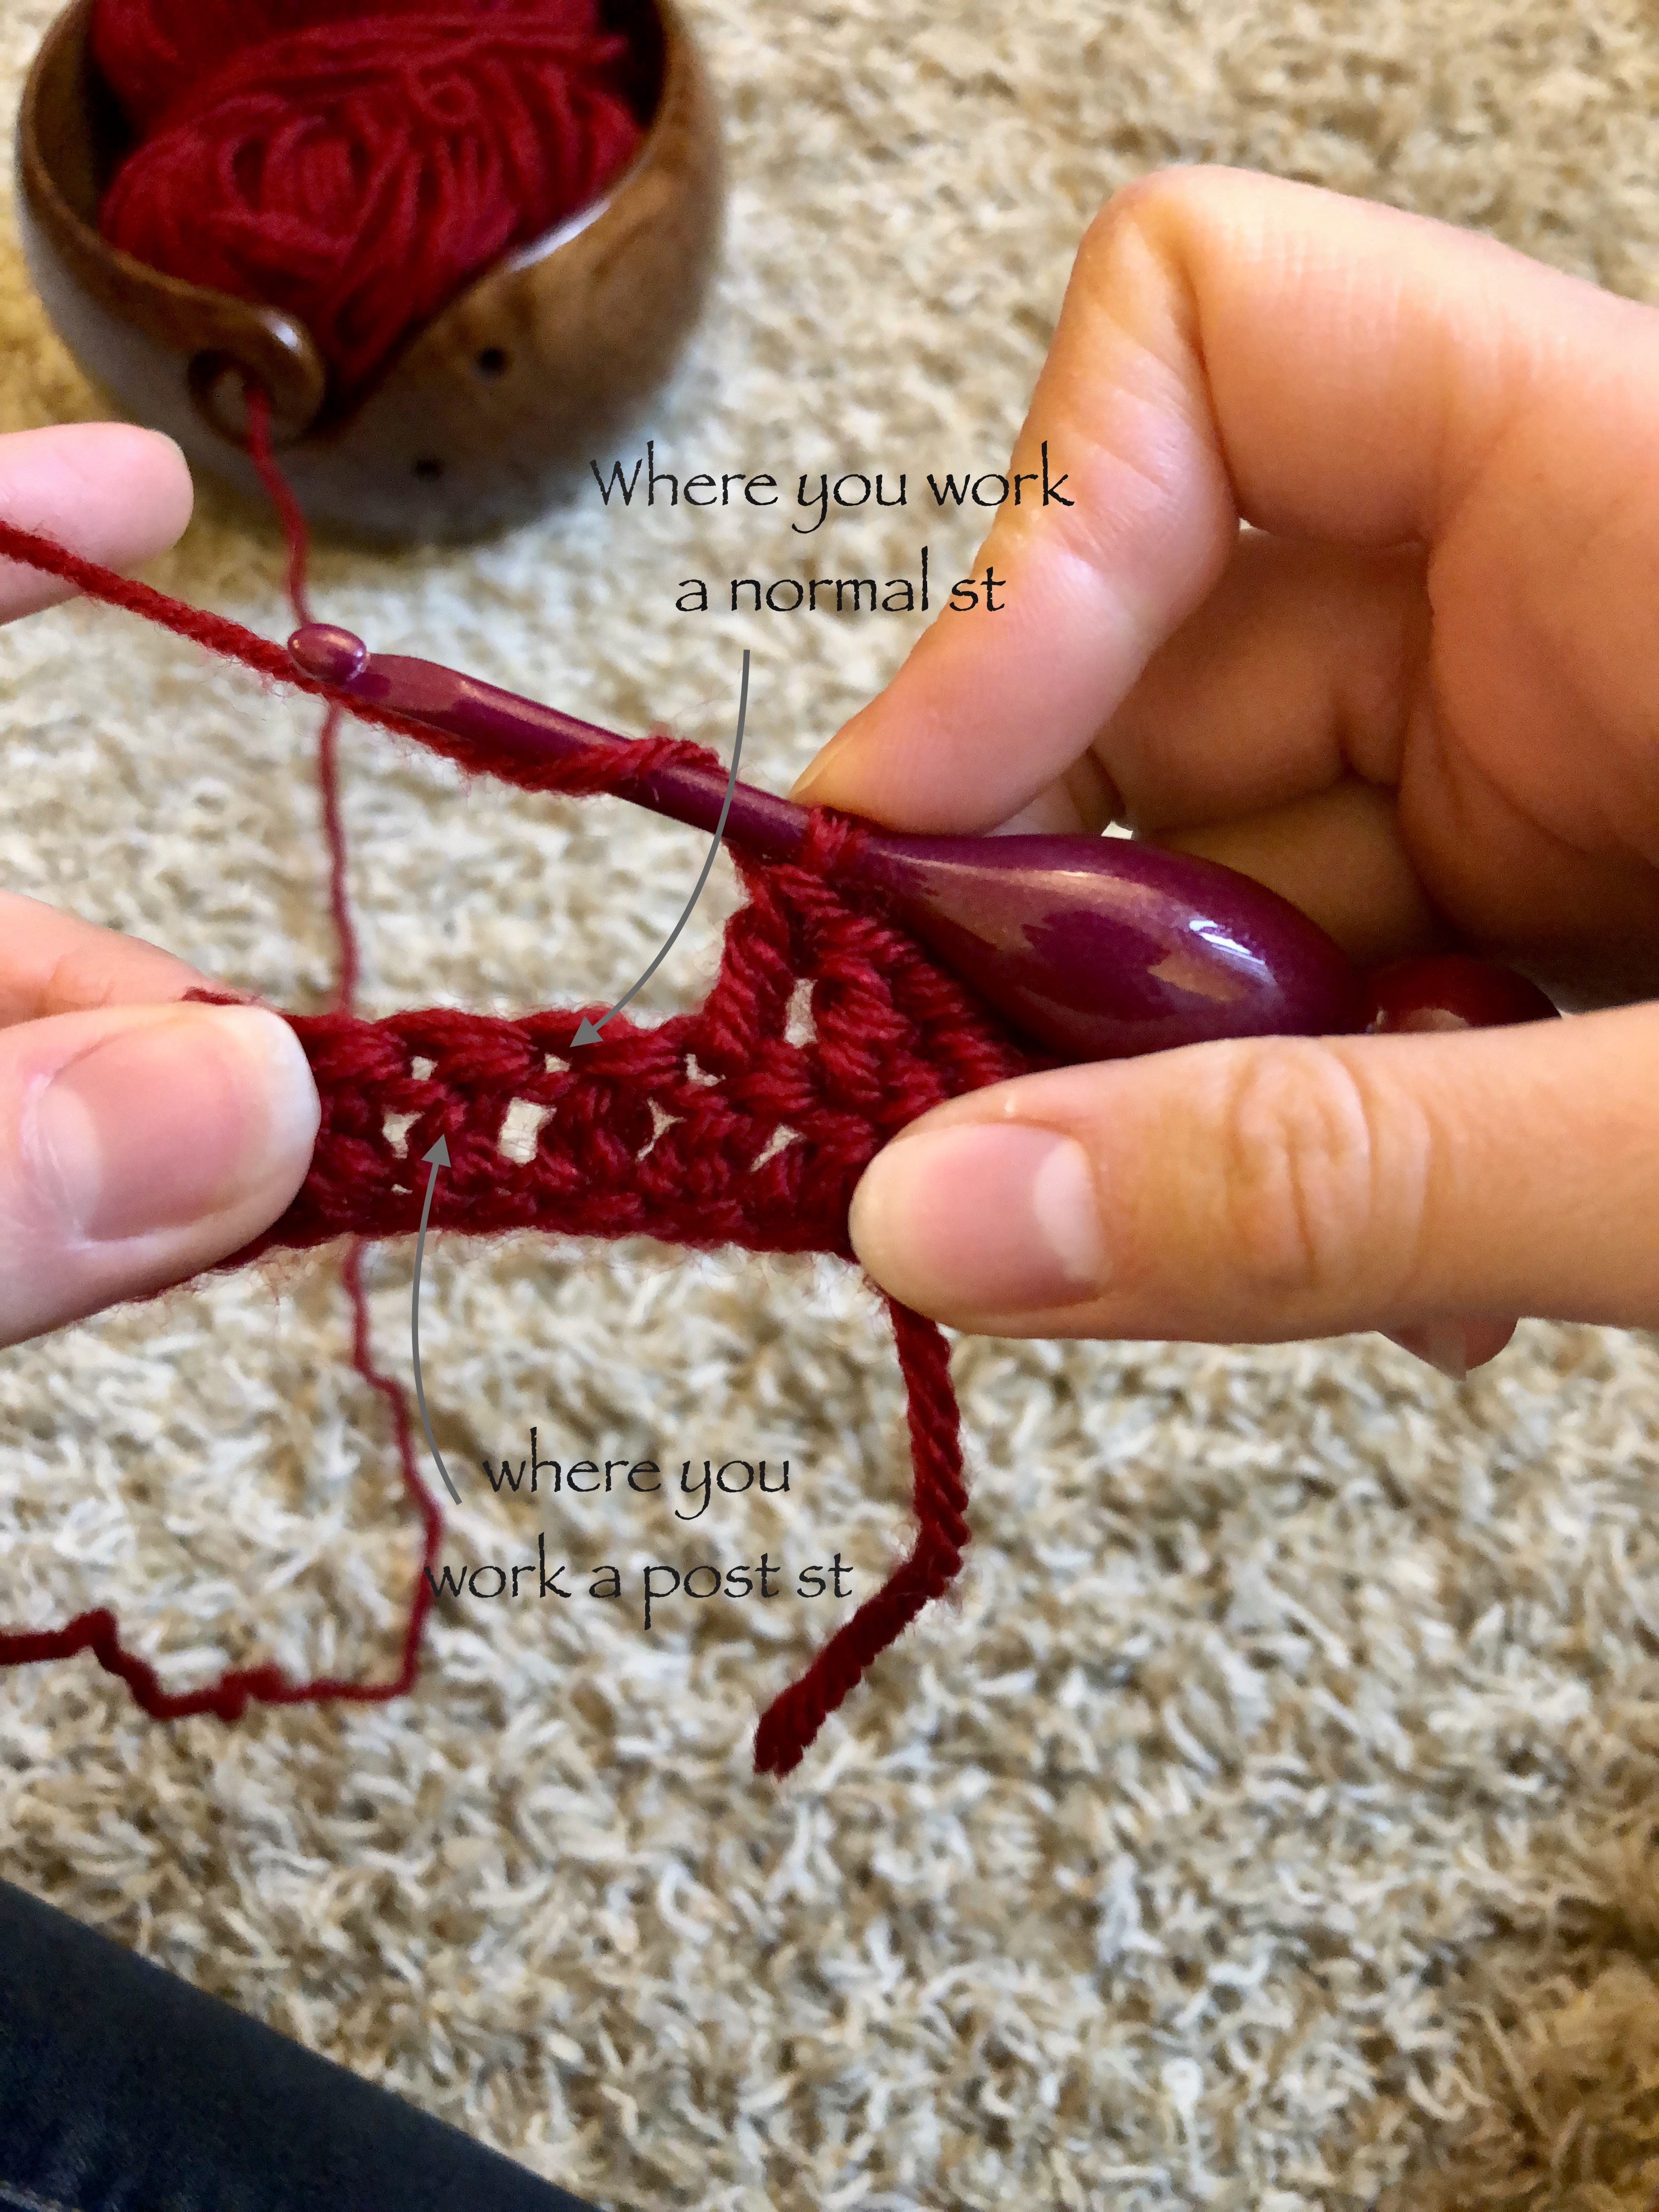
The biggest learning curve when working cable stitches is that you will be working around the posts of the stitches, rather then into the stitches themselves. This helps push the cable pattern up and give it that beautiful definition. You also want to make sure you work cable stitches with a looser tension then you usually would to avoid pulling and warping of your rows. If you are unfamiliar with how to post crochet or have never cable crocheted before, I encourage you to check out this helpful video tutorial by Tamara at Moogly blog here.
 To start this project, I created a foundation to fit around my coffee mug. I then worked double crochets across the next row. It should be noted that mugs come in all shapes and sizes. Please refer to the measurement section to ensure proper mug fit for this pattern.
The third row is when things get fun and you start your cabling. I wanted my pattern to have have a few 3 stranded braided cables with a some simple overlapping cables in between.
To start the cables you will be working back post double crochets in the posts of your 2nd row. For the simple overlapping cables, you just work 2 back post double crochets and for the braided cable stitches you will work 9 consecutive back post double crochets. All stitches in between are regular double crochets.
After completing the 3rd row, you will turn your work and begin working more of the details of those cable stitches. You will be starting out with one of the braided cables.
The braided cable stitches require a little more concentration, but I promise, they really are super easy once you get into it. You will begin by skipping 3 stitches and working front post treble crochets into the next 3. The treble crochets helps to give the overlapping stitches a little more length so that they don’t pull on the pattern and lay a little more flat.
 Once those 3 treble crochets are complete, you will front post treble crochet into the 3 stitches you previously skipped. These are worked in Front of the existing fptcs.

 To finish off this part of the braid, you will front post double crochet into the next 3.
For the simple overlapping cables, all you need to do is skip one stitch and front post double crochet around the next. After that you will work another front post double crochet into that skipped stitch. This fpdc is worked in Front of the 1st fpdc you made.
The 4th row is worked exactly the same as your 2nd, but make sure that you are working the stitches in the correct order. Since the cabling crosses stitches over and moves things around a bit, this can be a little hard to decipher. I usually just pull my work straight to better gauge what the next stitch is I need to work into.
This is the order you will work the simple crossover cables:

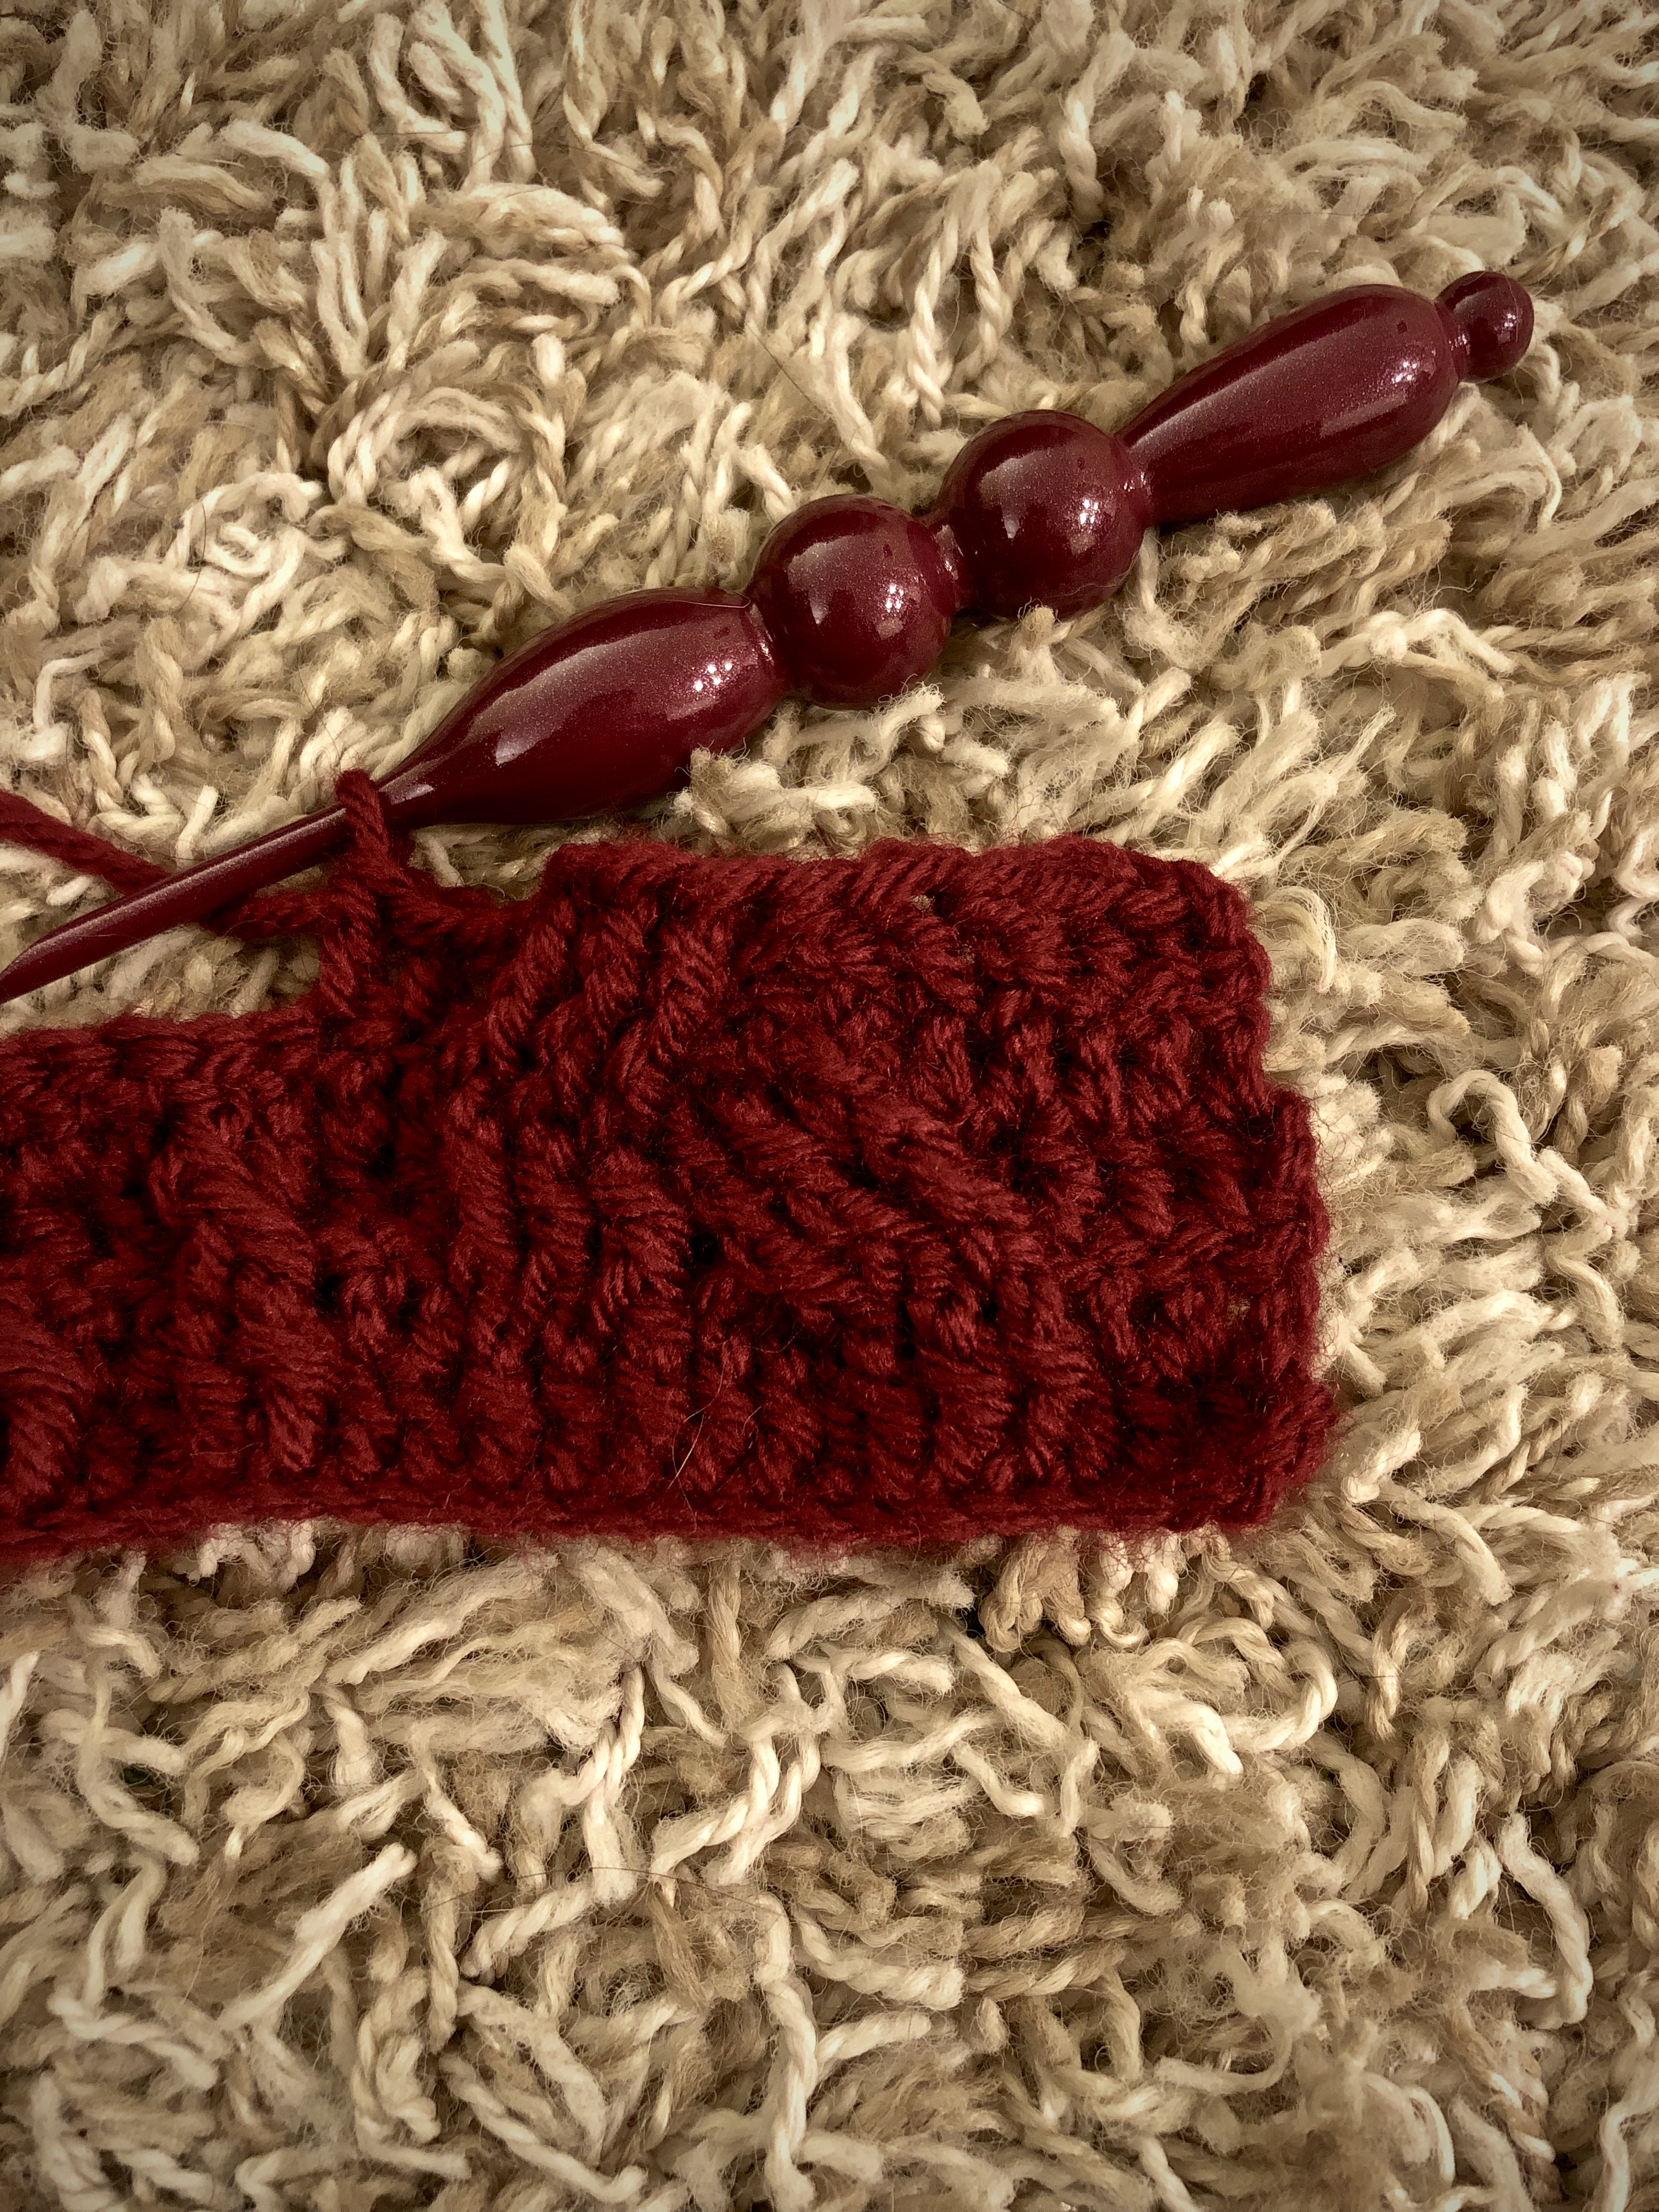
The 5th row is the last unique row required to complete the braided cable stitches. It is worked similarly to the 3rd, but for the braids you will fpdc into the first 3 posts instead of the last. The 4-6 posts are skipped, and you front post treble crochet into the 7-9 posts. Once those are worked, you start working fptc into the 3 skipped posts, but this time they are worked behind the fptc you just made.

I had a hard time getting a picture of what that looks like, but once you’re done, it should look like this:
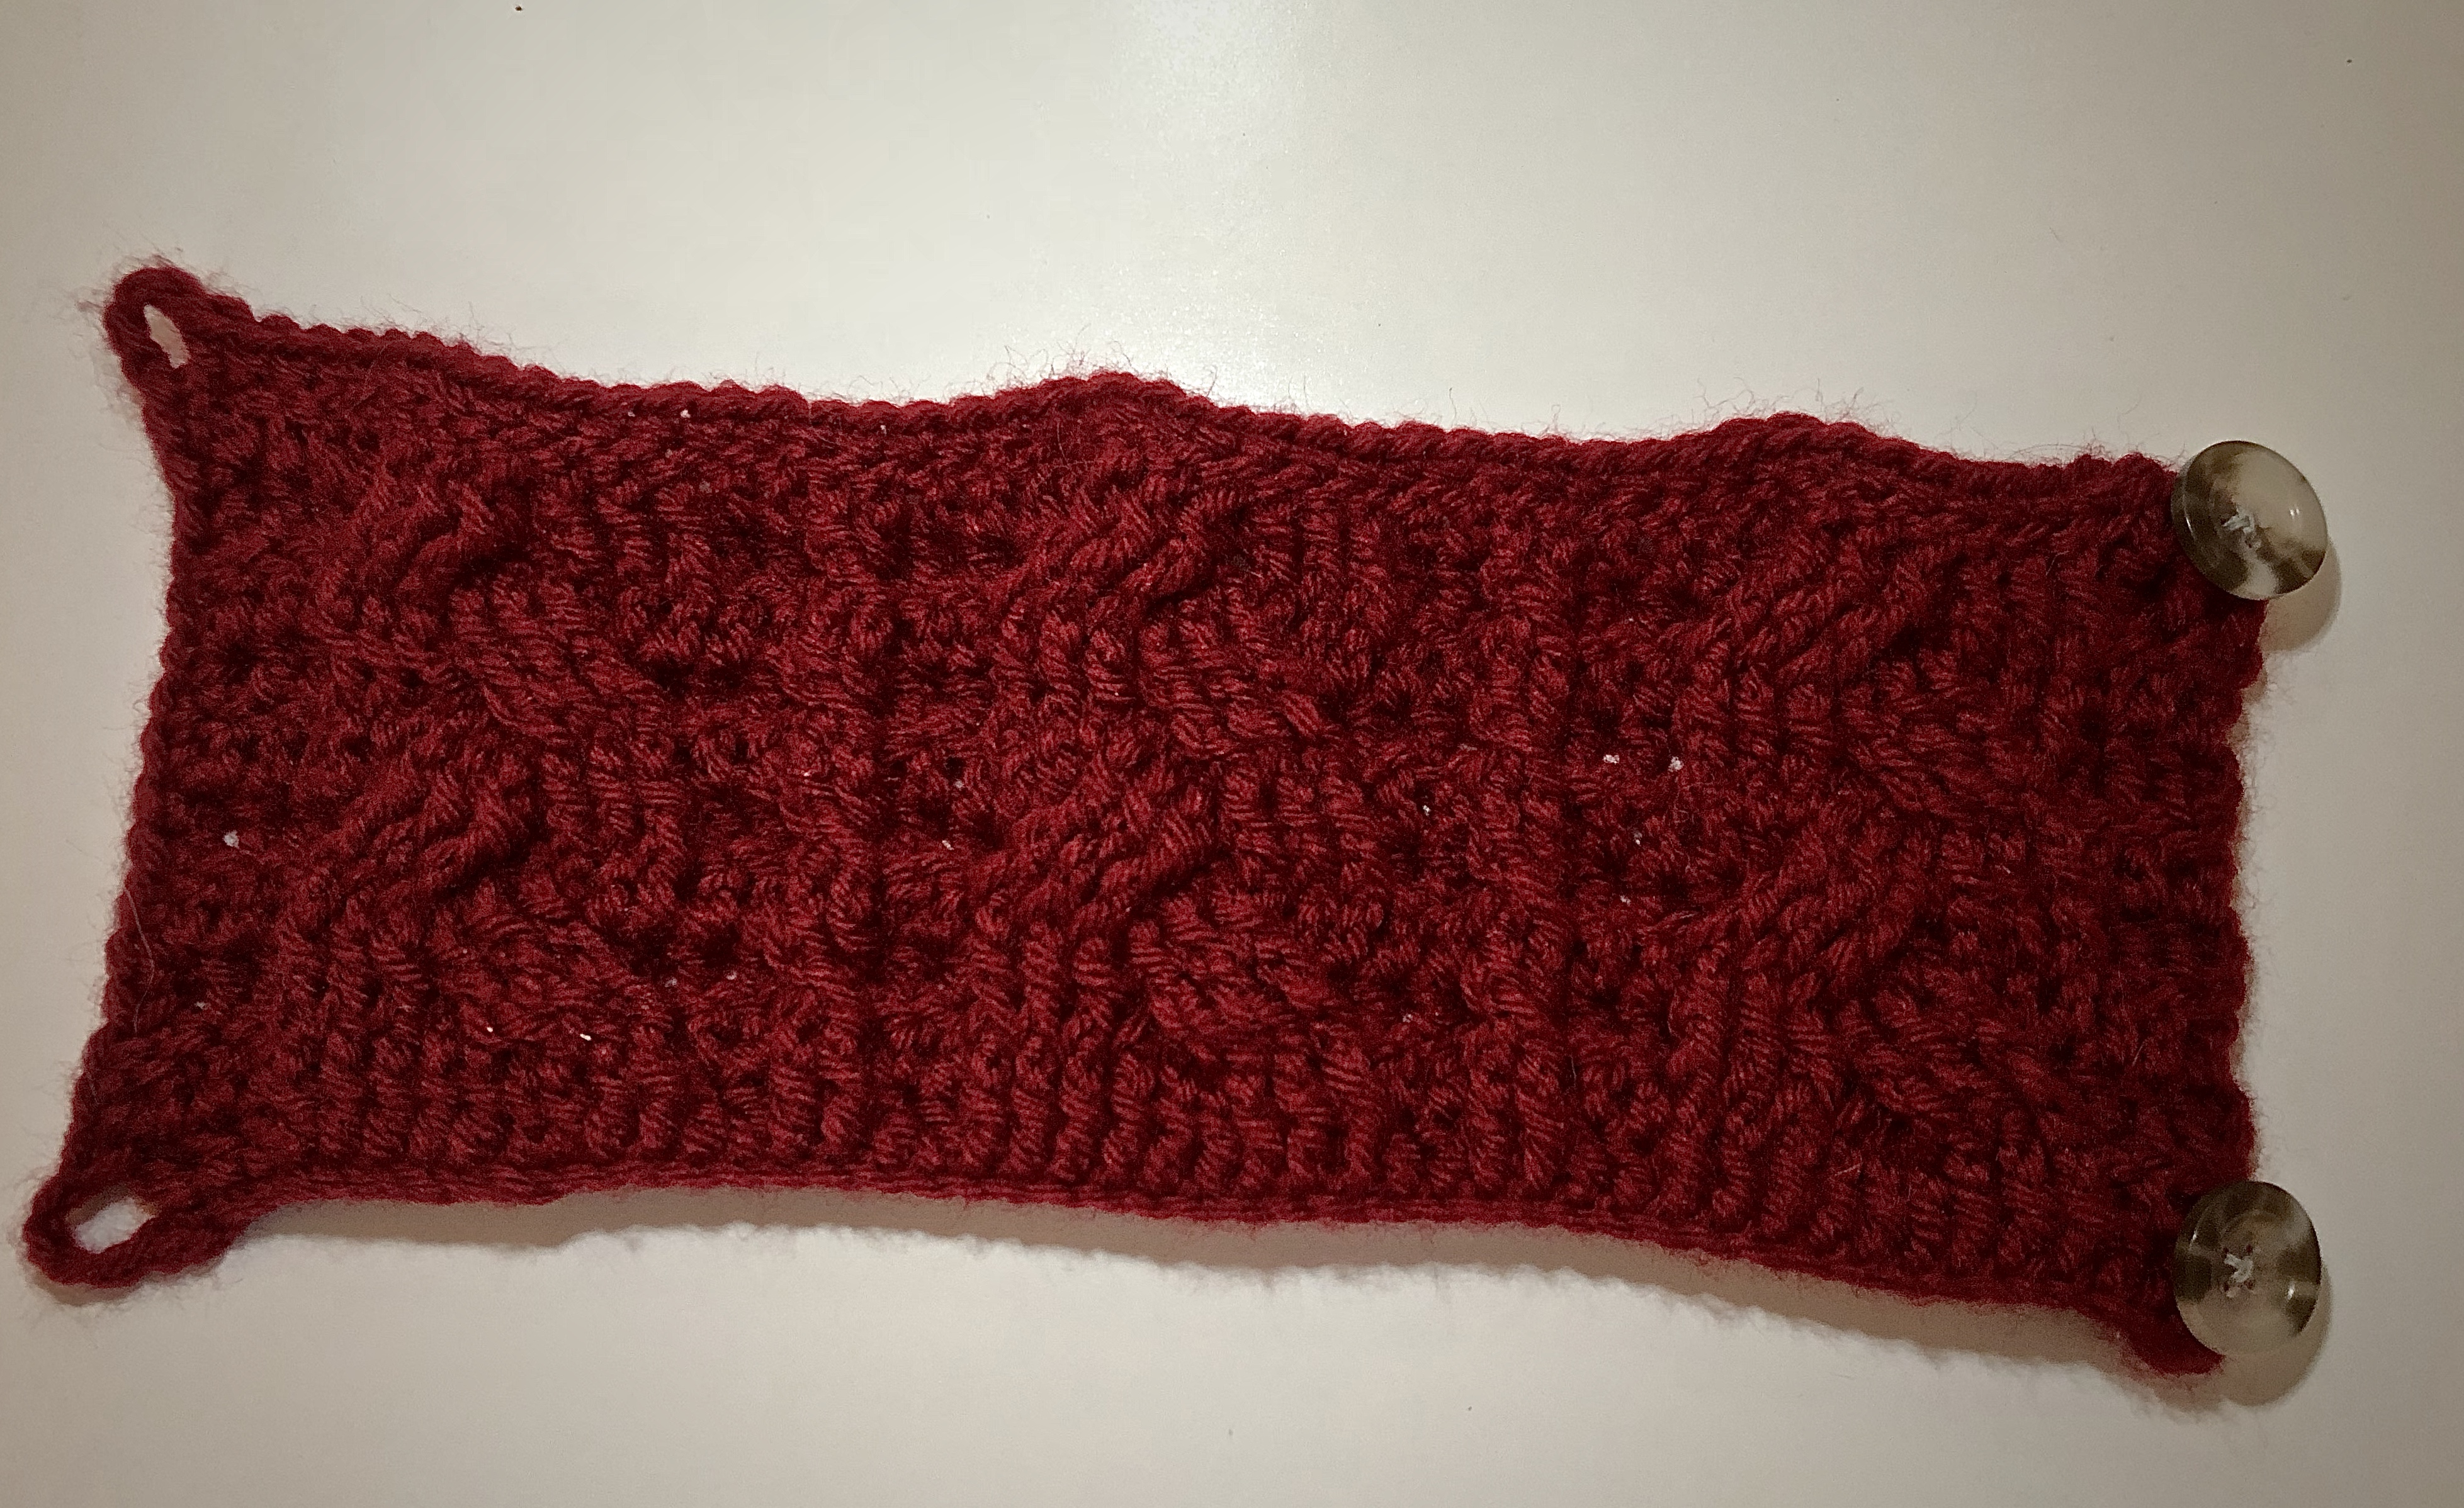
From here, it’s pretty smooth sailing. You simply repeat rows 2-5 one more time each. If you have a smaller mug, I would recommend only repeating through row 4 so that the cozy isn’t as tall. The last row is just single crochets to flatten out the top. Once I reached the end of the row, I chained 4 and then started to single crochet down the side. Once I was towards the bottom of the side, I chained 4 more and re-joined at the bottom. The chains will create your buttonholes. Adjust the amount you chain to fit the buttons you use.

What you need
1 4.00 mm crochet hook
1 skein of medium worsted weight yarn
2 buttons
Gauge
18 dc sts= 4″
8 rows = 4″
Completed Measurements
4″ tall and 10.5″ long
Abbreviations used in this pattern
ch= Chain
st= stitch
sk st(s)= skip stitch(s)
dc= double crochet
fpdc= front post double crochet
fptc= front post treble crochet
bpdc= back post double crochet
sc= single crochet
Special Stitches Used
front post double crochet: yarn over, insert hook behind post (from front to back), yarn over, pull through 2 loops, yarn over, pull through 2 remaining loops
front post treble crochet: yarn over twice, insert hook behind post (from front to back), yarn over, pull through 2 loops, yarn over, pull through 2 loops, yarn over, pull through remaining 2 loops
back post double crochet: yarn over, insert hook behind post (from back to front), yarn over, pull through 2 loops, yarn over, pull through 2 remaining loops
Cozy Pattern
Foundation: ch 47, turn
Row 1: working in 3rd ch from hook dc across, turn (45)
Row 2: ch 2, dc 3, bpdc 9, dc 2, bpdc 2, dc 2, bpdc 9, dc 2, bpdc 2, dc 2, bpdc 9, dc 3, turn
Row 3: ch 2, dc 3, sk 3, fptc 3, fptc in front into 3 sk sts, fpdc 3, dc 2, sk 1, fpdc, fpdc in sk st, dc 2, sk 3, fptc 3, fptc in front into 3 sk sts, fpdc 3, dc 2, sk 1, fpdc, fpdc in sk st, dc 2, sk 3, fptc 3, fptc in front into 3 sk sts, fpdc 3, dc 3, turn
Row 4: ch 2, dc 3, bpdc 9, dc 3, bpdc 2, dc 2, bpdc 9, dc2, bpdc 2, dc 2, bpdc 9, dc 3, turn
Row 5: ch 2, dc 3, fpdc 3, sk 3, fptc 3, fptc behind into the 3 sk sts, dc 2, sk 1, fpdc, fpdc in sk st, dc 2, fpdc 3, sk 3, fptc 3, fptc behind into the 3 sk sts, dc 2, sk 1, fpdc, fpdc in sk st, dc 2, fpdc3, sk 3, fptc 3, fptc behind into the 3 sk sts, dc 3, turn
Row 6-9: repeat rows 2 – 5 **Only repeat through row 8 if you want to make shorter for a smaller mug**
Row 10: sc across, ch 4, and start sc down the side of the cozy (1st button hole created). Work scs down until you’re almost at the bottom. Chain 4 and attach to the bottom of the cozy (2nd button hole created), fasten off.
Attach buttons on opposite side of the button holes at the top and bottom of cozy.
And there you have it! Now go and make some mug cozies 😉

it does look as if they are so tall that you wouldn’t be able to get your botton lip on the cup. Is there a way to make them shorter without ruining the cable?
There sure is! You could just skip the 7th, 8th or 9th row and continue on to the 10th. Hope this helps! 😀