Linda The Lamb- Free Pattern

Below you will find the free crochet pattern for Linda the Lamb. This cute little amigurumi is perfect for Easter, and was specially designed to pair with our Lewis the Lion pattern as an Easter themed set.
**Add this pattern to your Ravelry que here. **
I hope you all enjoy this classic take on a lamb laying down, with extra spring pizzaz from the floral bouquet on her head!
Before you start, please read through all pattern notes and the blog post for this pattern which includes the story behind this sweet little crochet lamb, and step-by-step pictures to making your own!
I hope you all enjoy this one!

What you’ll need
off white or cream colored worsted weight (4) yarn- approximately 32 yards
white fluffy yarn (such as Lion Brand’s Homespun or Yarn Bee Fleece Lite)- approximately 65 yards
fiber fill
4.0 mm (US G) crochet hook
2 9mm safety eyes
pink embroidery floss
black or charcoal embroidery floss
embroidery/ darning needle
2.75 mm (US C) crochet hook (optional for flowers & leaves)
spring colored embroidery floss (optional for flowers & leaves)
My Amazon Picks
Completed Measurements
circumference of head= 9″
height= 3 1/2″
length= 7″
Abbreviations Used
ch= chain
sc= single crochet
inc= increase (sc 2 into 1 st)
sl st= slip stitch
dec= decrease (see my blog post here for a tutorial- both a normal or an invisible decrease will work for this pattern)
fo= fasten off
MR= magic ring
hdc= half double crochet
dc= double crochet
Pattern Notes
- This Pattern is written in US Standards
- This lamb consists of 9 pieces (head, body, tail, 4 legs and 2 ears) all assembled together, 5 additional for the flowers (3 flowers, 2 leaves)
- Each portion of this pattern is worked in continuous rounds (vs. joined rounds)
- You may choose to work the legs in the fluffy white yarn if you prefer, just do not stuff with fiberfill if you go this route.
Pattern for the Head
Foundation [in off white worsted weight yarn]: ch 4, starting in 2nd ch from hook, sc 2 in the back loops of each ch, turn work and continue to work 2 in each chain of the front loops. (12)
Round 1: *sc, inc*, repeat from * around (18)
Round 2: *sc 2, inc*, repeat from * around (24)
Round 3: *sc 3, inc*, repeat from * around (30)
Round 4: ss around (30)
Round 5-9: switch to white fluffy yarn, sc around (30)
Attach safety eyes in between rounds 3 & 4 of either end of the off-white/cream portion. Attach yarn or floss to the back of the safety eyes if you wish to have the eyes indented like mine (see our blog post for more information on this). Embroider the nose around the foundation ch, using pink embroidery floss. Embroider the mouth with black or charcoal embroidery floss about 3 rounds down from the nose. Begin stuffing head with fiber fill.
Round 10: *sc 3, dec*, repeat from * around, continue stuffing head with fiber fill (24)
Round 11: *sc 2, dec*, repeat from * around (18)
Round 12: *sc, dec*, repeat from * around, continue stuffing head with fiber fill (12)
Round 13: *dec around, fo leaving a tail. Finish firmly stuffing with fiber fill. Use tail to weave in and out between stitches. Pull tight and fo. Weave in ends (6)
Pattern for the Body
[in fluffy white yarn]
Foundation: work 6 sc in MR (6)
Round 1: inc in each st around (12)
Round 2: *sc, inc, repeat from * around (18)
Round 3- 11: sc around, stuffing with fiberfill as you go (18)
Round 12: *sc, dec, repeat from * around (12)
Round 13: dec in each st around, fo, finish stuffing with fiberfill. (6)
Pattern for the Legs (make 4)
Foundation: work 5 sc in MR
Round 1-8: sc around (5)
Round 9: sc around, fo, stuff lightly with fiberfill (5)
Pattern for Ears (make 2)
ch 5, starting in 2nd ch from hook sc 2, hdc, dc 3 in last, turning work as you go, begin working in back loops of ch; hdc, sc 2, fo leaving tail for attaching
Pattern for Tail
Foundation: work 5 sc in MR
Round 1: sc around (5)
Round 2: sc around, fo leaving tail for attaching (5)
Pattern for the Flower (I made 1 in each size)
[Using the 2.75mm crochet hook and embroidery floss]
Large
work 10 sc in MR, ch 3, dc 4 into 1st st, ss into next, *dc 5 into next, ss into next, repeat from * around, fasten off.
Medium
ch 5, join 1st and last ch together to form a circle, ch 2 [*dc 4, ss, *dc 5, ss, repeat from * 3 more times] into the center of the circle, fo.
Small
ch 4, join 1st and last ch together to form a circle, ch 2 [dc 2, ss, *dc 3, ss, repeat from * 3 more times] into the center of the circle, fo.
Pattern for the Leaves (I made 2)
ch 11, starting in 3rd ch from hook; hdc 2 in 1st ch, sc 2, ss 3, sc 2, hdc 3 in the last ch (turning your work as you go) sc 2, ss 3, sc 2, hdc in last, fo.
Assembly
Start by attaching the legs to the body. Attach top of front legs right around the 3rd round of the body, approximately 3 stitches apart. Attach the top of the back legs around the 10th round.
Now that the legs are all secure in place, bend the front legs so that there is a slight bend towards the upper portion and secure in place. Repeat with the back legs. The legs should be secured down to look something like this:

Using the tail from the body, secure the head to the front with either the mattress stitch or a whip stitch. You will need an extra piece of fluffy yarn to tac the head sideways (as is shown), or you can leave it forward facing if you prefer.
Attach the ears roughly 3-4 fluffy rounds back from the eyes on the fluffy portion of the head.
The last piece is to attach the tail. I attached mine directly over the foundation of the body. Now you can weave in all the ends and your Linda the Lamb is officially complete.
You may also choose to add some flowers if you’d like. I made 3 flowers and 2 leaves and simply attached in a bunch by one ear.
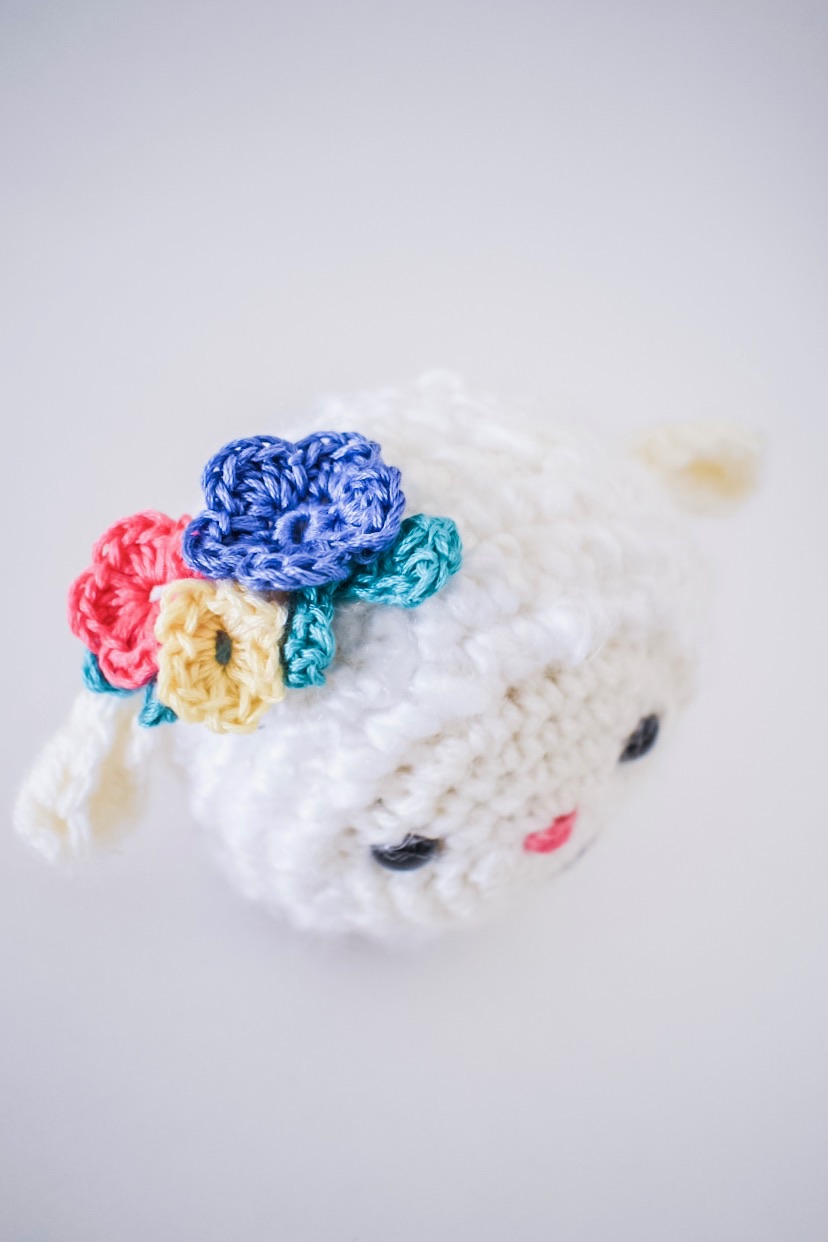 Weave in all the ends from the flowers, and thats all there is to it!
I hope you enjoyed adding this sweet little lamb to your crochet collection and that you’ll take a minute to share your completed Linda the lamb with me on social media or in the comments below! I love seeing all your work!
