El’s Top Down Sweater- Blog Post

**Below is the step-by-step instructions to working the El’s Top Down Sweater. For the concise pattern, the free pattern can be found here on our blog, or you can purchase the ad-free PDF from our Etsy shop here.**
It seriously feels like it’s been forever since I had a pattern ready to publish a post about!
…. In fact, I guess it really has been forever. (yikes!)
But, I’m back and ready to roll! This raglan style top-down is just the first of many patterns that we hope to release this season, and I cannot wait!

I designed this pattern after designing a similar style tee shirt for myself earlier this year (that pattern will be coming early next year) and I loved the way that came together so much, that I used the same concept to design this cute baby sweater for my niece.
My absolute favorite thing about working top-down garments is the customization you can do to the lengths of the sleeves and body. So while this pattern is designed to fit based on the Craft Yarn Council’s standard of body measurements, you can make adjustments to fit your specific needs by adding or decreasing rounds of the arms or body.
As the name suggests, you will be starting at the top ribbing of the neck, working your way down to the bottom cuff of the body and sleeves. The neck portion is worked as simple rows of single crochets worked into the back loops only of each stitch across. Once the required amount of rows has been achieved, you will join the final round to the first and move on to the details of the yoke of the sweater.
From here you will start working the yoke of the sweater. The foundation round is made in single crochet stitches, broken up by 4 sets of ch 2 to create the gapping that will happen at the top of the sleeves.
In each round after the foundation, you start working the Suzette stitch pattern. The essentials of the Suzette stitch are working one single crochet and one double crochet into a single crochet stitch. Typically this pattern is worked in rows, so every time you turn, you are working the (single crochet, double crochet) pattern into a single crochet stitch, resulting in a beautiful texture.
Since this sweater is worked in the round, my solution was to alternate between (single crochet, double crochet) in each single crochet around the first round and (double crochet, single crochet) in each single crochet for the next round. By alternating between these two types of rounds, you will mimic the look you would achieve if you were working in rows.

The complicated part of this comes when you finish the (double, single crochet) round because when you end, there will be two double crochet stitches right next to each other. To alleviate any gapping, you will work a slip stitch into the last double crochet of each of these rounds.
With me so far?
Fantastic! Let’s move on to the design of the yoke for this pattern. When I refer to the “yoke” I am talking about the neck ribbing down to what will end up being the under part of the armpit area. The yoke will be worked up to look like a square working outward and growing slightly in size as you go, until you reach the point of “splitting the yoke” to break the arms off from the body of the sweater.
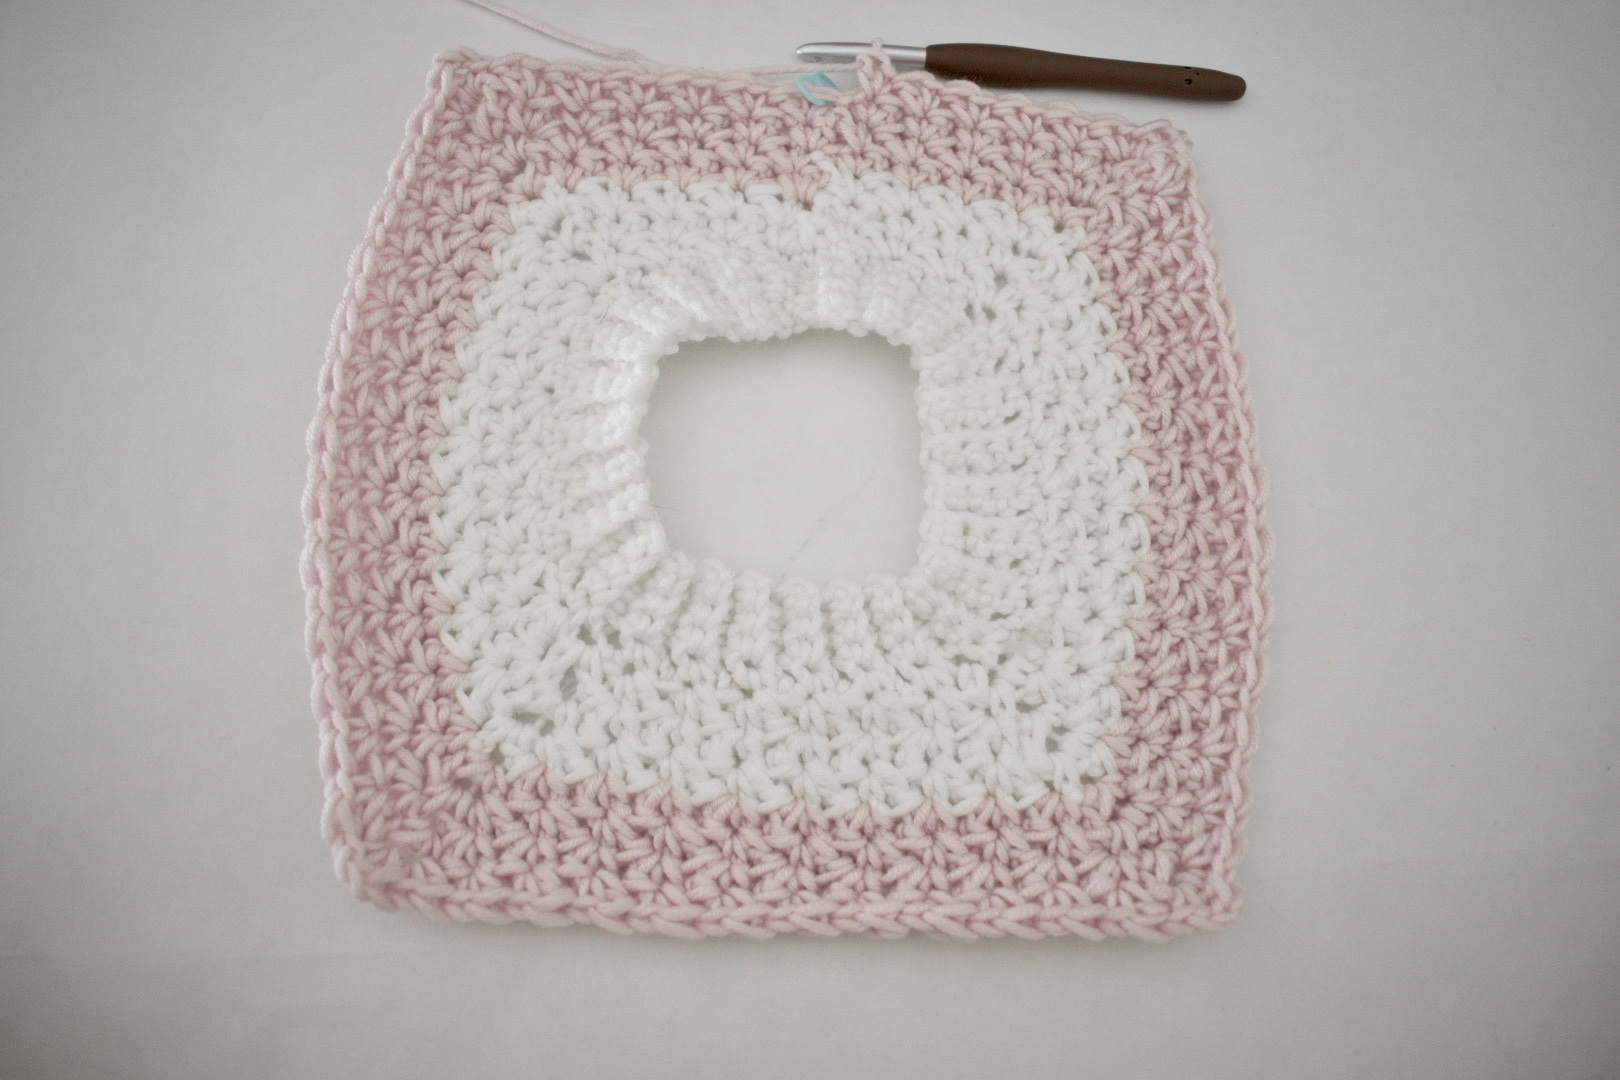
In order to grow the yoke and forming the square, you will be working a chain 2 space between the suzette stitch in the four corners of the sweater.
So when you start working the yoke, you will begin with the (single crochet, double crochet) format for several stitches. After repeating a few times, you will work a single crochet, followed by 2 chains and a double crochet, all worked into the same stitch. This process will result in a slight gapping and produce a sharp corner for the square shape.
The following round will be worked in a mirrored fashion by working the (double crochet, single crochet) format until you reach that chain 2 space from the previous round. Here you will work a double crochet, chain 2 and single crochet all into that chain space.
Take care to make sure that while you are alternating between the suzette stitch patterns, you are only working into single crochets as you go. This can be particularly tricky surrounding those chain 2 spaces, so I recommend consulting the stitch graph provided in the pattern to make sure you are working the pattern correctly.
Once you have repeated this process enough to grow the yoke to the size needed for the size sweater you are making, you will “split the yoke”. This process is actually quite easy and since you will no longer be increasing from this point, things move a lot faster from here on out.
To split the yoke, you will first need to locate your starting stitch. Since this pattern is written in continuous rounds, instead of joined, I recommend using a stitch marker to keep track of your starting stitch in the pattern notes. This starting stitch will be placed at the center back of the sweater, so you will simply fold the square in half with the starting stitch located at the center back. This will visually separate the arms from the body.

To physically separate them, you will continue in the suzette stitch pattern until you get to the first two corners. Rather than working between them as perviously, you will work a single crochet into the first corner, then a double crochet into the corner laid below it (or a double crochet, then a single crochet, depending on which size you are making).


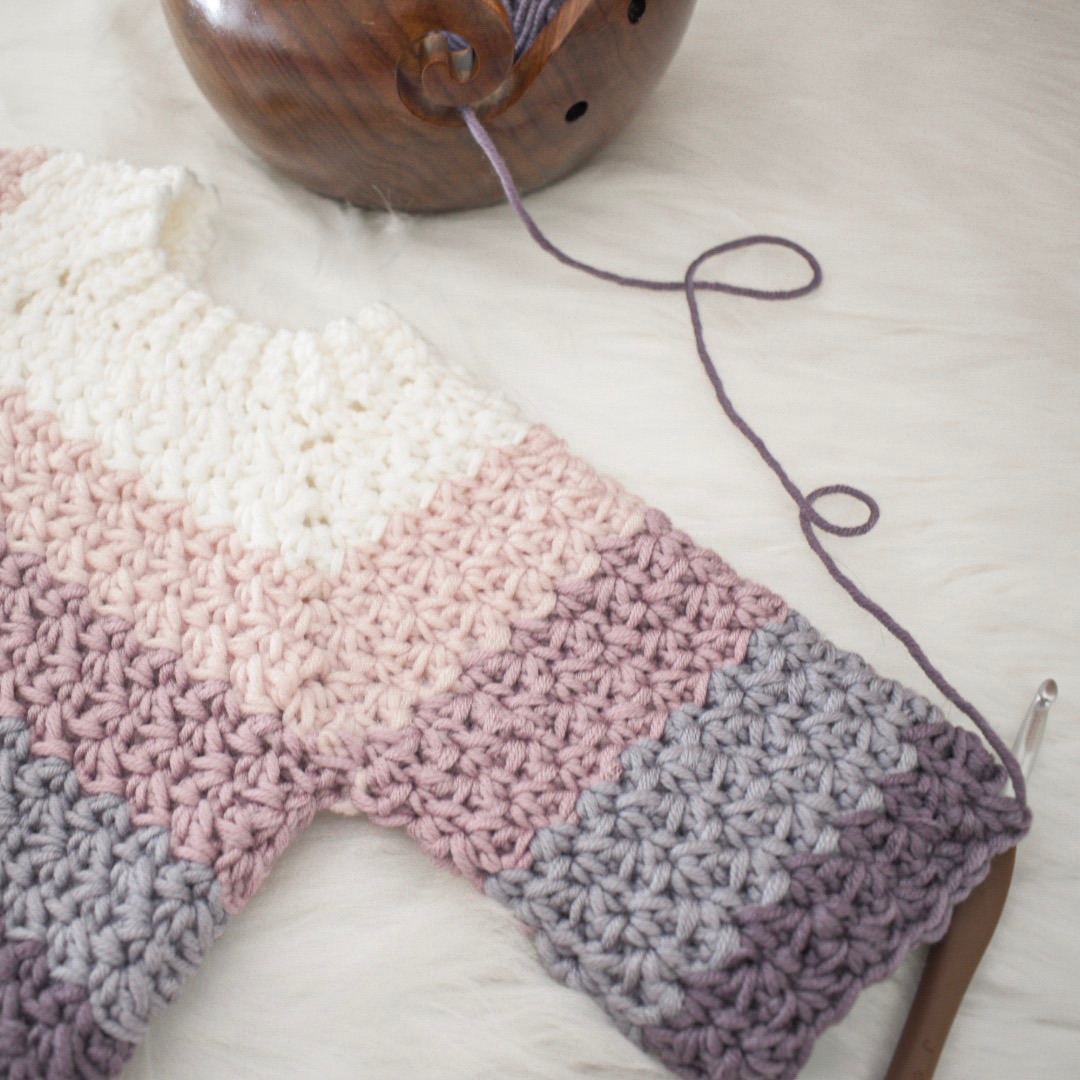
From here, you will continue working toward the other two corners and repeat the same process as prior. Doing so will completely separate the body from the arms. After this, you will simply be adding length to the body, alternating the suzette stitch pattern as you go and changing colors as you desire.
Once the needed length has been achieved for the size you are making, you will add a few rows of ribbing to the bottom. I use a technique of adding the ribbing as I go, but you could certainly work the ribbing separately and fasten it to the bottom later if you prefer. If you choose to follow the pattern of adding the ribbing as you go, I highly recommend checking out this helpful video tutorial by Toni of TL Yarn Crafts before you start.
Once the body is completed, you will start on the sleeves. To start, you will want to pick up your yarn at the bottom of the sleeve by where the armpit will be and continue the suzette stitch pattern. The first few rounds will be a little weird, as you will be working a series of slip stitches under the armpit to help close some gapping.


After the gapping has been closed, you will work each sleeve as you did the body, by continuing to alternate the suzette stitch repetition until the needed length is obtained.
The last step on the sleeve portion is to work a round of decreases to make the cuff fit the wrists. From here you will pick up your yarn and work rows of ribbing around the cuff, just like you did for the bottom of the body.


Now that the sleeves are complete, you just need to weave in any loose ends and your sweater is complete!
I hope you enjoyed making this fun sweater, and if you liked this pattern, you may also enjoy the Mommy and Me Easy Crochet Pullover set.


You can find the child sizes here, and adult sizes here.
I love the colors you used in this sample, can you please tell me what yarn and colors you used
Thanks so much Bev! I used Caron X Pantone Yarn in Ultra Violet Minerals (purple sample) and River Rock (taupe sample). Hope this helps and happy crocheting!
I would like to make this sweater in a size 2T but only have 4 colors of yarn. Do hou have a row chart for only using 4 colors?
Hi there! I’m so excited you want to make this sweater! I do not have a graph for using only 4 colors, but I did go through and figure out the math for ya on the 2T size. 😁
For the yoke and body you’ll work: the 1st color R F-5, 2nd color R 6-11, 3rd color R 12-17, and 4th color R 18-23. For the sleeves you’ll: skip the 1st color, work the 2nd color R F-4, 3rd color R 5-12 and 4th color R 13-20.
Hope this helps and happy crocheting!
-Bernadette
Thanks Bernadette. I will give that a try but the neckline is too high for me so I will experiment using your pattern as a guide 😀
This sweater is beautiful. Have you created an adult version?
Hi CA,
I’m so pleased to hear that you like this sweater. We do not have an exact adult version of this sweater, but our New Bloom Crop Top is very similar. They use the same stitch and are both top down raglans. The New Bloom Crop Top is easy to make long sleeved and switching to a wool based yarn (from the cotton based called for in the pattern) would give that pattern more of a sweater feel. 😁