Easy Crochet Pullover- Child & Youth Sizes

**You will find the free crochet pattern for this pullover sweater at the bottom of this post. If you are looking for an adult female size, you can find the free pattern for the original Easy Crochet Pullover here. Please read through all pattern notes and the picture tutorial for this sweater before you begin.**
If you’ve been following along for any amount of time, then you know that our daughter loves when I crochet things for her. You also know that I’ve created several Mommy & Me patterns with her in mind.
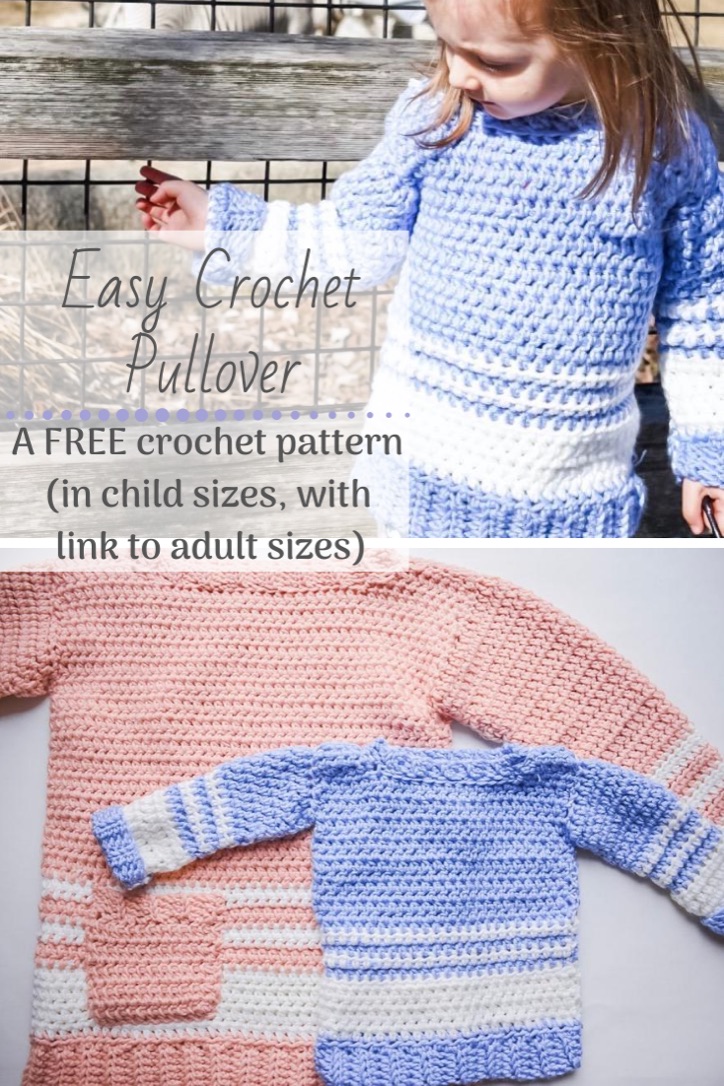
This sweater is no different. I had so much fun making the Easy Crochet Pullover for myself, and the whole time I was working on it, Audrey kept asking if it was for her. When I saw this periwinkle Color Made Easy yarn, I knew I just had to make a matching sweater for her.

This sweater is made almost identical to its adult female counterpart, with the only real difference being that the stripes are few rows thinner, and the sizing counts are obviously different. Because, they are so similar, you can use the step-by-step tutorial of making the Easy Crochet Sweater here, which I highly recommend before starting.

The sleeves are also worked quite different than the adult version, with less of an increase and more of a rectangle shape. I must have frogged the sleeves about a dozen times before realizing that children’s arms just don’t have the same shape as an adult. They’re pretty much the same size from wrist to upper arm, so the sleeves for this sweater mimic that.
If you are making the Youth size 16, it’s almost exactly the same size as an X-Small on the adult version, so you may choose to use the sleeve pattern on that if you’d prefer a more gradual increase sleeve.
Other then that, this sweater is the same makeup as the original. Also, very, super easy to make. You can crochet the adult size in a few days, so, as you may have already guessed, you can make a child size even quicker! Woot Woot!
I hope you all enjoy this pattern and the easy, comfort and style it offers for the littles in your life.

What You’ll Need
1 (2,2,3,3,3,3) skeins of Lion Brand Color Made Easy yarn for primary color- I used Horizon (or another category 5 weight acrylic yarn)
1 skein (for all sizes) of Lion Brand Color Made Easy yarn for 2nd color- I used Birch (or another category 5 weight acrylic yarn)
8.0mm (US L) crochet hook
embroidery needle
scissors
stitch marker
measuring tape
My Amazon Picks
Approximate Completed Measurements
Child
Size 2: 24” around, 12.5” long
Size 4: 25” around, 13.5” long
Size 6: 26” around, 14.5” long
Size 8: 29” around, 16.5” long
Size 10: 30” around, 18” long
Youth
Size 12: 32” around, 19” long
Size 14: 33” around, 19.5” long
Size 16: 34” around, 20” long
Gauge Used
8 hdc b/w posts= 4″
8 rows= 4″
Abbreviations Used
ch= chain
hdc= half double crochet
blo=back loops only
st= stitch
b/w= between
dec= decrease (half double crochet 2 together)
fo= fasten off
hdc inc= hdc 2 into one hdc
Special Stitches
Hdc B/w posts= work a normal half double crochet between the posts (under all 3 strands of the hdc stitch) instead of under just the “v” of the stitch.
Hdc decrease= yarn over, insert into your first stitch, and pull up a loop, insert your hook into the second stitch, yarn over and pull up a loop (4 loops on your hook). Pull last loop through all loops on your hook (as you would a slip stitch).
Pattern Notes
- Pattern is written in US standards
- I recommend going through and highlighting the numbers associated with the size sweater you are making before you start.
- This pattern is written to be slightly oversized, but you can make it more form fitting by using a US J/ 6mm crochet hook with a 10 sts X 10 rows= 4″ square gauge
- The pattern is written in Child size 2 with (4, 6, 8, 10, and youth sizes 12, 14, 16) numbers following.
- This sweater is made up of 2 rectangles, 2 arms, a collar and an optional pocket.
- When changing the colors, I like to join in the new color before tightening the fasten off stitch and then work the tails of both strands into the next few stitches. This will save time weaving in ends later.
Front/Back Panel (make 2)
Brim:
Foundation: ch 7, in 3rd loop from hook, hdc across, turn (5)
Row 1- 19 (20, 21, 24, 25, 27, 28, 29): ch 2, hdc in blo only, turn (5)
Body:
Foundation: Turn brim, ch 2 and begin working across the top of the brim. Pick up 24 (25, 26, 29, 30, 32, 33, 35) hdc across, turn (24, 25, 26, 29, 30, 32, 33, 34)
Row 1: switch to secondary color and ch 2, hdc across, turn (24, 25, 26, 29, 30, 32, 33, 34)
Row 2-6: ch 2, hdc between posts across, turn (24, 25, 26, 29, 30, 32, 33, 34)
Row 7: switch to primary color, ch 2, hdc across, turn (24, 25, 26, 29, 30, 32, 33, 34)
Row 8: switch to secondary yarn, ch 2, hdc across , turn (24, 25, 26, 29, 30, 32, 33, 34)
Row 9: switch to primary yarn, ch 2, hdc across, turn (24, 25, 26, 29, 30, 32, 33, 34)
Row 10: switch to secondary yarn, ch 2, hdc across, turn (24, 25, 26, 29, 30, 32, 33, 34)
Row 11: switch to primary yarn, ch 2, hdc across, turn (24, 25, 26, 29, 30, 32, 33, 34)
Row 12-25 (27, 29, 33, 36, 38, 39, 40): ch 2, hdc between posts across, turn (24, 25, 26, 29, 30, 32, 33, 34)
Pattern for Right Shoulder
Row 1: ch 2, hdc b/w posts 6 (6, 7, 7, 7, 8, 8, 9) hdc2tog b/w posts, turn (7, 7, 8, 8, 8, 9, 9, 10)
Row 2: ch2, hdc2tog b/w posts, hdc b/w posts 5 (5, 6, 6, 6, 7, 7, 8) turn (6, 6, 7, 7, 7, 8, 8, 9)
Row 3: ch 2, hdc b/w posts 4 (4, 5, 5, 5, 6, 6, 7) hdc2tog b/w posts, turn (5, 5, 6, 6, 6, 7, 7, 8)
Row 4: ch 2, hdc b/w posts across, fo leaving long tail (5, 5, 6, 6, 6, 7, 7, 8)
Pattern for Left Shoulder
Row 1: p/u on other side of rectangle, ch 2, hdc b/w posts 6 (6, 7, 7, 7, 8, 8, 9), hdc2tog b/w posts, turn (7, 7, 8, 8, 8, 9, 9, 10)
Row 2: ch2, hdc2tog b/w posts, hdc b/w posts 5 (5, 6, 6, 6, 7, 7, 8), turn (6, 6, 7, 7, 7, 8, 8, 9)
Row 3: ch 2, hdc b/w posts 4 (4, 5, 5, 5, 6, 6, 7), hdc2tog b/w posts, turn (5, 5, 6, 6, 6, 7, 7, 8)
Row 4: ch 2, hdc b/w posts across, fo leaving long tail (5, 5, 6, 6, 6, 7, 7, 8)
Pattern for Collar
Foundation: ch 3, starting in 2nd ch from hook, sc across, turn (2)
Row 1- 23 (25, 25, 28, 29, 30, 31, 32): ch 1, sc in blo across, turn (3)
Row 24 (26, 26, 29, 30, 31, 32, 33): ch 1, sc in blo across, fo leaving long tail for attaching to sweater
Pattern for Arms (make 2)
Brim:
Foundation: (in primary color) ch 6, starting in 3rd ch from hook, hdc across, turn(4)
Row 1- 8 (9, 10, 10, 10, 12, 12, 12): ch 2, hdc in blo across, turn (7)
Sleeve:
Foundation: (in primary color) ch 2, pick up 13 (14, 15, 16, 17, 17, 17, 19) hdc across the top of the brim (13, 14, 15, 16, 17, 17, 17, 19)
Row 1-4: switch to 2nd color, ch 2, hdc b/w posts across, turn (13, 14, 15, 16, 17, 17, 17, 19)
Row 5: ch 2, hdc inc b/w posts, hdc b/w posts across, turn (14, 15, 16, 17, 18, 18, 18, 20)
Row 6: ch 2, hdc b/w posts across, turn (14, 15, 16, 17, 18, 18, 18, 20)
Row 7: switch to primary color, ch 2, hdc b/w posts across, turn (14, 15, 16, 17, 18, 18, 18, 20)
Row 8: switch to 2nd color, ch 2, hdc b/w posts across, turn (14, 15, 16, 17, 18, 18, 18, 20)
Row 9: switch to primary color, ch 2, hdc b/w posts across, turn (14, 15, 16, 17, 18, 18, 18, 20)
Row 10: switch to 2nd color, ch 2, hdc inc b/w posts, hdc b/w posts, turn (15, 16, 17, 18, 19, 19, 19, 21)
Row 11-14: switch to primary yarn, ch 2, hdc b/w posts across, turn (15, 16, 17, 18, 19, 19, 19, 21)
Row 15: ch 2, hdc inc b/w posts, hdc b/w posts, turn (16, 17, 18, 19, 20, 20, 20, 22)
Row 16- 17 (18, 20, 22, 24, 27, 29, 30): hdc b/w posts across, fo, leaving long tail for seaming. (16, 17, 18, 19, 20, 20, 20, 22)
Pattern for the Pocket (optional)
Brim:
Foundation: ch 5, starting in 3rd ch from hook, hdc across (3)
Row 1-4: hdc in blo across (3)
Body:
Foundation: ch 2, and pick up 8 hdc across brim, turn (8)
Row 1- 6: ch 2, hdc b/w posts across, turn (8)
Assembly
Line up the front and back body panels so that the lines match up, then join the top stitches of the shoulders together using the mattress stitch and tie off.
Using the mattress, stitch around the edge of the collar rows to join to the neck opening, Tie off and weave in ends.
Use a tape measure starting at the shoulders and working down towards the brim of the body panels to find 4.25″ (4.5″, 4.75″, 5″, 5.25″, 5.25″, 5.25″, 5.75″) and mark with a stitch marker. Using a long strand of yarn seam up the sides of the front and back body panels towards the stitch marker, and tie off just below the stitch marker. Repeat on the other side of the body panels.
Using the tail of the arm panel or a long strand of yarn, join the long ends of the arm panel together, making sure the cuff and lines match up as you go. Repeat on the second arm panel. With the acute angle of the arm triangle pointing down and the 90º angle of arm triangle lined up with the shoulder of the body, attach the arms to either side of the sweater using the mattress stitch. Tie off and weave in the ends.
To add the optional pocket, you will attach it to the lower left corner of the body of the sweater (the pocket will be on your right side when wearing it). Use the top most secondary color line as a gauge of where the top of the pocket should be. The pocket will actually be upside down with the brim located at the opening. Stitch in place making a “U” shape around the left, bottom and right sides of the square, and leaving the top open. Fasten off and weave in all remaining ends.
That’s all there is to it! If you enjoyed making this Easy Crochet Sweater, I hope you’ll share a picture with us on social media!