The Linden Beanie- Free Pattern
The Pattern
Below you will find the story behind and written pattern for this beautifully textured beanie. If you would prefer a large font, inexpensive colored PDF version of this pattern for easier printing and following along, you can purchase it from our Etsy shop here or our Ravelry shop here. If you’re here to participate in the Crochet For a Cause promotional, jump down to the “Crochet For A Cause” heading.
This PDF will be pre color coded by size, making it easier to follow along, and includes additional notes for comprehensive sizing. Best of all is that 50% of all of our pattern sale proceeds go to Hope for Justice, an organization aimed at eradicating modern day slavery.
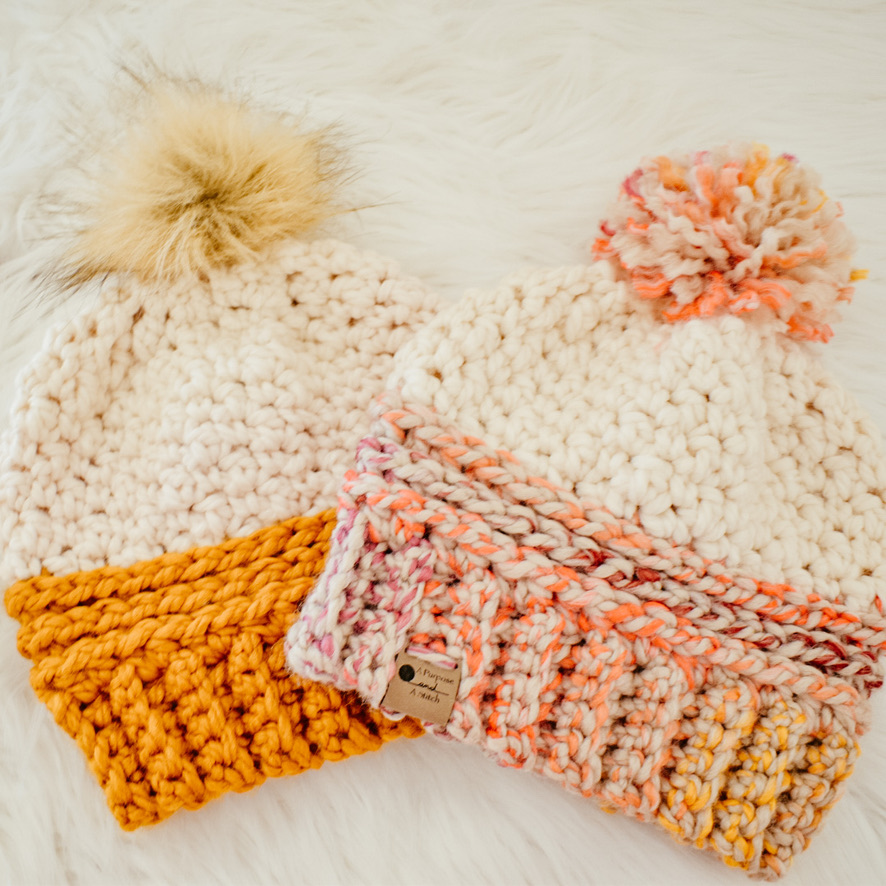
This design is meant to be a quick-make and is an advanced-beginner level pattern. While I made ours with One of my favorite things to design (and make) in winter are beanie hats. They’re fun (win), they work up quicker than garments (win, win) and you can experiment with so many different types of stitches (win, win, win!). 😬 I enjoyed working so much with Janne (of the Joy Of Motion Crochet blog) for doing a guest post on our Not Your Granny’s tee, that I couldn’t wait to work with her again. This time, in winter, and of course, I wanted to do a beanie. After the popularity of the Fireside Beanie, I knew I wanted to make a few more beanie patterns that were quick makes, with beautiful texture. With that in mind, and with my all time love of the camel stitch and the seed stitch, I couldn’t wait to dig right into combining the two. There was just one last thing. Two. Tone. Sometime last year, I’m not quite sure when, I became infatuated with beanies that had a mustard orange bottom and white top. I’m pretty sure it was the resemblance it had to my favorite Thanksgiving dessert. Food speaks to me guys. 😂 Anyone else currently running to the kitchen to make some pumpkin pie in the middle of summer? 🙋♀️ No, just me? Moving on then! After settling on the style of beanie I wanted to make, the only thing left to figure out was the stitches. I knew that since I was going two toned- I wanted it to be a brimmed beanie (with the brim in one color, and the rest in another), so the single crochets in the back loops only for ribbing was a no brainer for me. It’s my favorite style of brim, and especially with the extra bulky yarn, it goes by so fast! Once the rows of the single crochets in blo were complete, I joined with a series of slip stitches across the foundation and the last row, to form a cylinder. From here, I began to work my camel stitches. I don’t know that I’ll ever get over the knit look and love how it just pops out at you! If you have never worked the camel stitch before, I have linked to a video tutorial to help you get by in the pattern. The camel stitch is worked with half double crochet stitches. And the beautiful thing about half double crochet stitches, is that they have a third loop (or hump🐫-). By working into this third loop (as opposed to the front and or back loops), you will push the “v” of your stitch forward- giving it that beautiful knit look. This beanie has 3 rounds of camel stitches, with the third round being pushed forward when we join the second color. I recommend picking up the second color in the last stitch of the last round of camel stitches. You’ll do this by starting the half double crochet stitch, but by using the new color yarn for the last yarn over and pull up of the stitch. This offers the most seamless transition from the two colors. After the secondary color is attached, the main part of the beanie will begin with the seed stitch. The seed stitch is easy enough, and offers so much texture! If you’re new to crochet, I have a step-by-step picture tutorial for the seed stitch, that you can find here. The key with the first round of seed stitches, is that you’re going to need to work it into the 3rd loop of your previous row (as opposed to in to the “v” of the stitch as you normally would). This will push that last round of half double crochets forward, giving you a 3rd round of camel stitches. To work the seed stitch in the round, I opted to just alternate starting each round with a single crochet and double crochet, instead of turning the work. This way, you will continue to work each single crochet into a double crochet and vice versa. Depending on the size you are making, you will a few rounds of seed stitches for height, and then begin to gradually close the beanie up with decrease stitches. Once the beanie has a smaller opening at the top, and has reached the height needed, you will fasten off and weave the tail around the top. Pull tight to close and fasten off. I’m all about those poms, but I think this beanie looks just as good without one as it does with one, so feel free to attach a pom if so desired. Want a faux fur pom, but don’t know where to begin? I’ve got a step-by-step picture tutorial for that too! You can find it here. It’s that simple! Now, how many of these beautis will you be whipping up this winter? We’d love to see, so don’t forget to share with us on Instagram! Brim Pattern Foundation: ch 4 (5, 5, 6, 6) starting in 2nd ch from hook, sc across, turn (3, 4, 4, 5, 5) Row 1- 27 (29, 31, 33, 35): ch 1, sc in blo across, turn (3, 4, 4, 5, 5) To Join Together: ch 1, ss each stitch of last row to each ch of the foundation, ch 1 and move on to body (leaving yarn in tact) Body Pattern Round 1 [continuing in first color]:ch 1, p/u a hdc in each row of the brim around (29, 31, 33, 35, 37) Round 2: ss into ch1 sp, ch 1, camel stitch in same st and each around (29, 31, 33, 35, 37) Round 3: camel stitch in each around, changing colors at the end of this round, ss into 1st st, switching colors as you do. (29, 31, 33, 35, 37) Round 4 [in second color]: ch 1, sc into 3rd loop of the same st, dc, *sc into 3rd loop of hdc, dc into 3rd loop of hdc, repeat from * around, sc into 3rd loop in last (29, 31, 33, 35, 37) For baby pattern- skip to round 9 Round 5: *dc, sc, repeat from * around, dc in last (31, 33, 35, 37) For toddler pattern- skip to round 10 Round 6: *sc, dc, repeat from * around, sc in last (33, 35, 37) For child Pattern- skip to round 9 Round 7: *dc, sc, repeat from * around, dc in last (35, 37) For Teen Pattern- skip to round 10 Round 8: *sc, dc, repeat from * around, sc in last (37) Round 9: *dc2tog, sc2tog, dc, Sc, repeat from * around, dc in last (19, 22, 25) Round 10: *Sc, dc, sc2tog, dc2tog, repeat from * around, Sc in last (13, 21, 17)** **CHILD SIZE– end in: sc, dc, sc2tog in last 3 (15) **TEEN SIZE– end in: sc2tog, sc in last 2 (24) Round 11: *dc2tog, sc2tog, dc, Sc, repeat from * around, dc, sc, dc in last 3 (9, 11, 15)** **TEEN SIZE-end in: dc, sc in last 2(16) **ADULT SIZE– end in: dc2tog, sc2tog, dc in last 3 (11) For Toddler ONLY: Round 12: *Sc, dc, sc2tog, dc2tog, repeat from * around, sc, dc, sc in last 3 (11) For Teen ONLY: *Sc, dc, sc2tog, dc2tog, repeat from * around, sc, dc, sc2tog in last 4 (11) Assembly Fo, leaving a long tail. Use tail to weave in and out of top stitches, pull tight to close. Tie off. Attach Pom Pom if desired.
Crochet For A Cause

The Story Behind It

The Step-by-step


The Pattern
What You Need Approximate Completed Measurements Baby: 15” circumference & 5.5” tall
Toddler: 16.5” circumference & 6.5” tall
Child: 17.5” circumference & 7” tall
Teen: 18.5” circumference & 8” tall
Adult: 19.5” circumference & 9” tall Gauge Used 6 rows seed st= 4” 8 seed sts= 4” 3 rows camel st= 2” Abbreviations Used ch=chain
sc= single crochet
st (s)= stitch(es)
blo= back loops only
p/u= pick up [stitches]
hdc= half double crochet
dc= double crochet
ss=slip stitch
fo= fasten off Special Stitches Camel Stitch= hdc into 3rd loop of previous row’s hdc (for additional help I recommend this video tutorial by The Crochet Crowd, starting at roughly 1 min, 35 sec in)
Sc2tog= single crochet two together
Dc2tog= double crochet two togetherPattern Notes 


