Not Your Granny’s Tee- Free Pattern
Last year I had the most fantastic opportunity to be featured on the Joy of Motion blog, sharing the Not Your Granny’s Tee (you can read all about it here) and I was so overwhelmed with all the positive feedback we received!
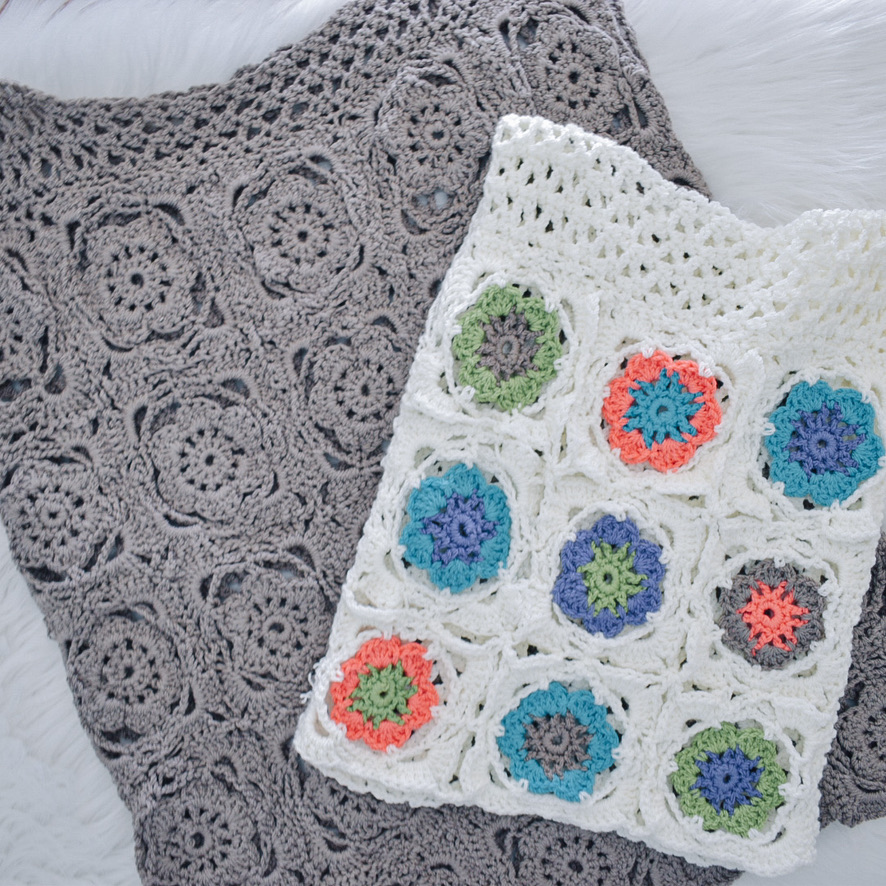
So you can imagine how excited I am to share this updated version today! Since releasing the pattern last year, I had had a vision of making a version more colorful, and adding some sizes to the original which was only available in adult female XS-2XL sizes.

So I purchased a few fun colors of the ZZ Twist yarn used to make my first and added a bit of pizzaz by making the flowers in the granny square colored. I’ll instruct you on when to change colors in the pattern below, but the video tutorial over on our Petal Perfect Granny Square page will walk you through the step-by-step from start to finish on making the granny square, including the color changes.

I have also included a video tutorial on this page of joining the squares as you go, as well as working the mesh stitch and assembly. If you prefer a higher quality version of that video, you can also view it on our Youtube page here.
All in all, I hope you guys enjoy this updated version of this tee and if you make one, please don’t forget to share with us on social media, nothing brings us more joy than seeing your versions of our patterns.

| What You Need |
|
| Approximate Completed Measurements |
 |
| Gauge Pattern |
| Granny squares 1 granny square= 3.5” x 3.5”
(dc, sc), ch 2, sk 2 pattern crocheted in rows 18 Stitches= 4” 10 rows= 4” |
| Abbreviations Used |
| ch= chain sl st= slip stitchsc= single crochetdc= double crochetsk= skip [stitch]ch sp= chain spacefo= fasten off |
| Special Stitches |
| Shell Stitch= dc 5 into designated stitch V Stitch= dc, ch 1, dc |
| Pattern Notes |
Completed Back Panels (before assembly) should measure approximately:
|
| For Comprehensive Sizing |
| Due to the make up of this pattern consisting of granny squares sewn together, comprehensive sizing between sizes listed is difficult to achieve unless you change gauge. Therefore, if you are looking to make a size measuring between two sizes, the easiest thing to adjust would be your hook size, and perhaps the weight yarn you are using. To make a top that is slightly larger than a size listed, you will need to increase your hook size to make larger squares and stitches. To decrease, you will need to go down in hook size to make smaller squares and tighter stitches. |
Granny Square Pattern (make 9, 16, 20, 25, 30, 35, 40, 45)
Foundation: Ch 6, sl st into your 1st ch (farthest from your hook)
Round 1: ch 1, sc 12 into the loop created (rather then into stitches), sl st into 1st sc
Round 2: ch 2, dc into 1st sc, *ch 1, sk 1, dc 2 into next, repeat from * around, ch 1, sl st into top of ch 2, p/u second color if using.
Round 3 [in second color, if using]: ch 2, *dc 5 into “v” created by your 2 dc from previous round, sc into the ch 1 space from previous round (located right after your “v”), repeat from * around, sl st into 1st dc
Round 4: sl st 2 (to get to the top of your “petal”), p/u 3rd color (if using), *ch 7, sk 5, sc, repeat from * around, ss into 2nd sl st of this round (at the top of your 1st “petal”)
Round 5 [cont in 3rd color, if using]: *ch 3, sk 3, sc (into 4th st of ch 7 from previous round), ch 3, sk 3, sc, repeat from * around, sc into 1st st
Round 6: ch 2,* dc 5 into ch 3 sp from previous round, ch 4, dc 5 into same ch 3 sp, ch 2, sk 3, sc, ch 2, sk 3, sc, repeat from * around right before corner, then sc into base of ch 2, fo
Back Panel Pattern
Row 1: ch 55 (67, 73, 91, 94, 97, 100, 103), starting in 4th ch from your hook *(dc, sc), ch 2, sk 2, rep from * across, turn (54, 66, 72, 90, 93, 96, 99, 102)
Row 2: ch 3, sk first sc, work (dc, sc) in first dc; *ch 2, sk 3, repeat from * across (54, 66, 72, 90, 93, 96, 99, 102)
Row 3- 27( 35, 43, 43, 53, 62, 70, 79) : repeat row 2, fo
Top Mesh Panel
Row 1: ch 10 (13, 22, 10, 16, 19, 22, 7), starting in 4th ch from your hook *(dc, sc), ch 2, sk 2, rep from * across, turn (9, 12, 21, 9, 15, 18, 21, 6)
Row 2: ch 3, sk first sc, work (dc, sc) in first dc; *ch 2, sk 3, repeat from * across. (9, 12, 21, 9, 15, 18, 21, 6)
Row 3- 27( 35, 43, 43, 53, 62, 70, 79): repeat row 2, fo leaving long tail for assembly
Assembly
Join the granny squares together to create a large square panel. Follow the chart here for assembly of how many squares wide and tall you’ll need for your size:

Weave in the ends of the granny square panel.
The Top and Back Panels will be joined with the rows as your width and the stitches (foundation row) as the length. Using the mattress stitch, seam the top panel to the 3 (4, 5, 5, 6, 7, 8, 9) granny squares running width-wise.

Line up the front and back, placing stitch markers in the 4 corners. Measure approximately 2” (3”, 4”, 4”, 5.5”, 6.5”, 7”, 7.5”) in on either side of the top and place stitch markers.
Measure from the top down approximately 5” (6.5”, 7.5”, 8”, 8.75”, 9.5”, 10.5”, 11”) on either side and place stitch markers.
Seam up sides and top from one stitch marker to the other using the mattress stitch.
Last thing to do is weave in all the ends, and steam block for neater lay of the granny squares. Your Not Your Granny’s tee is now complete!


