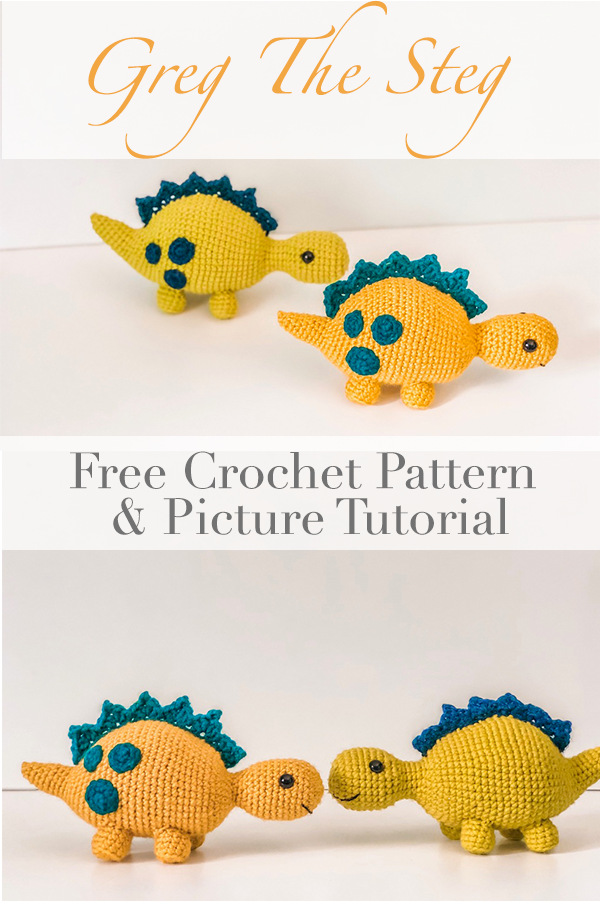
Greg the Steg- A Free Amigurumi Pattern

Below you will find the free pattern for this sweet and friendly dinosaur, Greg the Steg.
**You can purchase the ad-free PDF or add to your Ravelry Que here. **
Before you get started, make sure you check out the blog post on how I made Greg for detailed step-by-step instructions and pictures here.

I had so much fun making this guy, I just had to make 2! If you enjoy making him as much as I did, I hope you’ll share a picture with me below or on social media! I love to see the personal touches each maker adds to one of my patterns!
What You’ll Need
3.5mm crochet hook
medium worsted weight (4) yarn for body and legs- approximately 85 yards
medium worsted weight (4) yarn for spikes and spots- approximately 17 yards
fiber fill
2 10mm safety eyes
needle and thread
black embroidery floss
darning/embroidery needle
scissors
stitch marker
Completed Measurements
8 1/2″ long (from head to tail)
4 1/2″ tall (spikes to feet)
10″ around (the widest part of the body)
Abbreviations Used
ss= slip stitch
ch= chain
inc= inc
sc= single crochet
dec= decrease (I used the invisible decrease method)
fo= fasten off
blo= back loops only
Pattern for the Body
Pattern Notes
- The body portion is worked in joined rounds (vs. continuous rounds).
- The first stitch of each round will be worked into the same stitch you slip stitched into.
- When you slip stitch at the end of each round, take care to do so into your first stitch (not the ss or the ch1). I recommend using a stitch marker in your first stitch so that you do not accidentally work into the wrong place.
Foundation: Magic ring 6, ss, ch 1 (6)
Round 1: inc around, ss, ch 1 (12)
Round 2: *sc, inc, repeat from * around, ss, ch 1 (18)
Round 3: *sc 2, inc, repeat from * around, ss, ch 1 (24)
Round 4-10: sc around, ss, ch 1 (24)
Add safety eyes between rounds 8 & 9 on either side of the top of the head. Embroider on mouth using embroidery floss and darning needle. Begin to stuff head with fiberfill.

Round 11: *sc 2, dec, repeat from * around, ss, ch 1 (18)
Round 12: *sc , dec, repeat from * around, ss, ch 1 (12)
Round 13-15: sc around, ss, ch 1 (12)
Round 16: inc 2, sc 8, inc 2, ss, ch 1 (16)
Round 17: sc around, ss, ch 1 (16)
Round 18: inc, sc 4, inc 6, sc 4, inc, ss, ch 1 (24)
Round 19: *sc 2, inc, repeat from * around, ss, ch 1 (32)
Round 20: *sc 3, inc, repeat from * around, ss, ch 1 (40)
Round 21-25: sc around, ss, ch 1 (40)
Round 26: sc 7, *inc, sc 4, repeat from * 5 more times, sc 7, ss, ch 1 (46)
Round 27-28: sc around, ss, ch 1 (46)
Continue stuffing with fiberfill.
Round 29: sc 7, *inc, sc 5, repeat from * 5 more times, sc 8, ss, ch 1 (52)
Round 30-33: sc around, ss, ch 1
Round 34: sc 8, *dec, sc 5, repeat from * 5 more times, sc 7, ss, ch 1 (46)
Round 35-36: sc around, ss, ch 1
Round 37: sc 7 *dec, sc 4, repeat from * 5 more times, sc 7, ss, ch 1 (40)
Round 38: sc around, ss, ch 1 (40)
Round 39: sc 9, *dec, sc 3, repeat from * 4 more times, sc 9, ss, ch 1 (35)
Round 40: sc around, ss, ch 1 (35)
Round 41: sc 8, *dec, sc 2, repeat from * 4 more times, sc 9, ss, ch 1 (30)
Round 42: sc 4, *dec, sc 3, repeat from * 4 more times, sc 4, ss, ch 1 (25)
Continue stuffing with fiberfill.
Round 43: sc 6, *dec, sc, repeat from * 4 more times, sc 5, ss, ch 1 (20)
Round 44: sc 3, *dec, sc 2, repeat from * 3 more times, sc 3, ch 1 (16)
Round 45: sc 3, *dec, sc, repeat from * 3 more times, sc 2, ss, ch 1 (12)
Round 46-49: sc around, ss, ch 1 (12)
Round 50: sc 4, dec 2, sc 4, ss, ch 1 (10)
Round 51: sc 3, dec 2, sc 3, ss, ch 1 (8)
Round 52: sc around, ss, ch 1 (8)
finish stuffing with fiberfill.
Round 53: dec around, ss, ch 1, fo (4)
Pattern for the Legs (Make 4)
** Please note that the legs are worked in continuous rounds (vs. joined rounds)**
Foundation: work 6 in the magic ring (6)
Round 1: inc around (12)
Round 2: sc in blo around (12)
Round 3-5: sc around, fo (12)
Stuff each leg with fiberfill
Pattern for the Spikes
Foundation: ch 24
Row 1: starting in 2nd chain from your hook, (dc, ch 3, sl st in 1st ch made, dc 2) in same st, sk 1, sl st in next, sk 1, *(dc 2, ch 3, sl st in 1st ch made, dc 2) in same st, sk 1, sl st in next, sk 1*, repeat from * across, fo.


Pattern for Spots (make 1 of each)
**Please note that all spots are worked in continuous rounds (v.s joined rounds)**
Small Spot
magic ring 4, sc around, fo
Medium Spot
magic ring 4, inc around, fo
Large Spot
magic ring 5, inc around, fo
Assembly
You will first sew the legs to the body of your dinosaur. I attached the front legs so that the center was placed between rounds 26 and 27 and so that one leg was about 3-4 stitches to the left and the other 3-4 stitches to the right of the starting stitch seam. The back legs were placed so that the center was approximately located between rounds 36 and 37, also about 3-4 stitches to the left and right of the starting stitch seam.
Once your legs are secured in place, add on the spikes. I recommend pinning in place first to make sure proper placement before sewing on. You’ll want the line of spikes to run down the center of the back, from the neck dip back to the base of the tail. Stitch in place using your darning needle and a strand of yarn.
Last is to add on your dinosaur’s spots. Again, I recommend pinning in place however you like best. Using a needle and thread, attach to the body.

I love it! I did it for a baby and he LOVE IT EVEN MORE! It’s cute and easy!
Aww, just made my day! Thank you so much for sharing, so happy to hear it turned out well and is being well loved 🥰
What size hook did you use for the dinosaur?
oh goodness! Thank’s for bringing it to my attention. I used at 3.5mm crochet hook. Added to the pattern now 🙂