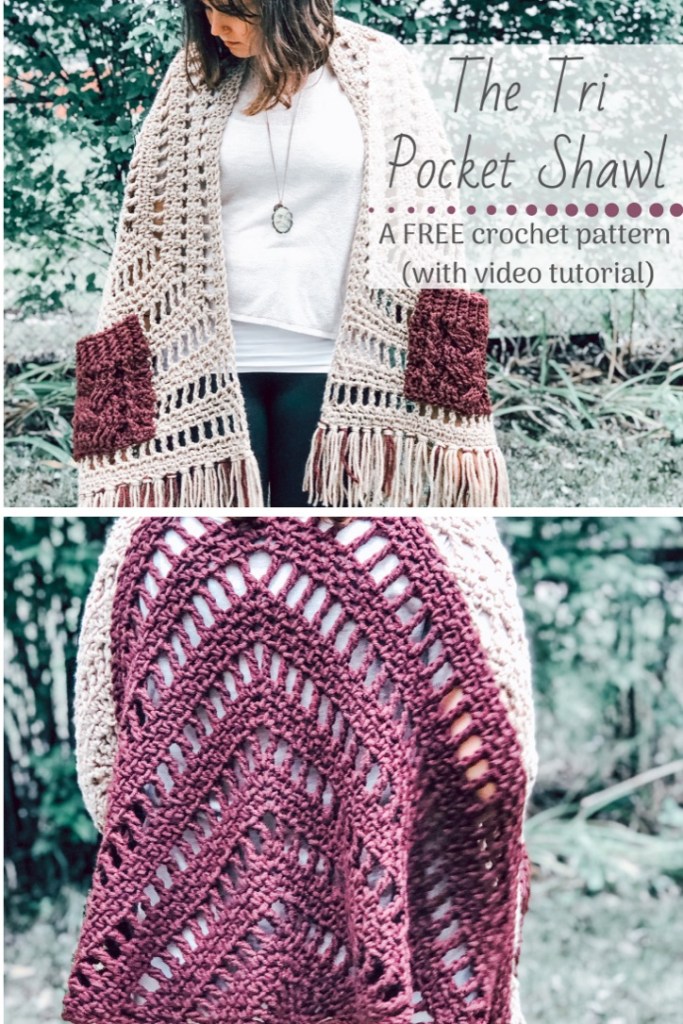
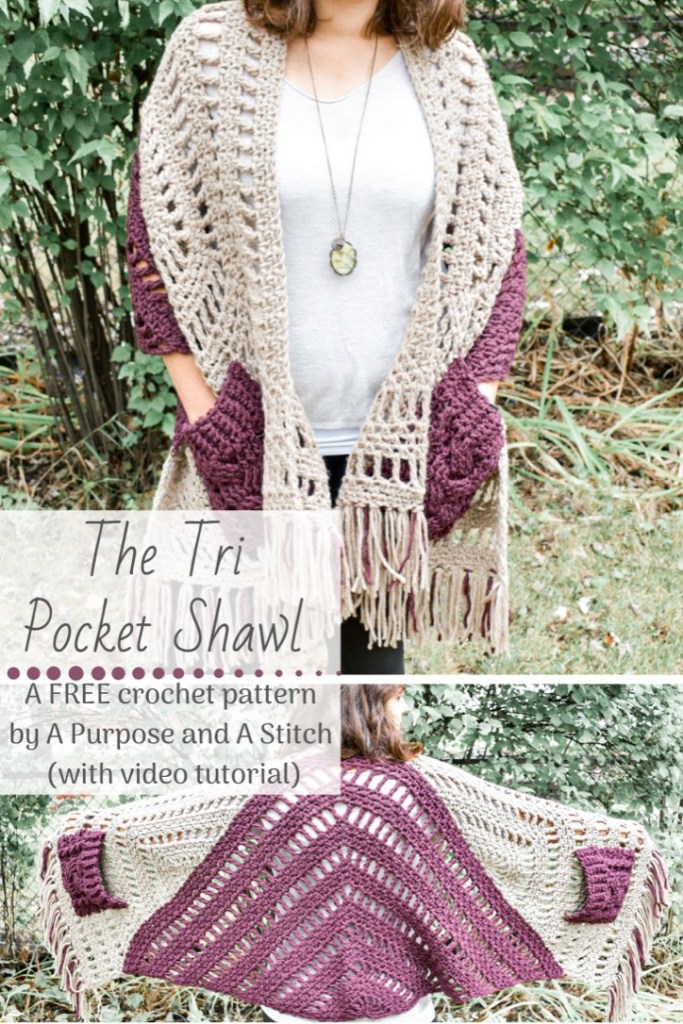
The Tri Pocket Shawl- Free Crochet Pattern

About The Post
Below you will find the FREE pattern for this beautiful Tri Pocket Shawl. If you would prefer, you can purchase the inexpensive PDF from our Etsy or Ravelry shops. This colored, large font PDF is printable and easy to follow. Best of all 50% of all our PDF pattern sales are donated to eradicating modern day slavery.
This shawl is fairly easy to make so I don’t have a step-by-step picture tutorial to offer you, but there is a video tutorial for making the triangle panels that make up this pattern in this post, just cuz. 😉 Once that’s completed, I will post it here, so you don’t have to worry about a separate blog post for this pattern.
About The Design
Unless you live under a rock, you’ve probably seen the popular pocket shawl trend circulating social media. When Lion Brand Yarn reached out looking for an accessory pattern using their limited time rereleased Wool Spun yarn, I knew a unique take on a pocket shawl was the way I wanted to go. I of course, had to make the pockets cabled. Because we all know how much I love me some good crochet cables.
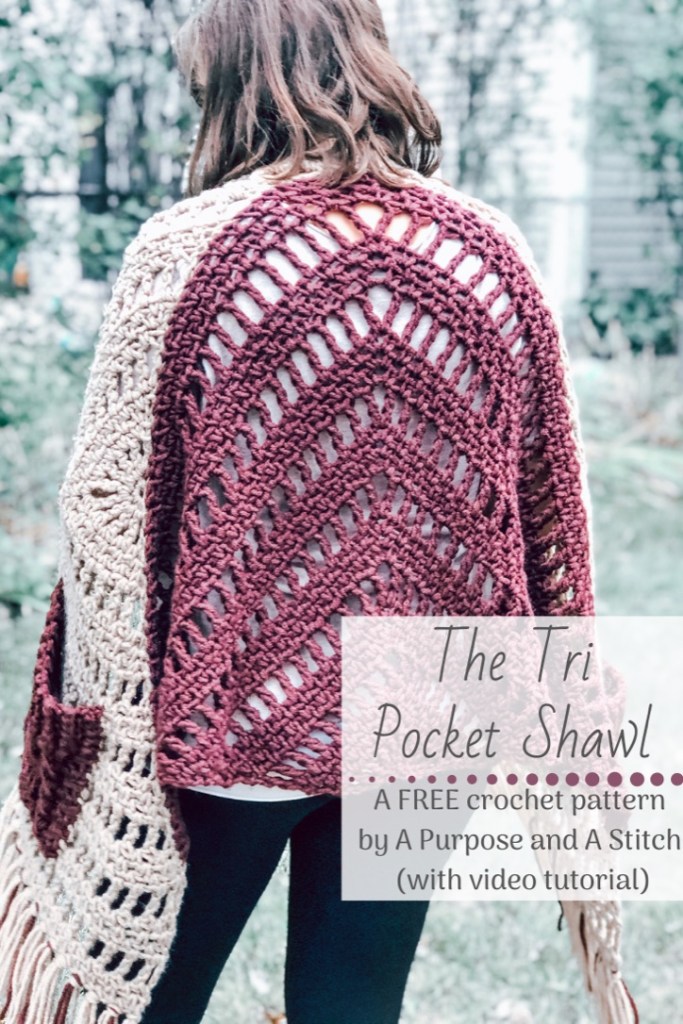
The shawl is comprised of 3 triangle panels. Well, a triangle and 2 trapezoids if you want to get technical 😅, but the idea is that 3 triangular shapes come together to make a long rectangle. Aside from the beautiful angles this creates, it allows for some fun color work as well. I chose to make my center triangle a beautiful eggplant color, encased in taupe. You can choose to work your shawl in a solid color, or 2 complimenting colors, but regardless, I think you’re going to love it!

About The Pattern
This is an intermediate level pattern (mostly because of the cabled pockets) and ss mentioned, this pattern is comprised of a large triangle in the center and encased in 2 smaller triangles that you will turn into trapezoids by adding to the outer angle of those two panels.
Blocking is next, and arguably one of the most important steps. I don’t always recommend blocking, so when I do- please know it’s for a good reason! These panels will not line up perfectly. They just wont. This was partially intentional and offers a nicer fit when worn, but seaming will be much trickier without the blocking. From here you’ll seam the 3 panels together to create a long rectangular shaped shawl.
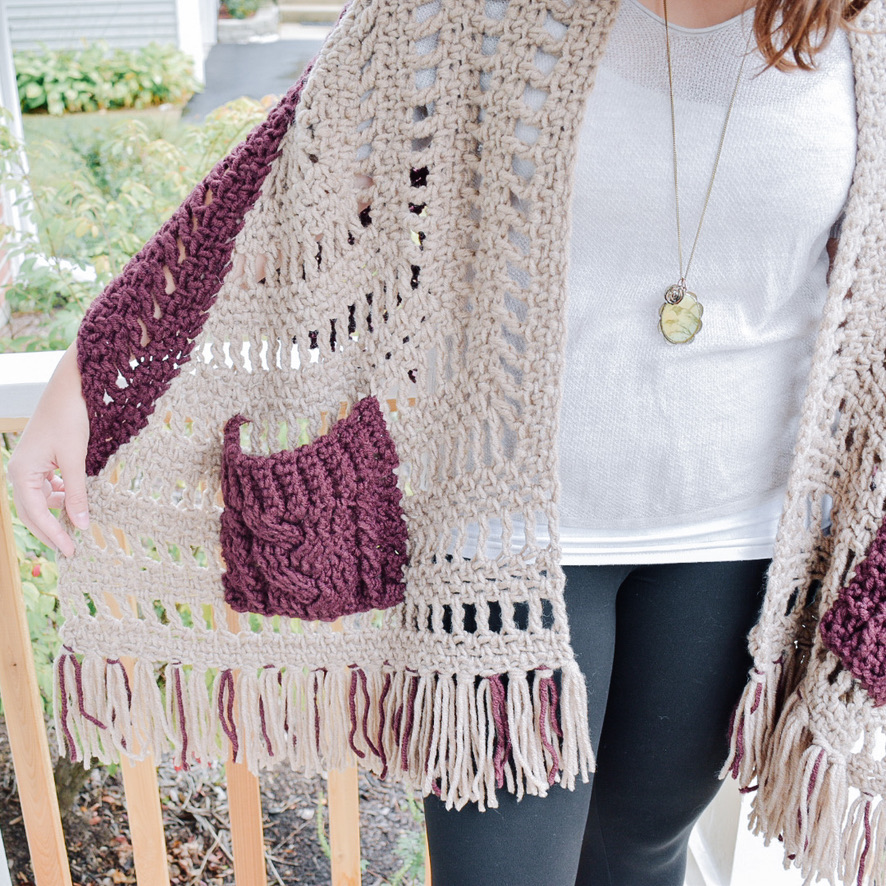
Once your shawl is completed, you’ll make some cabled pockets. These pockets are oversized and GORGEOUS! A little apprehensive of the cabling? Don’t sweat it, these pockets are actually designed off our Cozy Cabled Blanket Square, which we have a video tutorial for. You can find that here.
After you’ve made both the squares, you’ll tac those on and add some fun fringe for a completed shawl look.
The best part about this all, is that this pattern uses bulky weight yarn and a larger crochet hook so the actual crocheting part works up surprisingly fast!
About The Fit

This is meant to be an oversized shawl that fits most comfortably. A little on the taller side and want your shawl to be a bit longer? Then all you need to do is add to those edges and bam, your shawl is longer! Is this too long for your taste? Just work fewer rows on those ends.
As mentioned above, this design is meant to fit well over your shoulders so it can drape comfortably. To ensure that this shawl fits well while worn, I recommend wearing it so that the point of the center triangle is on top closest to your neck. The fit will be more akin to a well fitting accent piece in your wardrobe than a typical shawl.

About The Yarn
For my pattern, I used Lion Brand’s Wool Spun yarn. This is an old favorite that they have recently brought back for a limited time. I used this yarn in my Galway Girl Glittens, so if you’re looking for a matching hand warmer set to go with this shawl, you can find that FREE pattern here.
Don’t have access to this yarn or wanting to make this after the limited release is over? No sweat, any weight 5 bulky yarn should work as a great substitute. I do just recommend working with a wool- based yarn as opposed to acrylic since blocking is an important aspect of this pattern. My first go to as a substitute would be WeCrochet’s Bulky Wool of The Andes Superwash or Lion Brand’s Hue and Me.
Can’t do wool due to allergies? Wool Spun has a very similar composition as far as ply count to Lion Brand’s Color Made Easy, so I imagine, that would work well too. WeCrochet’s Brava Bulky would also be good.

The FREE Pattern
| What You Need |
| 3 skeins Lion Brand’s Wool Spun Bulky weight yarn (#5) in A color- I used Burgundy (approximately 375 yards) 3 skeins Lion Brand’s Wool Spun Bulky weight yarn (#5) in B color- I used Taupe (approximately 375 yards) 8 MM (US L) crochet hook embroidery/ darning needle (for seaming and weaving in ends) scissors |
| Approximate Completed Measurements (not including fringe) |
| 21″ wide 57″ long (not including tassels) 63”X 21” after blocking |
| Gauge Used |
| 10 sts= 4″ of gauge pattern 8 rows= 5″ |
| Gauge Pattern |
| Ch multiple of 2, plus 1 Row 1: sc in 3rd ch from hook, *ch 1, sk 1, sc*, repeat from * to * across, turn. Row 2 & 3: Ch 2, sc in ch-1 sp, *ch 1, sk 1, sc in next ch-1 sp*, repeat from * to * across, sc in last ch-2 sp, turn. Row 4: ch 4, tr in ch-1 sp, *ch 1, sk 1, tr*, repeat from * to * across, tr in last ch-2 sp, turn. Row 5: repeat row 2 Repeat rows 2-5 for swatch. |
| Abbreviations Used |
| bpdc= back post double croche tblo= back loop only ch= chain Ch-1 (2) sp= chain 1 (2) space Ch-space= space previously made dc= double crochet fo= fasten offf pdc= front post double crochet fptc= front post treble crochet inc= increase (e)(s) lp(s)= loop (s) MR= Magic Ring rep= repeat RS= right side [of work] sc= single crochet sk= skip st= stitch tr= treble (triple) crochet WS= wrong side [of work] yo= yarn over |
| Special Stitches Used |
| Magic Ring= Wrap yarn around index finger. Insert hook into ring on finger, yarn over and draw up a loop. Carefully slip ring from finger and work the stitches of round into the ring. Moss stitch= sc in ch-1 sp, ch 1, sk next st back post double crochet: yo, insert hook in front of post (from back to front) yo, pull through 2 loops on hook, yo and pull through 2 remaining loops front post double crochet: yo, insert hook behind post (from front to back), yo, pull through 2 loops, yarn over, pull through 2 remaining loops front post treble crochet: yarn over twice, insert hook behind post (from front to back), yarn over, pull through 2 loops, yarn over, pull through 2 loops, yarn over, pull through remaining 2 loops |
| Pattern Notes |
| This Pattern uses US standards This pattern is worked back and forth in rows of treble crochet and the moss stitch The chs worked across the rows count as a stitch in the final stitch count for each row For the Triangle Panels, the turning chs count as the first stitch and first ch of each row. For the Pocket squares, the turning chs do not count as a stitch. This pattern will consist of 3 triangle panels, seamed together to form a long rectangle, and 2 cabled pockets seamed on to either end of the rectangle. Each triangle panel in B will have one side worked longer than the other, that long side will be on the outside of your shawl when seaming. |
Triangle Panel Pattern (make 1 in A and 2 in B)
Foundation: work 5 sc into a MR, pull closing string to cinch closed (do not sl st to beginning), turn. (5)
Row 1 : ch 4, tr, ch 1, (tr, ch 1, tr) in next, ch 1, (tr, ch 2, tr), *ch 1, (tr, ch 1, tr)*, repeat from * to * to last, turn. (20)
Row 2: ch 2, sc in 1st st, ch 1, moss st in 1st ch-1 sp and acros to ch-2 sp, (sc,ch 2, sc) in ch-2 sp, ch 1, moss st in next ch-1 sp and across, sc in last ch-1 sp, ch 1, sc into the 3rd ch of turning ch, turn. (24)
Row 3&4: ch 2, sc in 1st st, ch 1, moss st in 1st ch-1 sp and across to ch-2 sp, (sc, ch 2, sc) in ch-2 sp, ch 1, moss st in next ch-1 sp and across, sc in last ch-1 sp, ch 1, sc in 1st ch of turning ch, turn. (32)
Row 5: ch 4,( tr, ch 1) in next ch-1 sp and across, to ch-2 sp, (tr, ch 2, tr) in ch-2 sp, (ch 1, 1, tr) in next ch-1 sp, and across to last sc, tr in 1st ch of turning ch, turn. (36)
Row 6: ch 2, sc, ch 1, moss st to ch-2 sp, (sc,ch 2, sc) in ch-2 sp, ch 1, moss st to last ch-1 sp, sc in next ch-1 sp, ch 1, sc in ch-4 sp, turn. (40)
Row 7&8: ch 2, sc in 1st st, ch 1, moss st in 1st ch-1sp and across to ch-2 sp, (sc, ch 2, sc) in ch-2 sp, ch 1, moss st to last sc, sc in 1st ch of turning ch, turn. (48)
Row 9-20: rep rows 5-8 (96)
For panel in A, continue to Row 21 below.
For panels in B, continue on to “triangle extension pattern”.
Row 21-28: rep rows 5-8 (128)
Triangle Extension Pattern (for B triangles)
Row 21: ch 4, tr in 1st ch-1 sp, (ch 1, tr) in next ch-1 sp and across, to ch-2 sp, tr in ch-2 sp, turn. (49)
Row 22-24: ch 2, moss st across, sc in last ch-1 sp, turn. (49)
Row 25-28: repeat rows 21-24, fo.
Pocket Ribbing Pattern (make 2 in A)
Foundation: ch 6
Row 1: starting in 2nd ch from your hook, sc across. (5)
Row 2-19: ch 1, sc in blo across, turn. (5)
Continue to “Pocket Pattern”
Pocket Pattern
Row 1 (WS): ch 2, dc in each row of Pocket Ribbing across, turn. (19)
Row 2 (RS): ch 2, dc 2, sk 1, fpdc in next, fpdc in front into sk st, dc, sk 3, fptc 3 in next 3, fptc in front into 3 sk sts, fpdc 3, dc, sk 1, fpdc in next, fpdc in front into sk st, dc 2, turn. (19)
Row 3 (WS): ch 2, dc 2 , bpdc 2, dc, bpdc 9, dc, bpdc 2, dc 2, turn. (19)
Row 4 (RS): ch 2, dc 2, sk 1, fpdc in next, fpdc in front into sk st, dc, fpdc 3, sk 3 sts, fptc 3 in next 3, fptc behind into the 3 sk sts, dc, sk 1, fpdc in next, fpdc in front into sk st, dc 2, turn. (19)
Row 5 (WS): ch 2, dc 2 , bpdc 2, dc, bpdc 9, dc, bpdc 2, dc 2, turn. (19)
Row 6- 13: repeat rows 2-5
fo and weave in ends. Wet block before assembly.
Assembly

Wet block all pieces to fit the following measurements:
- The A triangle should measure approximately 45” across the bottom and 29“ along either side.
- The B triangles should measure approximately 29” across the bottom, 21” across the side the extension was added to and 28.5” across the other side.
- The pockets will measure approximately 8” X 8”
With the A triangle in the center, place the bottom of either B triangle along either side of the A triangle with the Extension patterns on the outermost edge. Using the mattress stitch (or method of choice), seam the 3 triangles together to form a rectangle measuring approximately 57″ long by 21″ wide.
Using the Mattress stitch (or method of choice), seam the pockets in place along the sides and bottom (the top ribbing should not be seamed down), with the bottom of the pockets centered, running along the start of the 25th row of the Extension pattern of either B Triangle.
Weave in all ends.
Adding Fringe

Cut 110 strands of color B, approximately 10” long and 23 strands of color A, approximately 10” long.
Start in 1st st last row of Extension Pattern
*Take 2 strands of A and 1 strand of B and fold in half, forming a loop at one end. Use your hook to pull loop through st, draw loose ends through the loop and pull tight to secure.
Skip next st, take 3 strands of A and fold in half, forming a loop at one end. Use your hook to pull loop through st, draw loose ends through the loop and pull tight to secure.
Repeat from * across. Trim fringe across for an even look.
Turn work over and repeat this process across the end of the rectangle.