Farmers Market Bag

**Below you will find the step-by-step picture tutorial and free pattern for this versatile mesh bag.**
You may not be aware but my in-laws are bee farmers. They started keeping honey bees a few years after Will and I started dating and never looked back.
One of their main sources of revenue is through selling their honey at Farmers Markets. I had never actually been to a Farmers Market before they started this venture, but since my very first visit to one, I was in love.


It’s the perfect place to get local fruits, vegetables, homemade breads, jams, meat and so much more!
This year I decided I wanted to make a bag that I could use for when we go to the market. One that would expand based on how much I may purchase that week but that would be lightweight and cute on its own as well.
 I love the mesh bags I have seen in years past and decided that was the route I was going to go. The problem I had was deciding on a stitch to use. I wanted to use something that would be different, but easy and that would work up quickly.
I ended up modifying a stitch I found in one of my crochet stitch books, and couldn’t be happier with the end result!
Overall, this bag is much simpler to make then you might think. The base of the bag is formed of a rectangle that you will later work decreases into along the sides and top in order to shape into a bag.
To start working the the rectangle, you will begin with a foundation chain and a row of single crochets.

From this point forward, you will be alternating between two steps for each subsequent row.
The first step is to chain 5, skip 2 and single crochet in the next. You will repeat this across your second row and every alternating row moving forward.
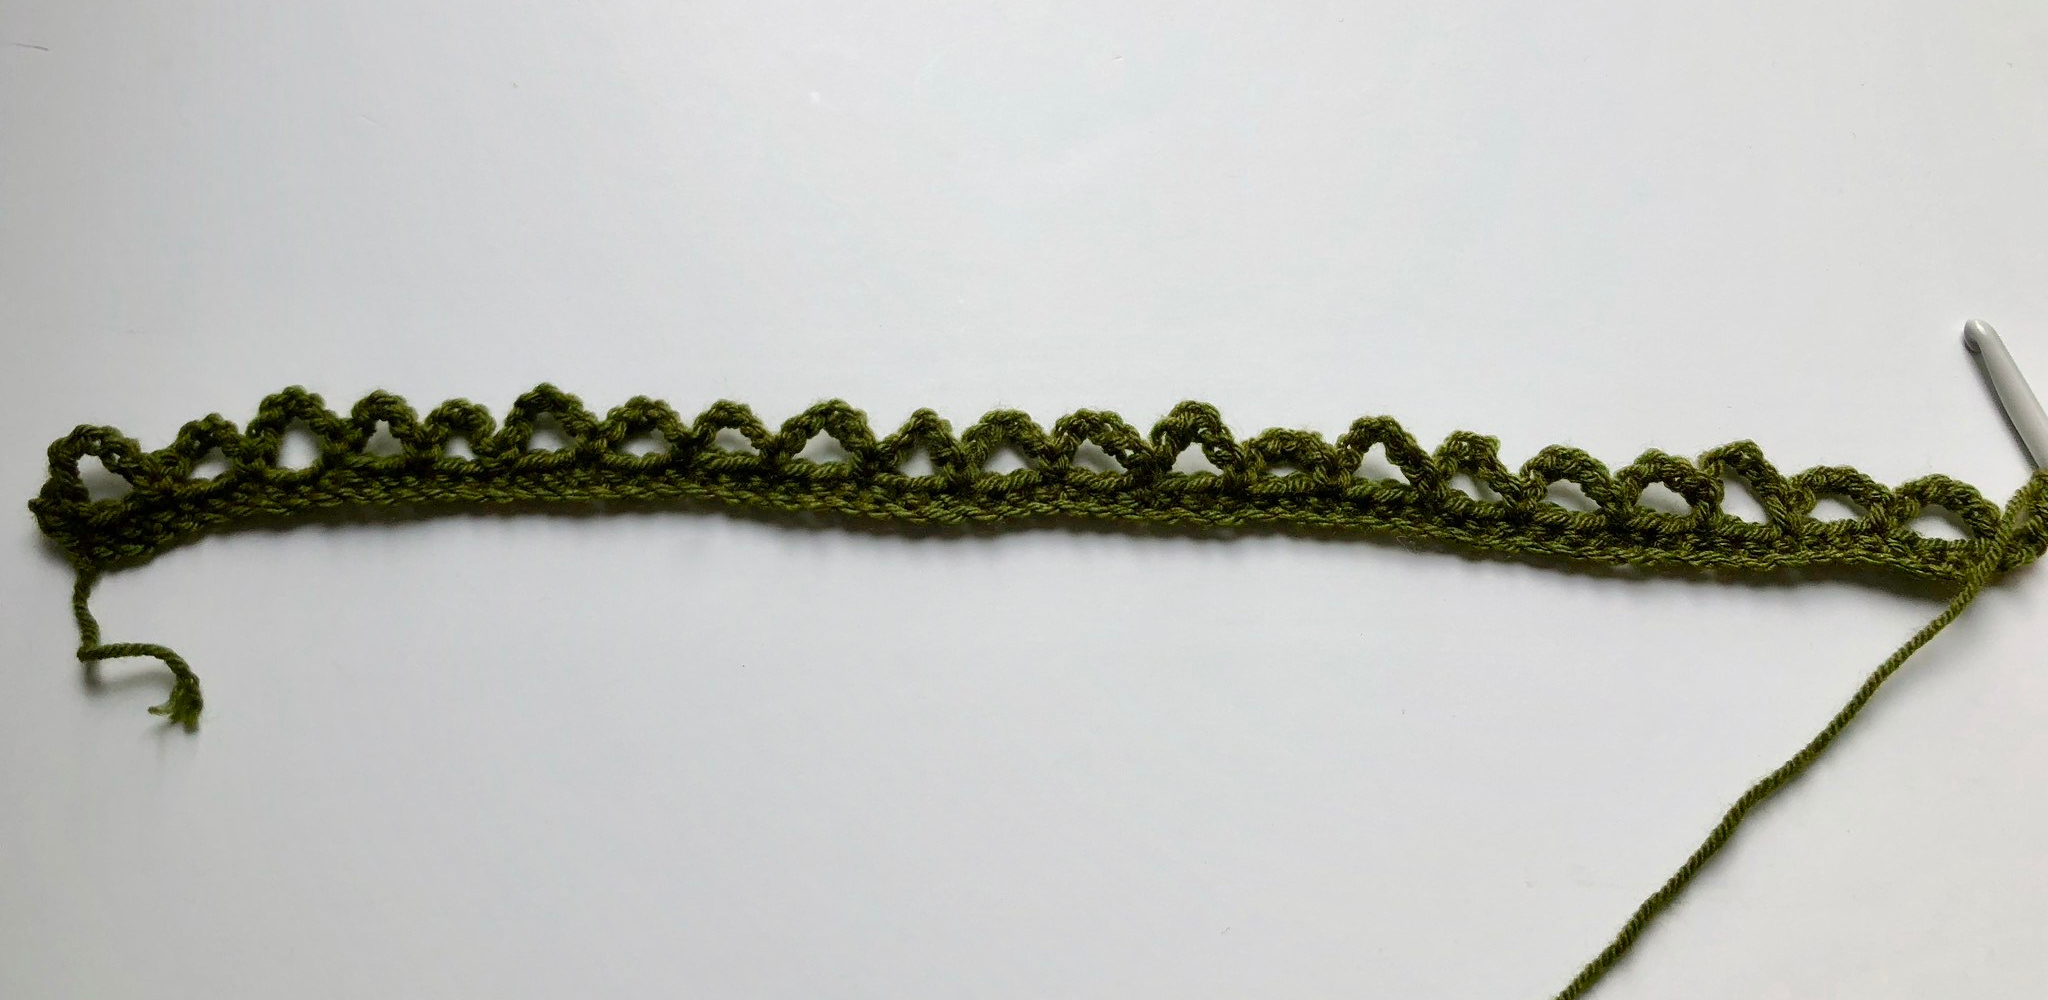
Before turning your work, you will chain 4. This will count as a chain 1 and a double crochet in your next row.
For the next step you will be double crocheting 2 into each of the chain 5 spaces created in your previous row, with a chain 1 between each group of 2 double crochets.


You will repeat this process across, ending with a treble crochet into the first single crochet of your previous row.


When you turn your work you will begin the next row of step one by single crocheting into the top of the treble crochet that ended your last row.

You will then repeat step one by chaining 5, skipping your 2 double crochets and single crocheting into the chain 1 across. You will complete this row by single crocheting into the 3rd chain of your chain 4 that ended row 2.
To complete the rectangle, you will repeat these two steps until an adequate length is achieved.


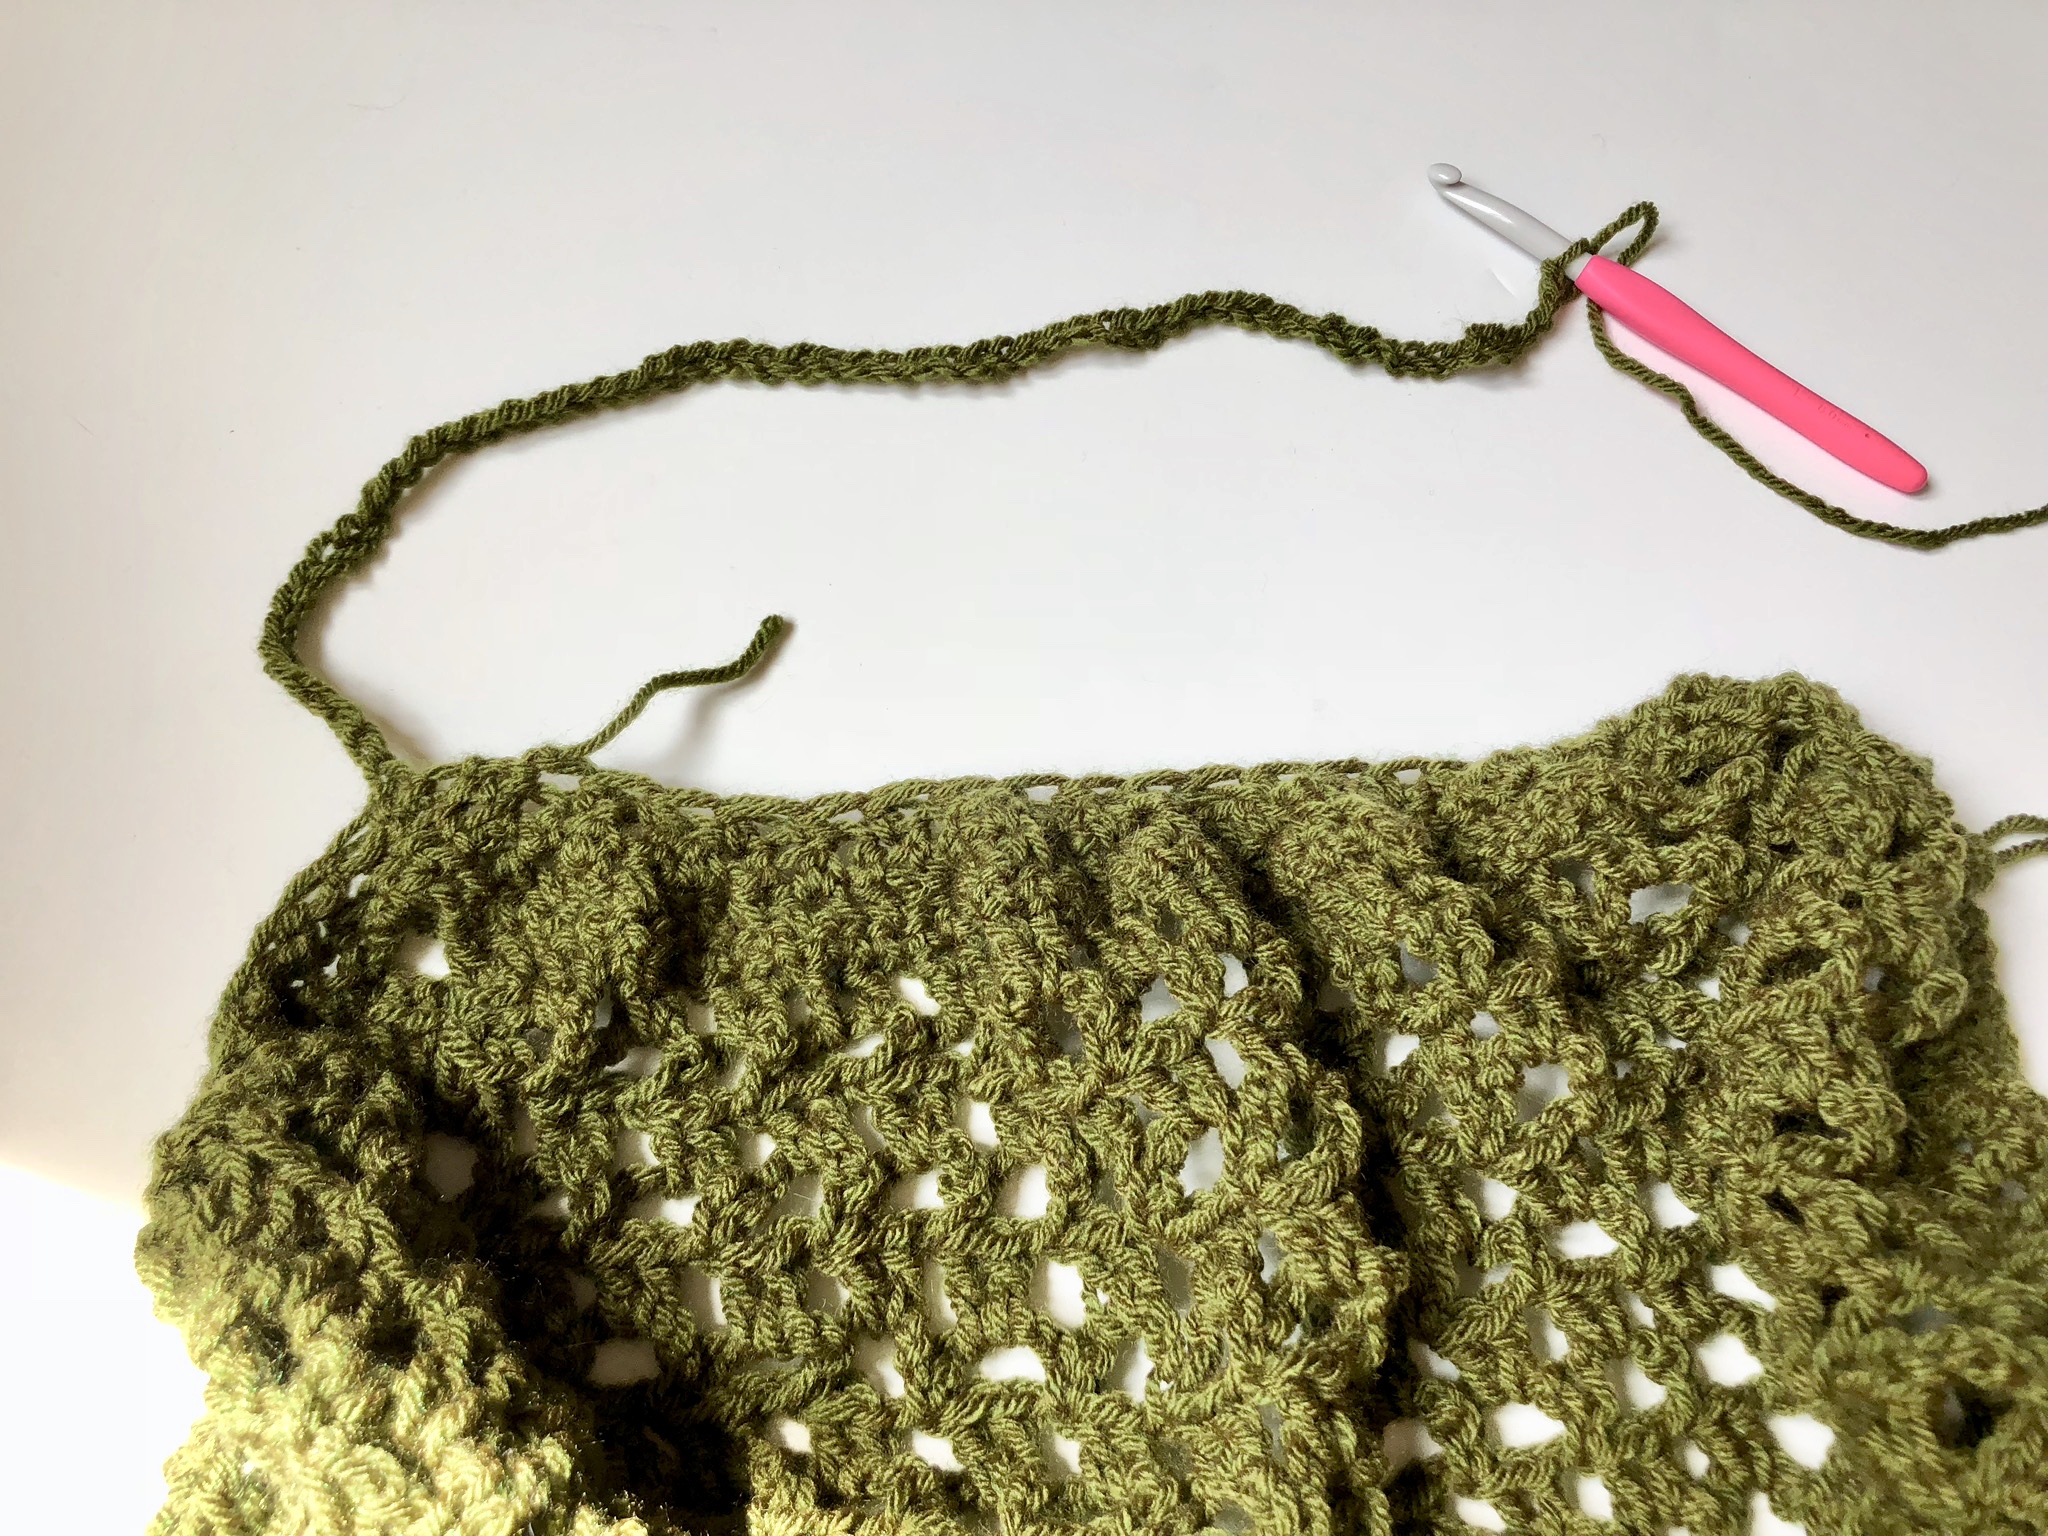
Once your rectangle is long enough, you will work one row of single crochet stitches across. Next, you will begin to decrease in order to start forming what will turn into one side of the top of your bag.
The decreases across the top of the bag will be slightly different from those occurring along the sides. I had originally envisioned a seed stitch look, which is why I chose to alternate between working regular double crochets and single crochet decreases.
Several rows of this pattern are worked across the top of the rectangle which bunches up the top forming a curve. Once complete, you will repeat this process across the bottom of the rectangle.

When starting the bottom you will begin to work the same pattern of double crochets and single crochet decreases directly into the front loops of the foundation chain of the rectangle.


If you fold the rectangle in half at this point, you will be able to see how the bag is beginning to form.


After completing the bottom decreasing rows, you will leave your yarn in tact in order to start working decreases across the sides of your bag.
The decrease pattern along the side will be worked in only single crochet stitches. But first, you must pick up some stitches across the sides.
You will begin by picking up 5 single crochet stitches along the seed stitch portion of bottom of the rectangle. I worked 2 single crochets into the first row, 1 in the next 2 rows and 1 in the single crochet row that started the rectangle off.


Next you will pick up one single crochet stitch into each row down, ending by picking up 5 more stitches in the seed stitch pattern worked across the top. Once the single crochets are in place, you will complete the next two rows by alternating between a single crochet and a decrease across.
Once this side is completed, you will fasten off and repeat on the other side of the rectangle, picking up your yarn in the very top row of the seed stitch pattern on either the top or bottom of the rectangle. Rather then fastening off once completed with this side, you can just leave your yarn in tact to start working the handles.
The handles are the last and final step but are very quick to work up. They each consist of only a few rows of half double crochets. The trickiest part is figuring out exactly where to attach the base of each handle to the bag. They will be worked along the angle created at the top of the bag where the side decreases and top decreases meet.

To start out the first handle, you will simply work a chain foundation that will be attached to the third row of the seed stitch portion of the other end of the top of your bag.
Once complete, you will attach the chain to the 3rd row down from the top of the angled stitches. You will then single crochet into the next stitch up, chain 1 and turn the bag.


From here you will half double crochet across the foundation chain ending this row by attaching to the 2nd and 1st stitches on the other end of the bag. Chain 1, turn and work one more row of half double crochets across. This handle will be completed by you attaching this end to the top row of the angled stitches and fastening off.


The other handle will be worked in the same fashion, starting by you attaching the yarn to the 3rd stitch down from the top on one side.
After both handles are complete, you will simply weave in the ends. Now your Farmers Market Bag is complete!
I hope you have as much fun making this bag as I did and get as much use out of it as I hope to. 🙂

Completed Measurements
Bag portion measures roughly 18″ wide and 13″ deep
Handles are 20″ long
Gauge Used
4 sets of 2 dc rows= 4″
6 rows of pattern= 4″
Abbreviations Used
ch= chain
sc=single crochet
sk=skip
dc= double crochet
sp= space
tc= treble crochet (yarn over twice, insert hook into the stitch and p/u a loop, yarn over and pull through 2 loops on hook, yarn over again and pull through 2 more loops, yarn over once more and pull through last 2 loops on hook)
dec= decrease (single crochet 2 together using the normal decrease method)
st= stitch
fo=fasten off
pu= pick up
hdc= half double crochet
What You’ll Need
2 skeins of Lion Brand’s Vanna’s Choice Yarn or other medium (4) worsted weight yarn- approximately 186 grams ** See notes in “Pattern Notes” Section regarding yarn selection
1 8.0mm (US size L) crochet hook
scissors
Pattern Notes
- This Pattern uses US standards
- When I originally made this pattern, I used Lion Brand’s Vanna’s Choice Yarn. However, this yarn has a lot of give. While perfect for garments and other household items, I think a sturdier yarn (such as their ReUp or ReTweed yarn) would be a better choice for this pattern.
- The body of this pattern is worked back and forth in rows
- In first row, the first skipped stitch does not count as a stitch.
Pattern for the Bag
Foundation: chain 65
Row 1: starting in the 2nd ch from your hook, sc across, ch1, turn (64)
Row 2: sc in 1st st, *ch 5, sk 2, sc, repeat from * across, sc in last, ch 4 (counts as dc, and ch 1 in next row), turn
Row 3: *dc 2 in ch 5 sp, ch 1, repeat from * across, tc in last sc, ch 1, turn
Row 4: sc into tc, *ch 5, sk 2, sc into ch 1 sp, repeat from * across, sc into 3rd ch of ch 4 from previous row, ch 4, turn
Row 5-36: repeat rows 3&4 16 more times
Row 37: sc in each stitch across, ch 3 and turn (64)
Row 38: *dc, sc dec, repeat from * across ending in a dc, ch 1 and turn (43)
Row 39: *sc dec, dc, repeat from * across ending in a sc in last st, ch 3 and turn (29)
Row 40: *dc, sc dc, repeat from * across ending in a sc in last st, fo (20)
Pattern for the Bottom
Flip your work over and pick up your yarn on one end of your foundation chain. You will begin to work the other end of your bag into the front loops of your foundation chain.
Row 1: *dc, sc dec, repeat from * across ending in a dc, ch 1 and turn (43)
Row 2: *sc dec, dc, repeat from * across ending in a sc in last st, ch 3 and turn (29)
Row 3: *dc, sc dc, repeat from * across ending in a sc in last st, leave your yarn intact (20)
Pattern for the Sides
You will now begin to work the sides of your bag. Turn your work and begin to pull up sc stitches.
Row 1: starting in the very first row of the side of your bag, pick up a sc st. Pick up 4 more (5 total) on the seed stitch portion of the top of your bag. Pu a sc st in each row along the side of your bag (36 total). Pu 5 sc stitches evenly spaced on the opposite side of the top of your bag, ch 1 and turn (46)
Row 2: *sc, dec, repeat from * across, ch 1, turn(31)
Row 3: *sc, dec, repeat from * across, fo (21)
Pick up the yarn and repeat Rows 1-3 on the opposite side of your bag, leaving yarn intact to start working the handles.
Pattern for the the handles
Foundation: ch 45, attach to opposite side of the top of the bag in the 3rd dec from the top. sc into 2nd dec down from top of the bag, ch 1 and turn. (60)
Row 1: Starting in the 1st ch, hdc across, sc 2 into the 2nd and 1st dec down from the top of the bag, ch 1 and turn. (45)
Row 2: Starting in 1st hdc, hdc across, sc into 1st dec down from the top of the bag, fo (45)
For the handle on the opposite side of the bag, pick up the yarn in the 3rd dec down from the top of the bag and begin working Foundation- Row 2 above.
Weave in all ends and your Farmers Market bag will be complete!


Hi. I am using an 8mm hook but I’m jut not too sure how large the net should be. The holes are measuring about an inch. Should I go down a hook size or so? It seems like if would not be really strong enough.
Hi Doris,
I actually designed this bag back when I had a SUPER tight gauge, so if the holes are looking too large for your liking- I think you could definitely go down a hook size (or 2) and still end up with a roomy and enjoyable bag! Hope this helps and happy crocheting!
The pattern shows an 18.0mm cook. I am assuming this is an error. What size are you using?
Hi Tammy, it’s an 8.00 mm hook (US L) 🤗