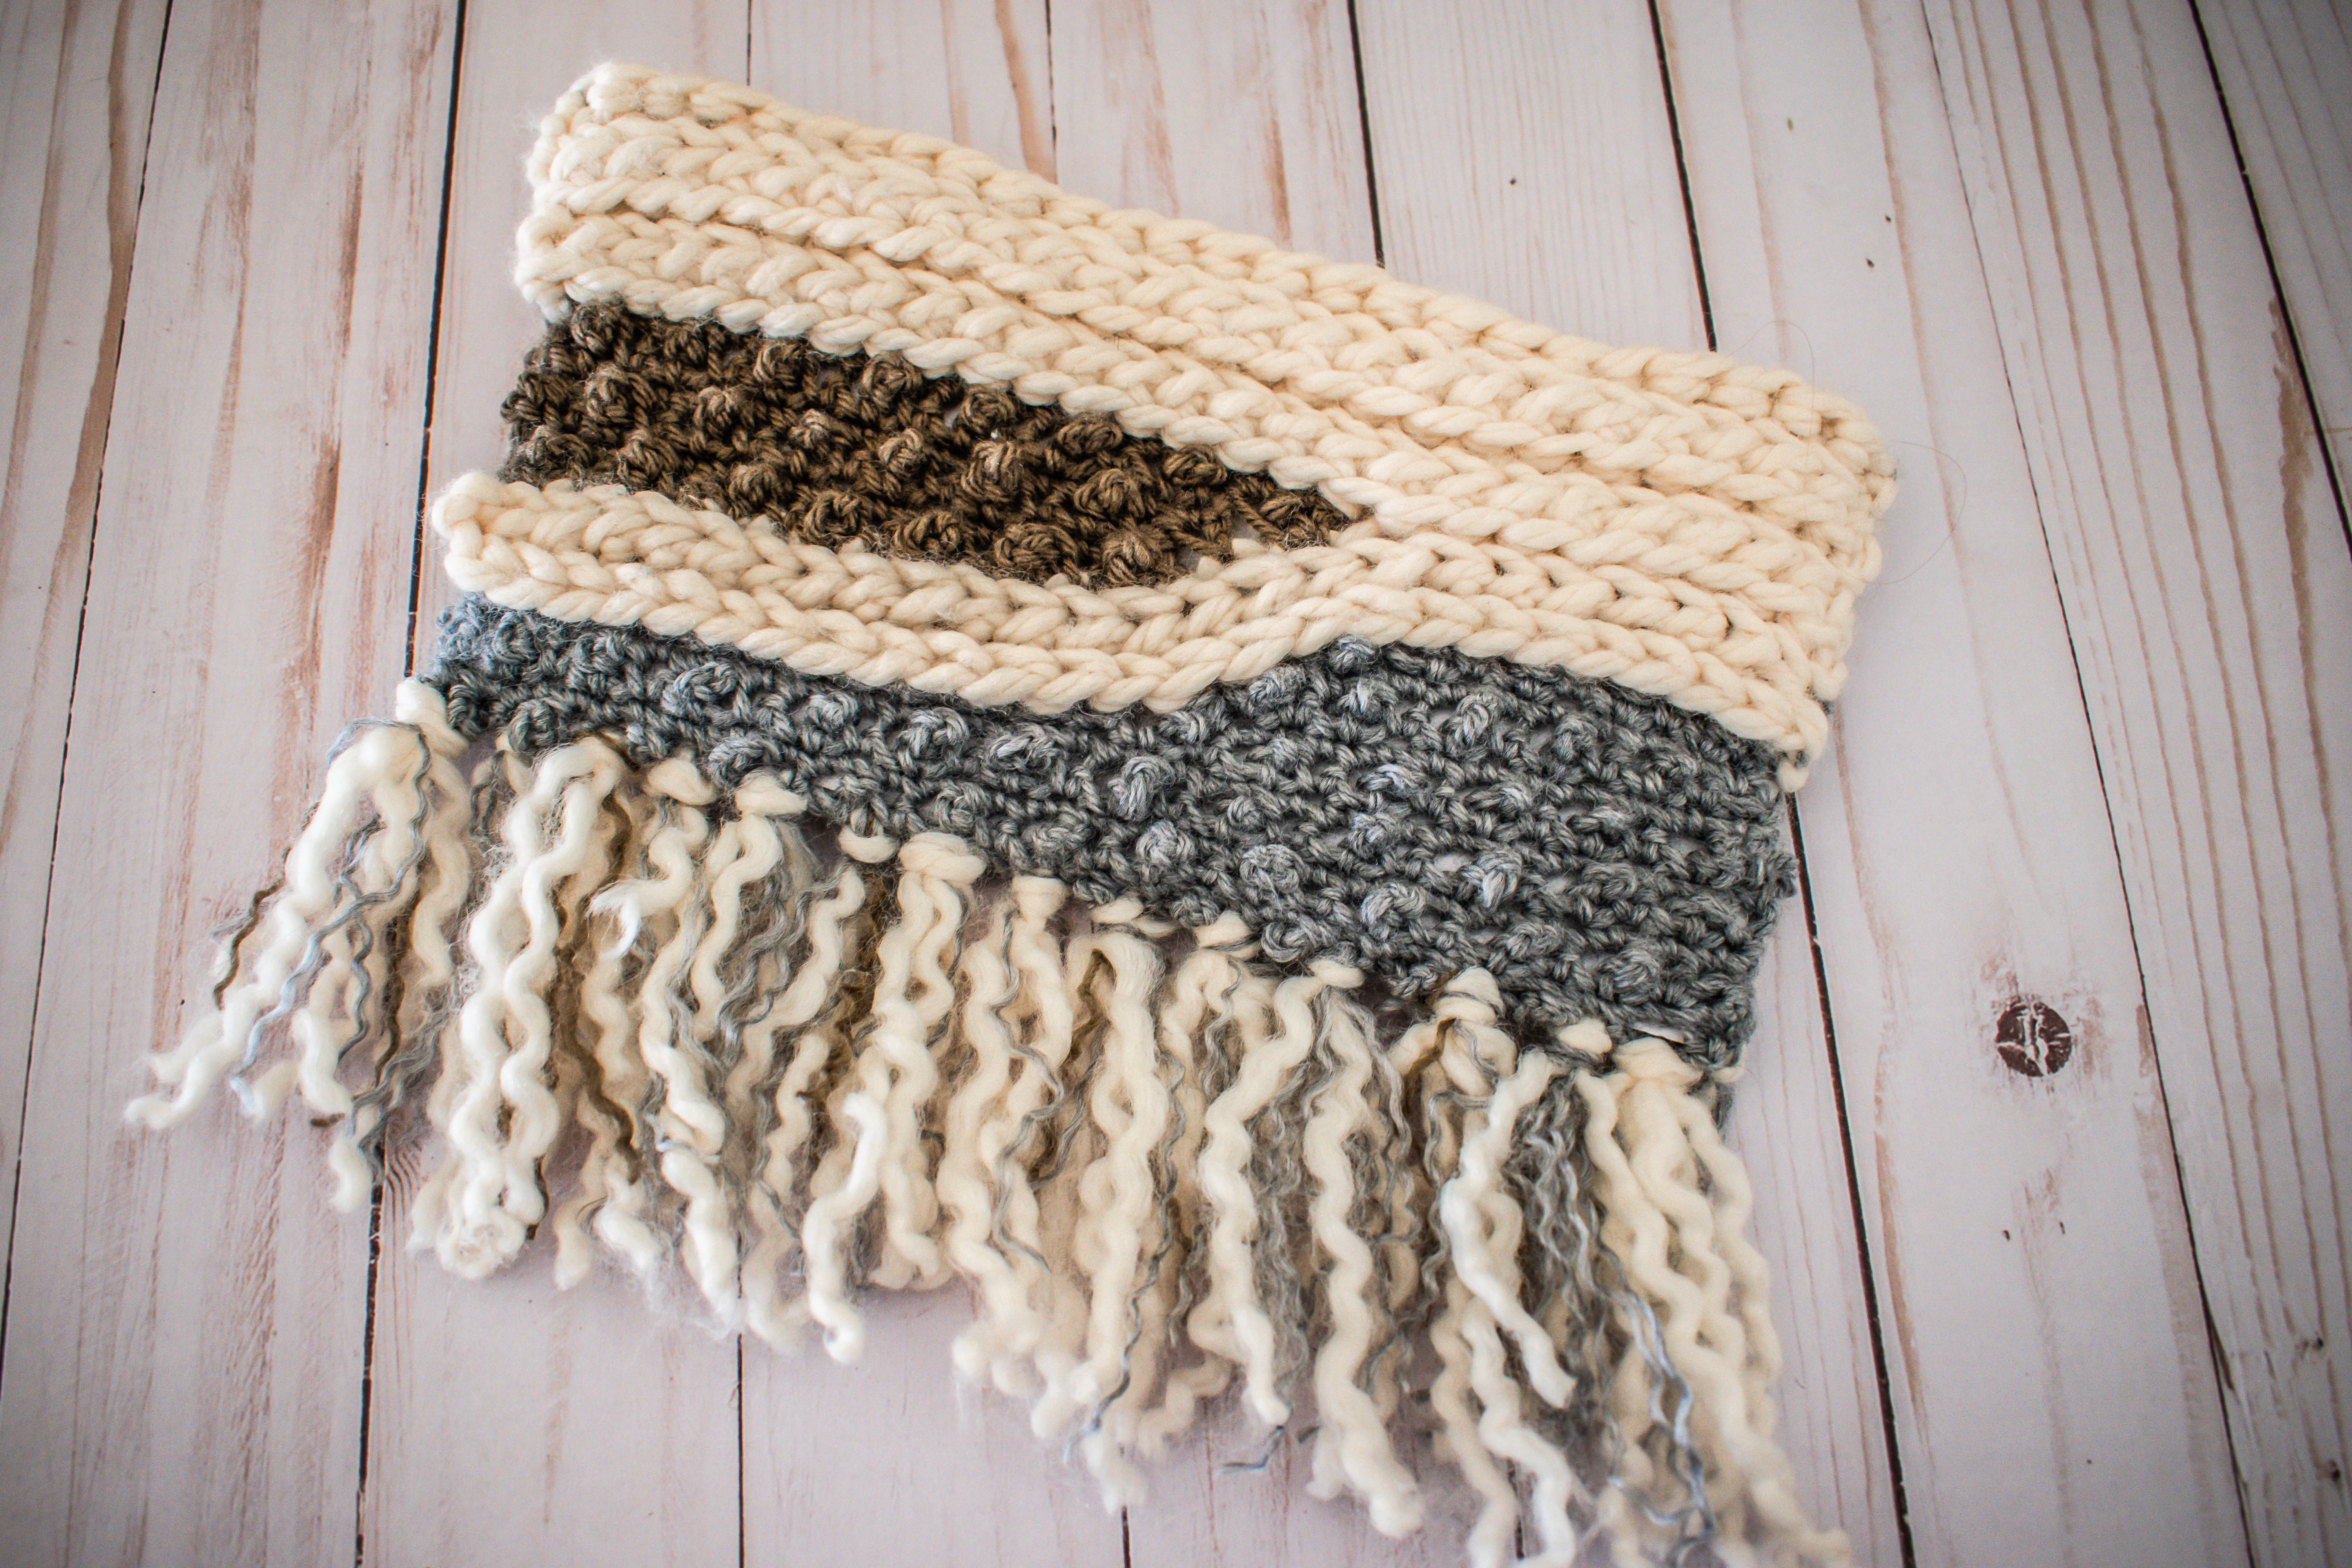
Woven Dreams Clutch- Blog Post
Hey there! Thanks so much for being here and being interested in making this beautiful crocheted “Woven Dreams” clutch! You can get the written pattern for free here, or pick up the inexpensive PDF from our Etsy or Revelry shop in just a few days!
This pattern is a bit unorthodox with many different pieces all worked as one and (as far as I know) a few stitches of my own design, so I’m just going to jump right into it.
Okay- probably not the best way to win you over, but I promise, it’s actually much easier to work up than the pattern initially reads, and if you stick your heels in and work through it, you’ll end up with a beautiful clutch perfect for your next outing!

Before you start, you will need to gather your materials. This clutch is made up of a bulky weight (category 6) wool yarn such as Lion Brand’s Wool Ease Thick & Quick. I used this yarn in the Fisherman colorway, so throughout the pattern you’ll see this mentioned as the “cream yarn”. You will also need 2 different colored worsted weight (category 4) yarns such as Lion Brand’s Vanna’s Choice and a K crochet hook. The last required item needed is a 9″ zipper (or a button) and a needle and thread. You could also grab 2 Swivel Hooks and D-Rings and a long metal chain if you wish to turn it into a purse instead.
This clutch is worked as one long rectangle, made up of several different patterns that are all worked together (very little seaming here my friends)!
Things will start out at what will later become the top of the clutch. Taking the bulky weight yarn, you will work a chain row, then in the 3rd chain from your hook you will begin to work a row of half double crochet slip stitches.
These slip stitches start out exactly like a half double crochet, with a yarn over, followed by you inserting your hook into the next stitch. However, the stitch ends like a slip stitch by you yarning over, pulling up a loop and then pulling that loop through the 2 loops on your hook.


This stitch is one of the main stitches used in this pattern, so once you’ve got that, you’ll be good to go!
The next row is worked exactly the same, but the placement of the stitches changes a bit. Rather than working into a conventional “V” stitch, you will insert your hook under the 3rd loop (or hump) of the half double crochet, as well as the front loop of the stitch (completely ignoring the back loop). You will then continue on with the half double crochet slip stitch.
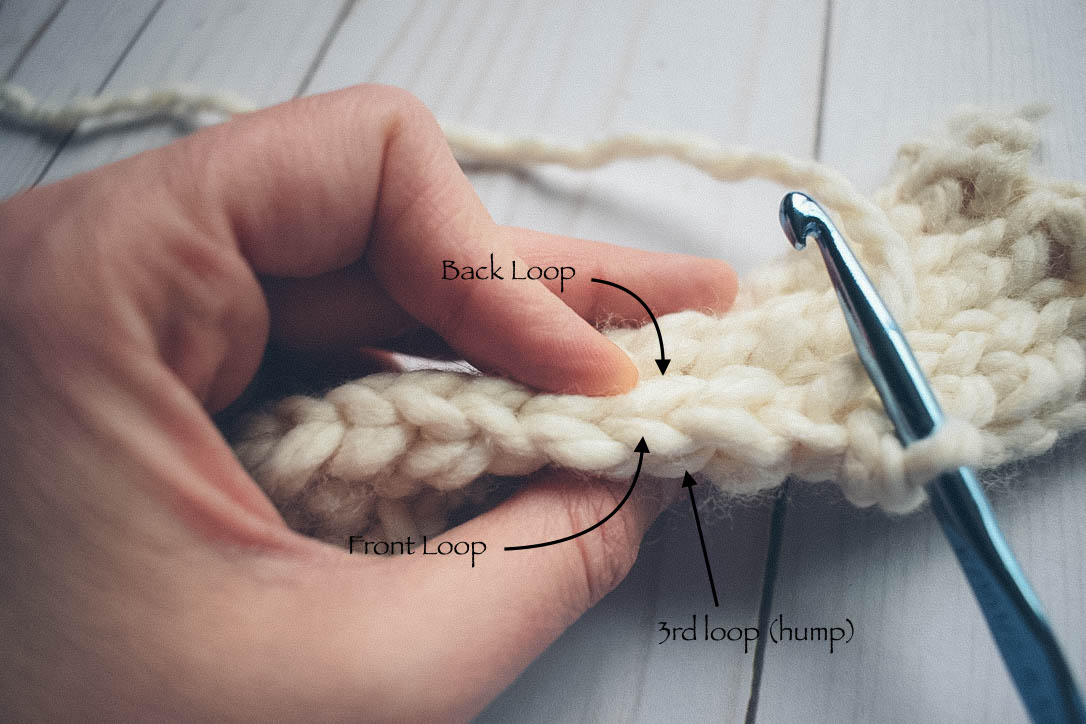
After the first few stitches like this, the back loop is pushed forward towards the front of your work, and it becomes much easier and natural feeling to work into these two loops.
And I just LOVE the look of this combination.

The next row will be those wonderful half double crochet slip stitches again, but this time they will be worked into the back loop only.
You’ll repeat these last two rows one more time, and then only work half of the 5th row of the half double crochet slip stitches into the front and 3rd loops. You will stop after the 9th stitch, but leave your cream color yarn in tact for later use.
Now you will pick up the first color of your worsted weight yarn. You ended the last cream row on the wrong side of your work, and you will continue working on the wrong side for the first row of your 1st Colored Pattern.
Starting in the next cream stitch of the row, you will pick up the worsted weight yarn and work a series of single crochets and increases into the front and 3rd loops of the half double crochets from the 4th row.
Since the worsted weight yarn is so much smaller than the bulky weight yarn, and you’re not switching hook sizes, the increase of stitches are important for making sure the clutch runs even all the way through.


You will repeat this process across to the end of the row, and turn your work. You will now continue the 1st Colored Pattern by single crocheting across to where you previously ended the cream portion and decreasing in the last stitch. You are now starting to work the shaping of the colored portion of the clutch.

The next row will be a row of berry stitches. These stitches are fun and give a bit of texture to the colored portions of the clutch. The original berry stitch pattern that I found calls for you to: insert your hook into the stitch, yarn over, pull up a loop, then chain 3 and pull that third chain through the last loop on your hook.
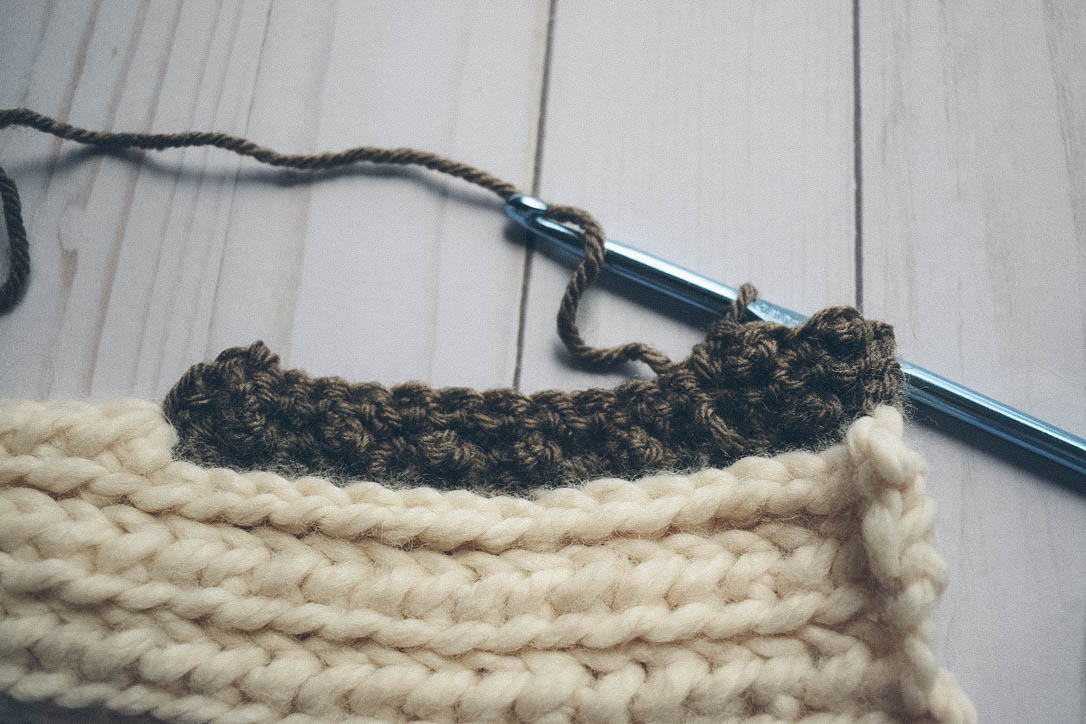
I also experimented with chaining 4 for more of a pop, so even though the pattern calls for a chain 3, feel free to chain 4 if you’d like your clusters to look more defined.
The next row will be another row of single crochets, followed by another row of the berry stitch. This will repeat for the remainder of the 1st colored portion with one more decrease to continue the shaping.

It should also be noted that the berry stitch cluster should be located on the front of your work. If this does not happen naturally for you, feel free to just push them forward.
It is now time to fasten off this first colored pattern portion and resume the cream colored pattern. The first colored portion ends on the right side of your work, but you’ll want to flip your work over to continue on the wrong side.
You will finish the 5th row of the cream colored portion by working up the rows of the worsted weight section. Work one half double crochet decrease into each row up (4 decreases total). Once you reach the top of the 1st colored pattern, you will work a series of half double crochet slip stitches and decreases across. Once you reach the end, you should be back at 25 stitches per row.


The next row (now on the right side of your work) will be another row of half double crochet slip stitches into the back loops only across.
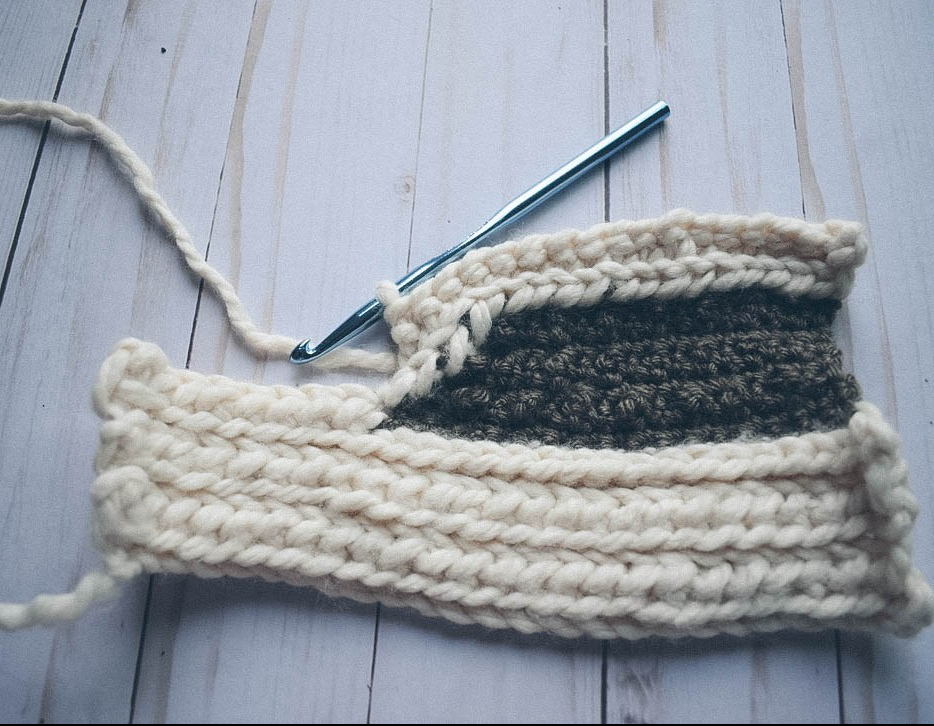
You can now fasten off the cream colored yarn, flip your work over and prepare to pick up the 2nd color of your worsted weight yarn.
This section is the longest pattern of this clutch, and again worked primarily in the berry stitch.
It starts with the first row working exclusively in the 3rd loop of each stitch, and again, rather than working across the entirety of the cream row, you will stop 9 stitches in, and turn your work to work a row of single crochets across.
This portion will continue to work with a row of single crochets on the right side of your work, and berry stitches on the wrong side. Each row worked in the berry stitch will end with you working into the next 2 cream stitches (increasing each row). It should also be noted that the last stitch of each berry stitch row will function as your turning chain, and you will not work into it for the following row.


After working 6 rows of the berry stitch pattern, you should be roughly at the top of the cream portion and you will want to finish the 7th row with alternating single crochets and increases into the 3rd loop across.


This next portion is arguably the easiest section of this clutch, as there is no shaping, just several rows of alternating single crochets and berry stitches (this portion will be located at the very bottom of your clutch later on).
Once complete, you will begin the shaping of the other end of the 2nd Colored Pattern. Meaning that you will work the next row into the first 16 stitches only, and gradually start to decrease for the next 6 rows.

When you reach the end of this pattern of the clutch, you will fasten off. Without turning your work, you will begin the back side of the cream colored portion for your clutch.
This first row of the cream pattern is worked with a series of half double crochet slip stitches and decreases to get you back to the 25 stitches per row.
You’ll now work 2 rows half double crochet stitches into the 3rd loop only, with the 2nd row ending 8 stitches in. Again, you will leave the yarn in tact, but drop it to work the back side pattern for the 1st colored yarn.
This last colored portion pattern is also worked in the berry stitch, and will mirror the first pattern in this color on your completed clutch.

To mirror it, the pattern will start small, and increase the rows as it goes, just as it did starting the 2nd Colored Pattern (by working a single crochets into 2 stitches of the cream portion at the end of every single-crochet row).
After a few more rows of alternating single crochets and the berry stitch, you’ll finish the rectangle by picking the cream yarn back up.
The first row will be a mixture of half double crochet slip stitches in the third loop, and decreases across (again, making adjustments to get back to 25 stitches).
From here you will finish the clutch by working a few more alternating rows of half double crochet slip stitches in the front and third loops, and half double crochet slip stitches in the back loops only.
Once the rectangle is complete, you will move on to assembly! I started by folding the rectangle in half width-wise, so that the fold occurs right between row 12 & 13 of the 2nd Color Pattern.
With the top cream stitches lined up, mattress stitch down both sides of the clutch.


You can now add your preferred closure to the top opening! I chose to use a 9″ zipper which I hand sewed to the top, but a button would probably also work well!


Once the closure is in place, I HIGHLY recommend wet blocking to make a neater looking, and more straight-edged clutch.

After blocking your Woven Dreams Clutch is officially complete! But, if you’re like me- you want a bit more pizzaz. ;-D
I made one clutch with a chain- for converting into a purse, and the other with tassels on the bottom. I personally prefer the tassel look, but a few of my sisters liked the clean look of no tassels, so I wanted to leave it open to your preference. I think it would also look great to have one with a chain AND the tassels!


To add the chain for a purse look, you will need 2 Swivel hooks and D- Rings as well as a matching metal chain approximately 47″ long.

You will use a strand of your cream yarn and attach a D-Ring to either end of the top opening of your clutch.


You can then use a pair or two of jewelry pliers to affix the Swivel hooks to the chain. Now all that’s left is to clip the Swivel hooks to the D-Rings.


To add the tassels to the bottom, I messed around with quite a few variations. I tried no tassels, short cream tassels, cream and colored tassels and then settled on longer cream and colored tassels, made with the fibers split for a bit more texture.


You will first cut the yarn so that each strand measures approximately 7″ long, and then split the piles down to one. For Lion Brand’s Quick and Thick, it breaks down to 2 strands and for most acrylic worsted weight yarn it will break down to 4 strands.


You will then clump approximately 2-3 cream strands per 1-2 colored strands per tassel. Fold in half and feed the fold through the bottom of the clutch (one tassel per every other stitch right between rows 12 & 13 of the 2nd Colored Pattern).


You will then pull the tails through the loop and pull tight to secure in place. Repeat across the entire bottom of your clutch.


Now your Woven Dreams Clutch is all dolled up and ready to join you on your next outing!
I hope you all enjoyed making this fun and unique crochet pattern. And as always- I hope you’ll share a pic of your completed clutch with me on Facebook or Instagram, seeing your completed work is what keeps me going!
