Star Spangled Beach Tote

I love large purses and totes, they make carrying things around so much easier! For the past 2 years our diaper bag has taken the place of a purse for me so I haven’t really used any other bags to carry stuff in.
Will and I are taking a trip (just the two of us) in a few short weeks. I am both excited and anxiety ridden as this is the longest we will have been apart from Audrey since her birth, but I really am looking forward to some time away! However, since she is staying home, so is the diaper bag and I really don’t have any other large bags that are still in good shape.
I’ve been wanting to create a pattern for a purse of my own for years and finally had the opportunity to earlier this month. Yay, Yay, Yay!
I actually have a few purse ideas in my head, but wanted to start things simple, yet practical for our trip. I figured a large tote would be perfect. You can get the free pattern for this tote here.
I had originally thought of doing a nautical theme of just blue and white, but then…
I went to Michaels to get yarn one day and they had all of their 4th of July decor out and seeing their red, white and blue flower bouquets totally caught my eye. The colors just looked so darn good together! I decided my tote needed red in it too.
That gave way to the idea of utilizing the star stitch for a 4th of July themed tote. Rather then using the star stitch for the whole tote, I wanted it to add a subtle depth of detail and decided on using it for just the white rounds (like the white stars in the US flag… clever, yes I know. lol) between my colored rounds.

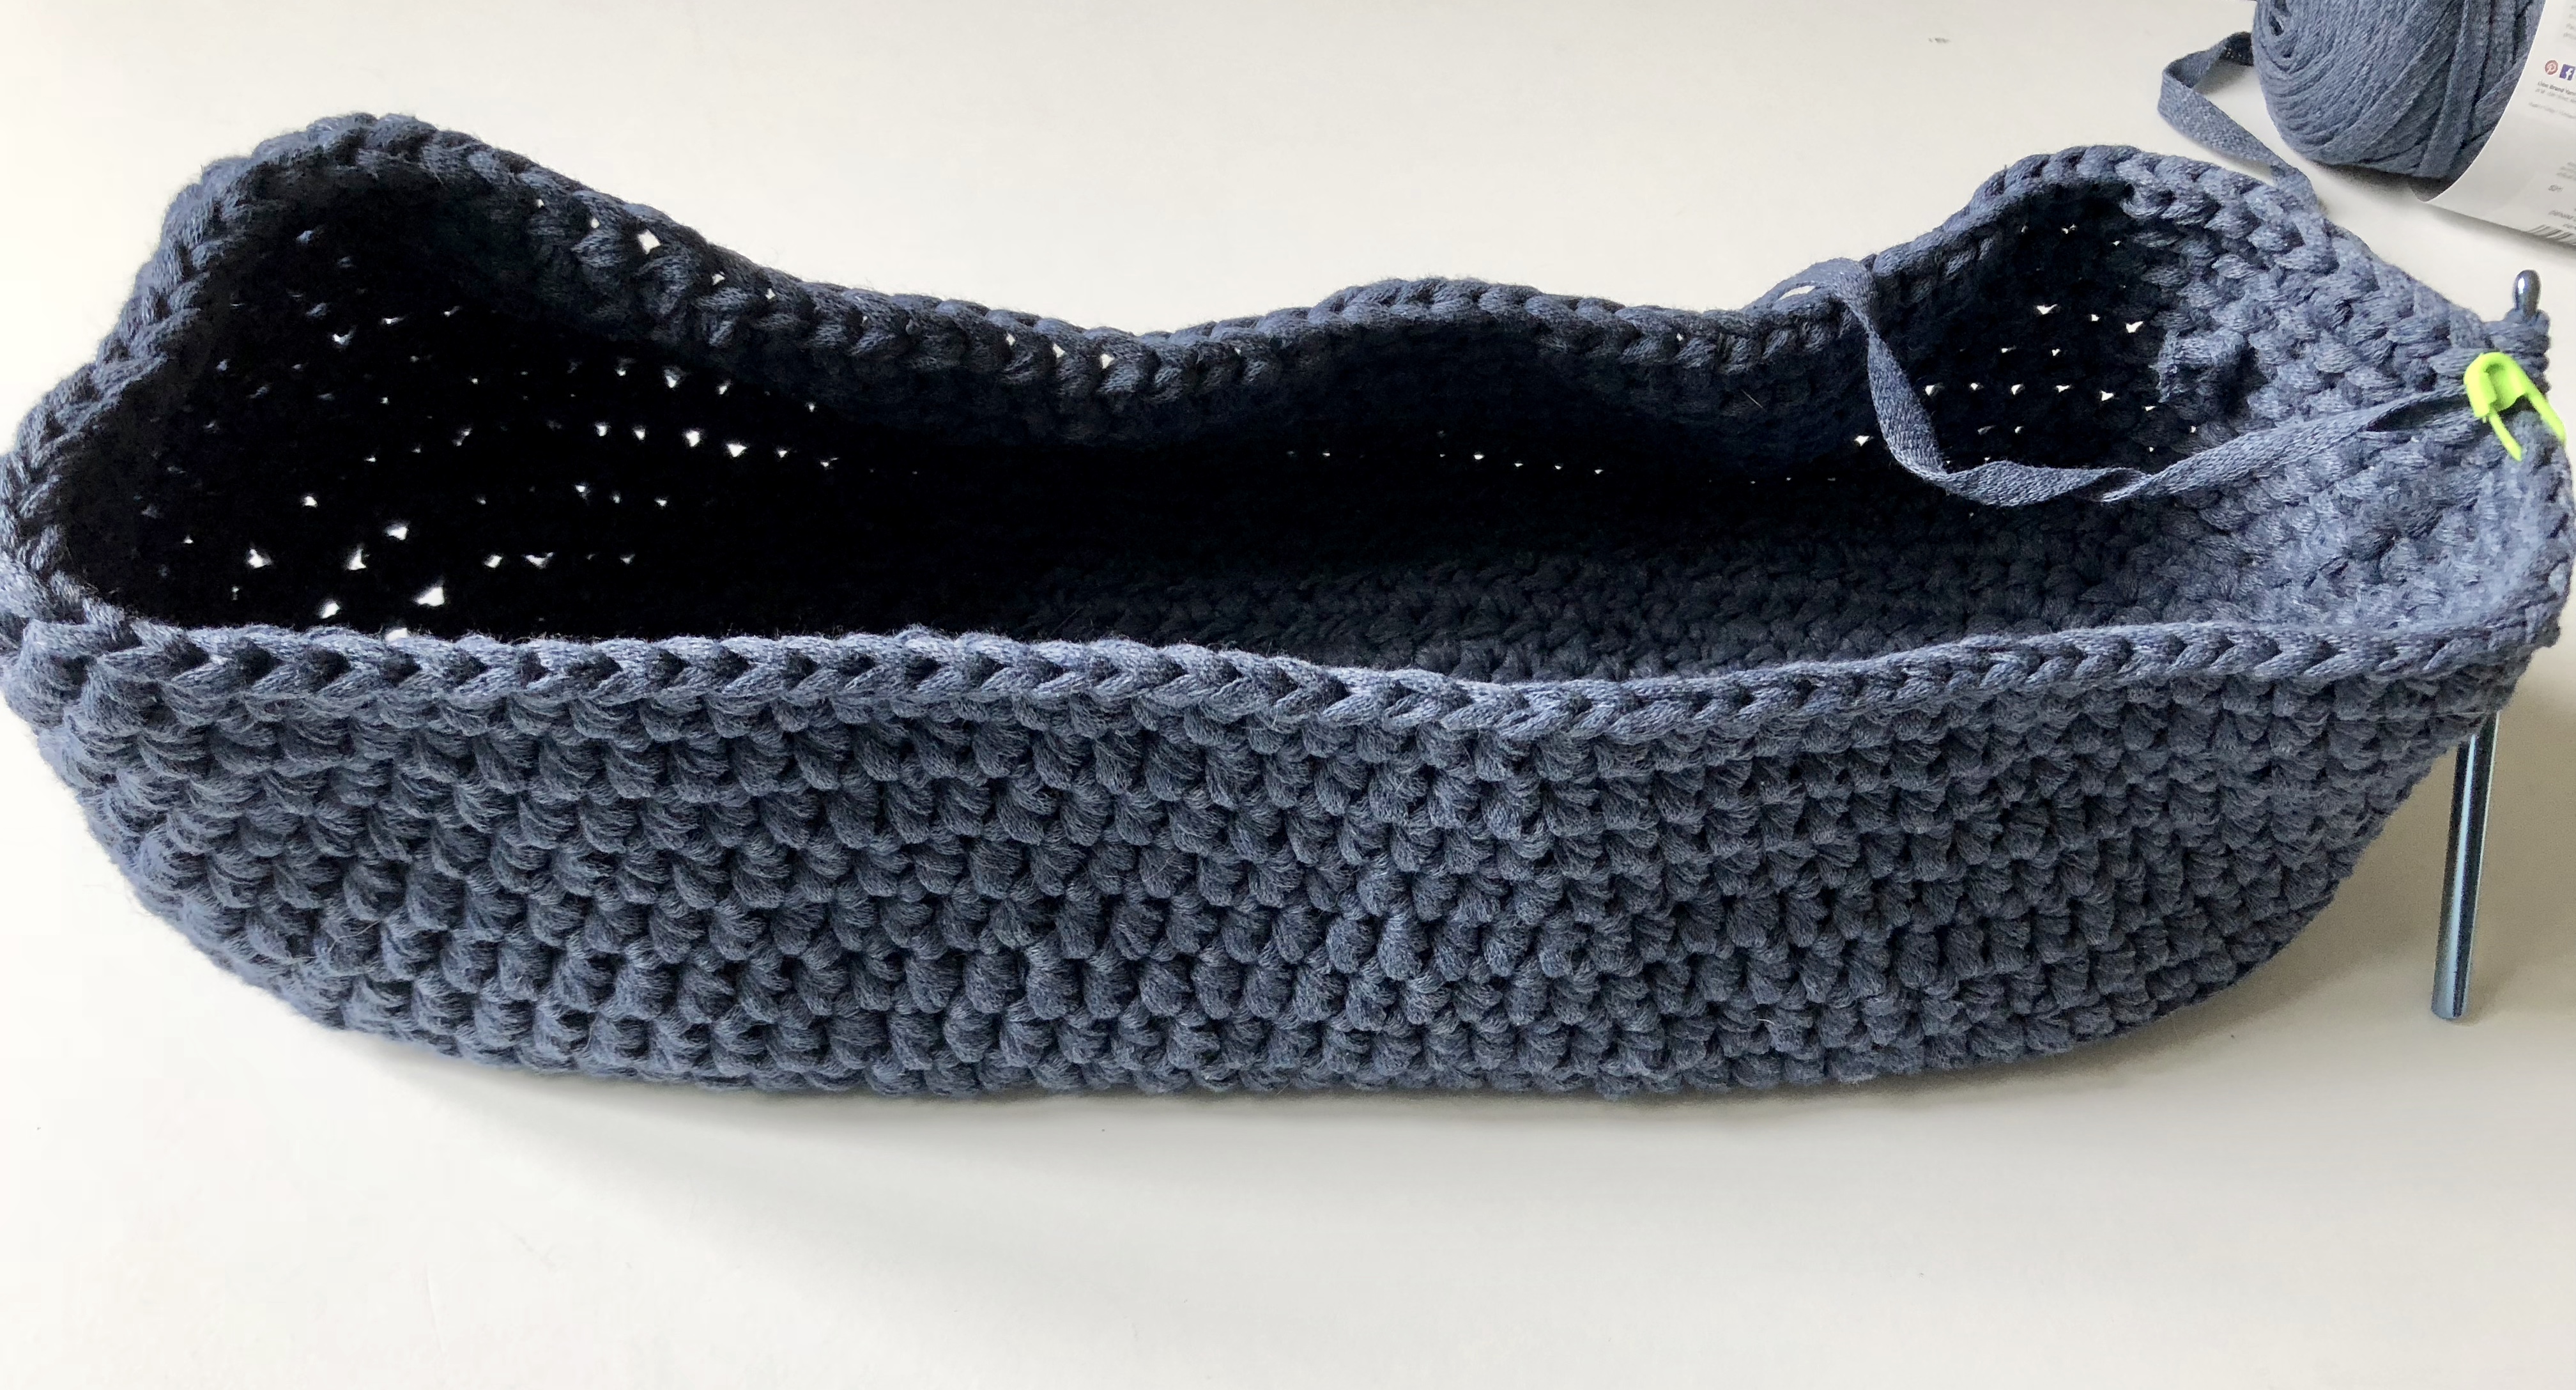
The nice thing about this tote is that it is all one piece, so it keeps things relatively simple in that matter. The biggest hurdle I ran into was joining half double crochets in the round. To my knowledge (and extensive research), there is no perfect way to join half double crochets for a jogless join.
I had gone with half double crochets because that is the stitch used in the 2nd half of the “complete star stitch” and I wanted each color change to be roughly the same height.
Now you may be familiar with the two most common ways to join rounds. The first being to ignore your join stitch from the previous round and to work your first stitch into the same stitch as your chain. The second being to work into your join stitch from the previous round and working your first stitch into the stitch after your chain.
I have seen the first method more commonly used when working with single crochets and the second when working with double crochets. Unfortunately, neither method is a perfect method of joining when using half double crochets. Due to the height of a half double crochet, using the first method will give your join a slant to the right, whereas the second method will give your join a slant to the left. I do find that with my typical gauge, the first method offers a less noticeable slant, but it’s still there.
When making your tote you can utilize either join method, or, you could do what I did and alternate between the two for each round. I wrote the alternating method into the pattern, but it does require a bit more thinking on your brain to constantly switch between the two, so I am leaving it up to the maker to join as they please.
Now that that is out of the way, on to the actual pattern. 🙂
I started things out with a foundation chain into which I worked half double crochets into both the front and back loops (creating an oval).

The next round will begin with an increase followed by half double crochets until you get to the other end of your oval when you will increase twice around the curve. You’ll continue this round by half double crocheting until you get to your starting point when you’ll end with another increase.

For the next round and every subsequent round of the base, you will be gradually increasing around the curves only. The sides will continue to be worked without any increases. 


Once the base of your tote is big enough, you will work one round in the back loops of your stitches only. This will help to flatten the bottom of your tote out rather then it being rounded.

You will continue to work the remainder of the tote by joining the rounds (rather then the continuous rounds you’ve been working so far)
For the joined rounds, I recommend alternating between the two join methods I mentioned earlier.
For the first join method, you will begin by chaining 2 and working your first half double crochet into the same stitch as your chain 2. At the end of this round you will ignore the slip stitch of the previous round and slip stitch into the first stitch of this round.
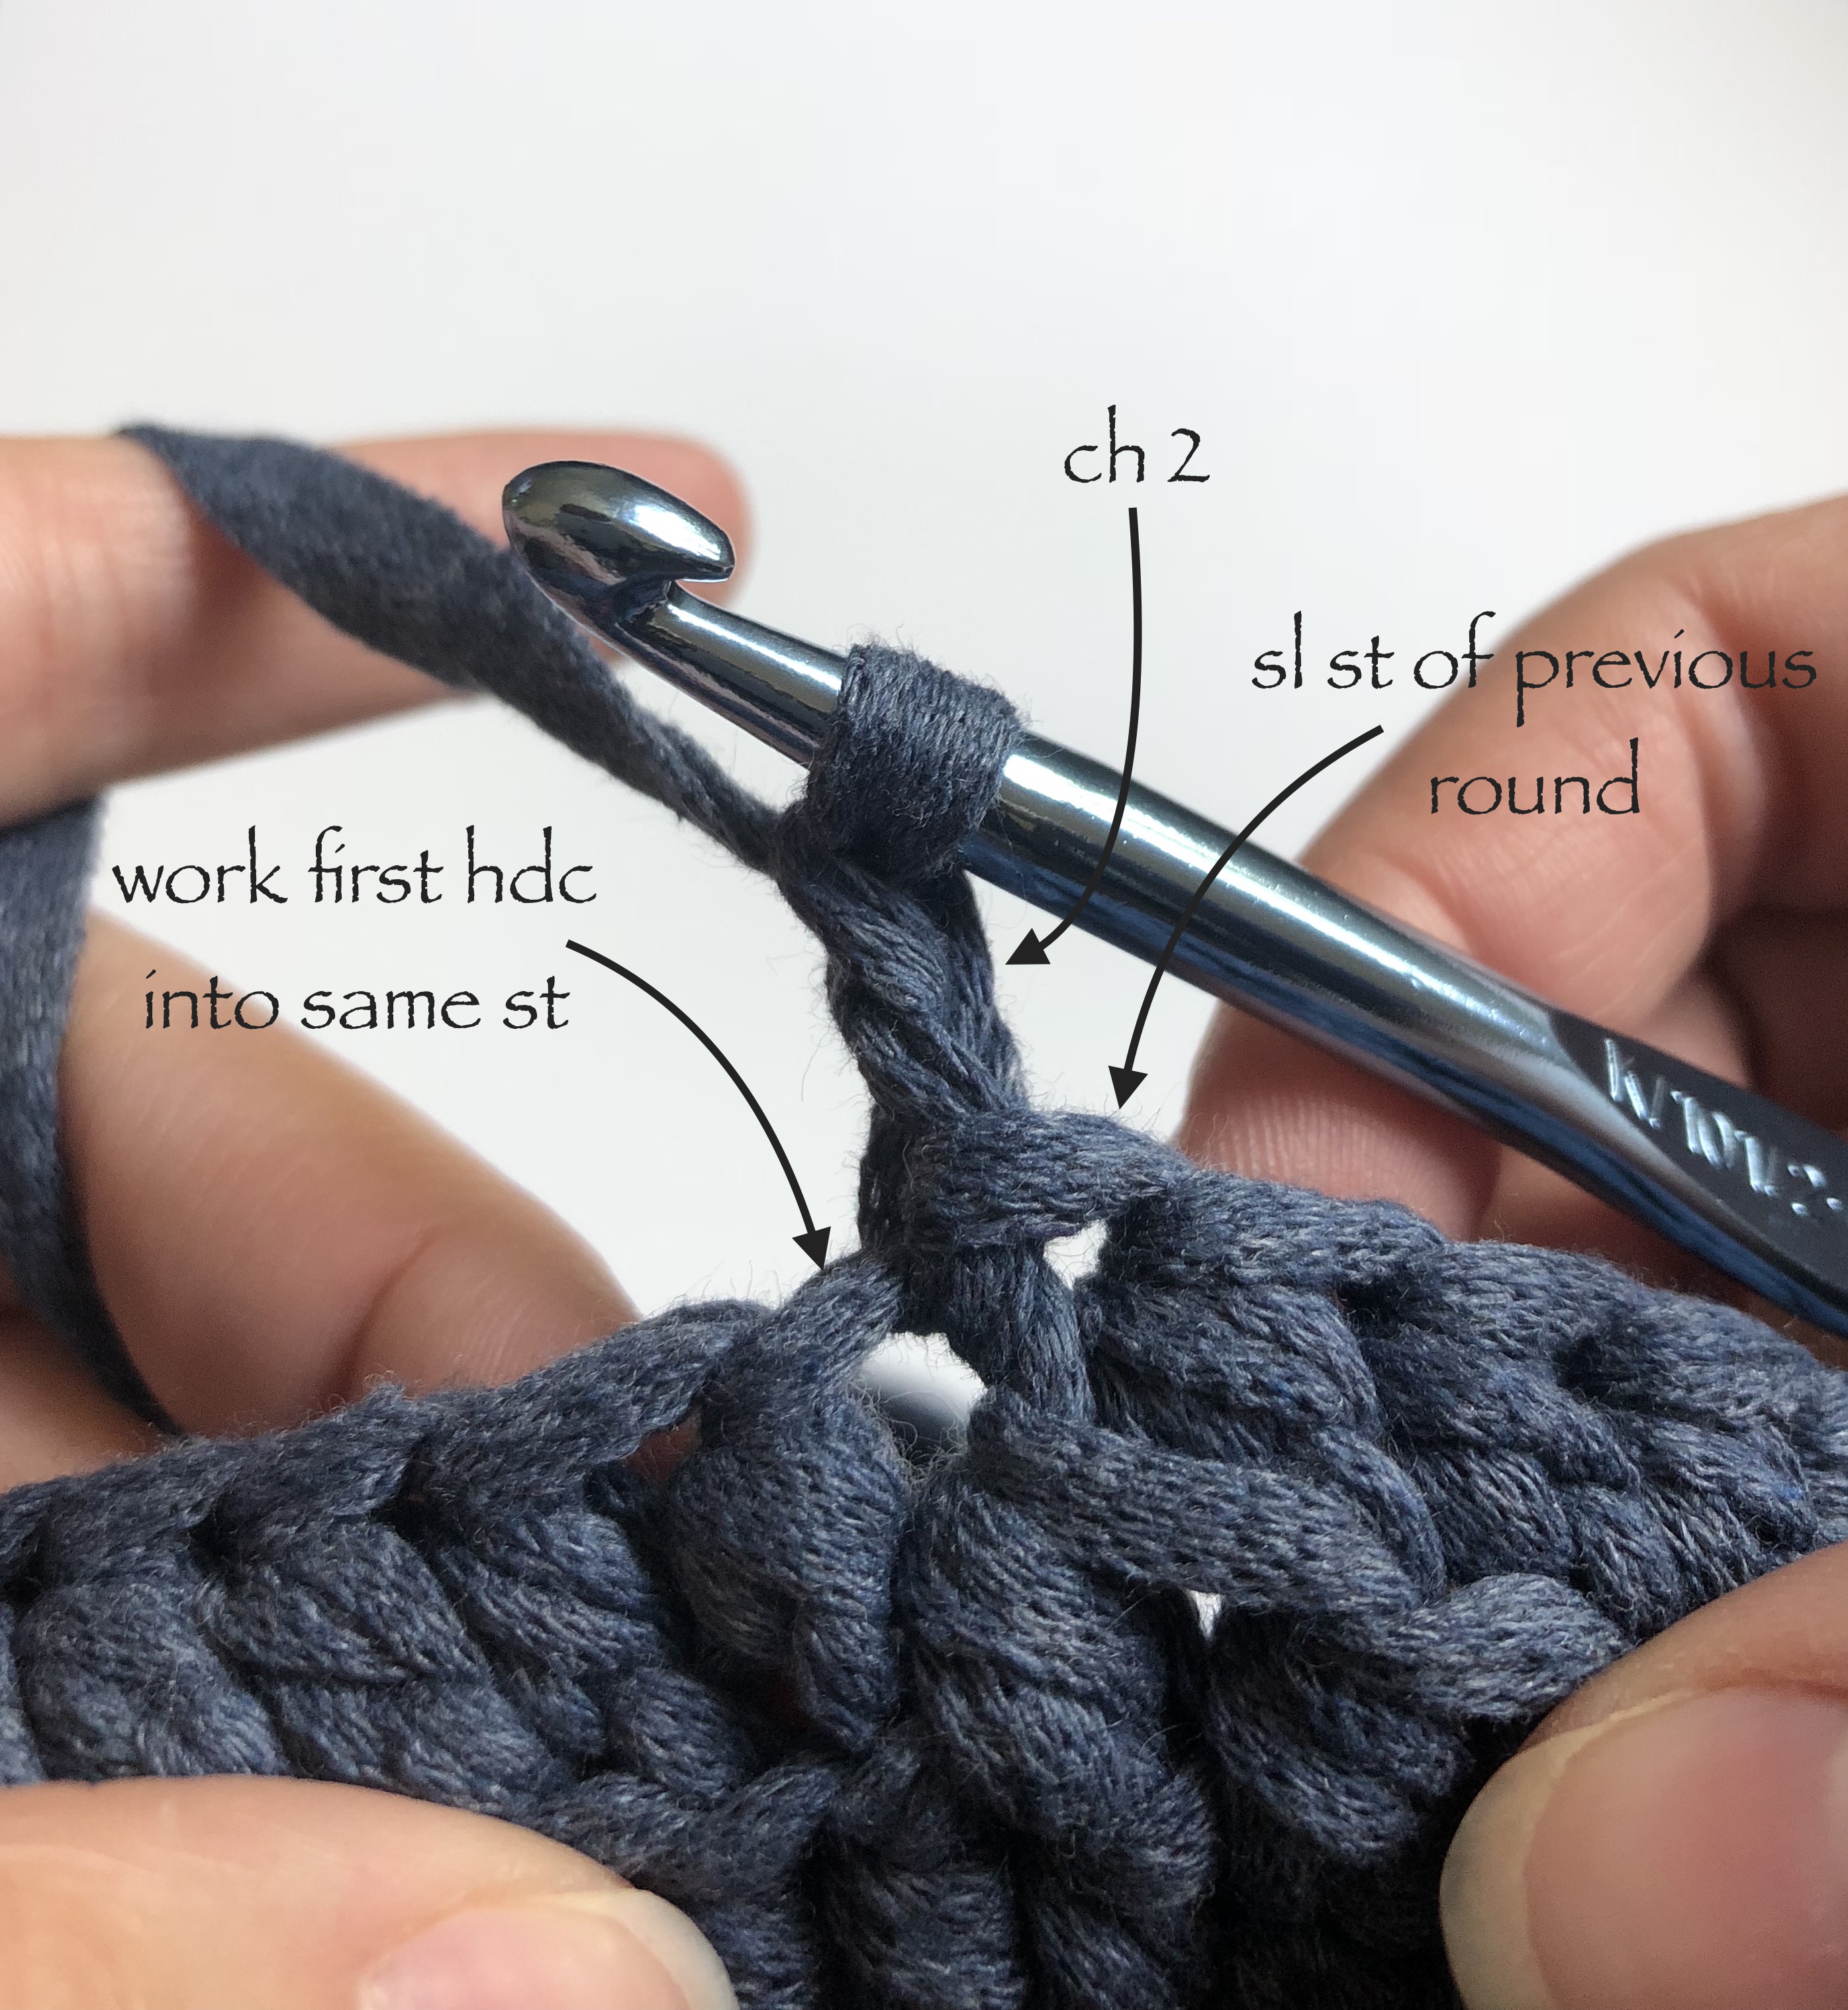
For the second join method you will begin by chaining 2 and working your first half double crochet into the NEXT stitch (not the stitch of your chain 2) and complete the round by working into the slip stitch of your previous round.

After there is a good amount of blue for the base, the fun of working the star stitch and changing colors will begin!
I recommend working each color change during the slip stitch of your last round. You will do this by using your new color as the loop you pull up and through the last loop on your hook during a slip stitch.
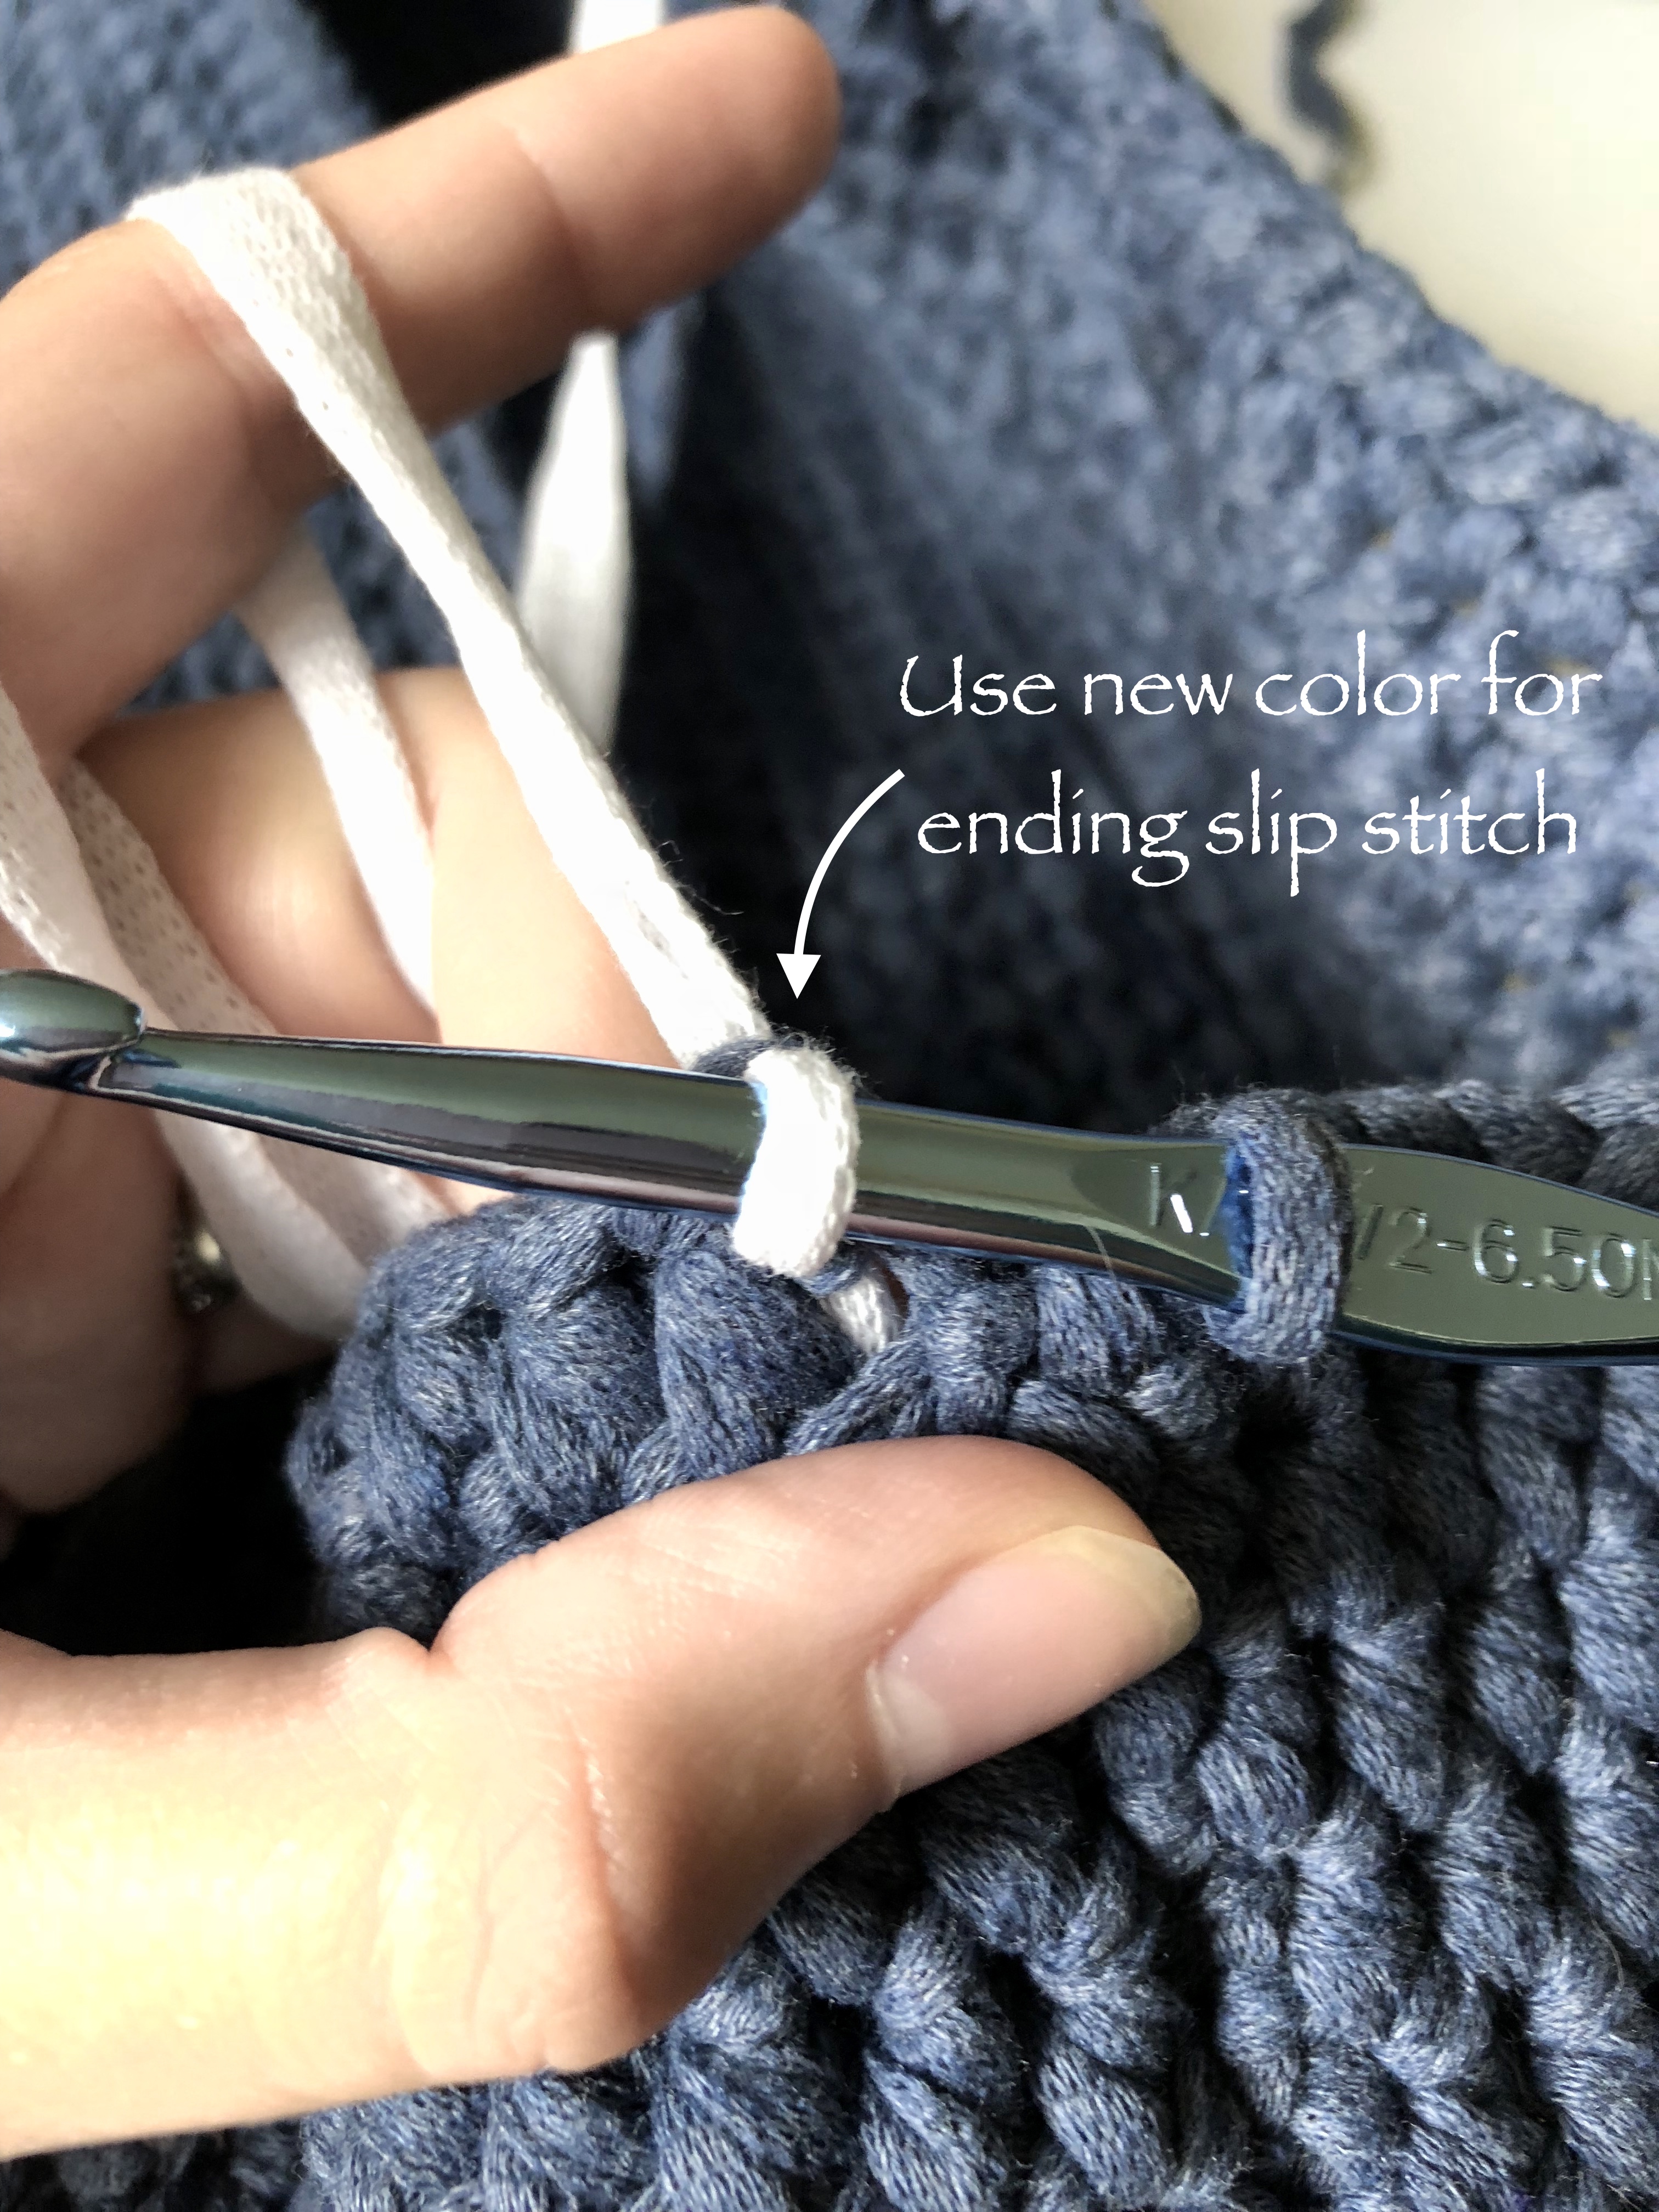 This will give your work a more seamless color change.
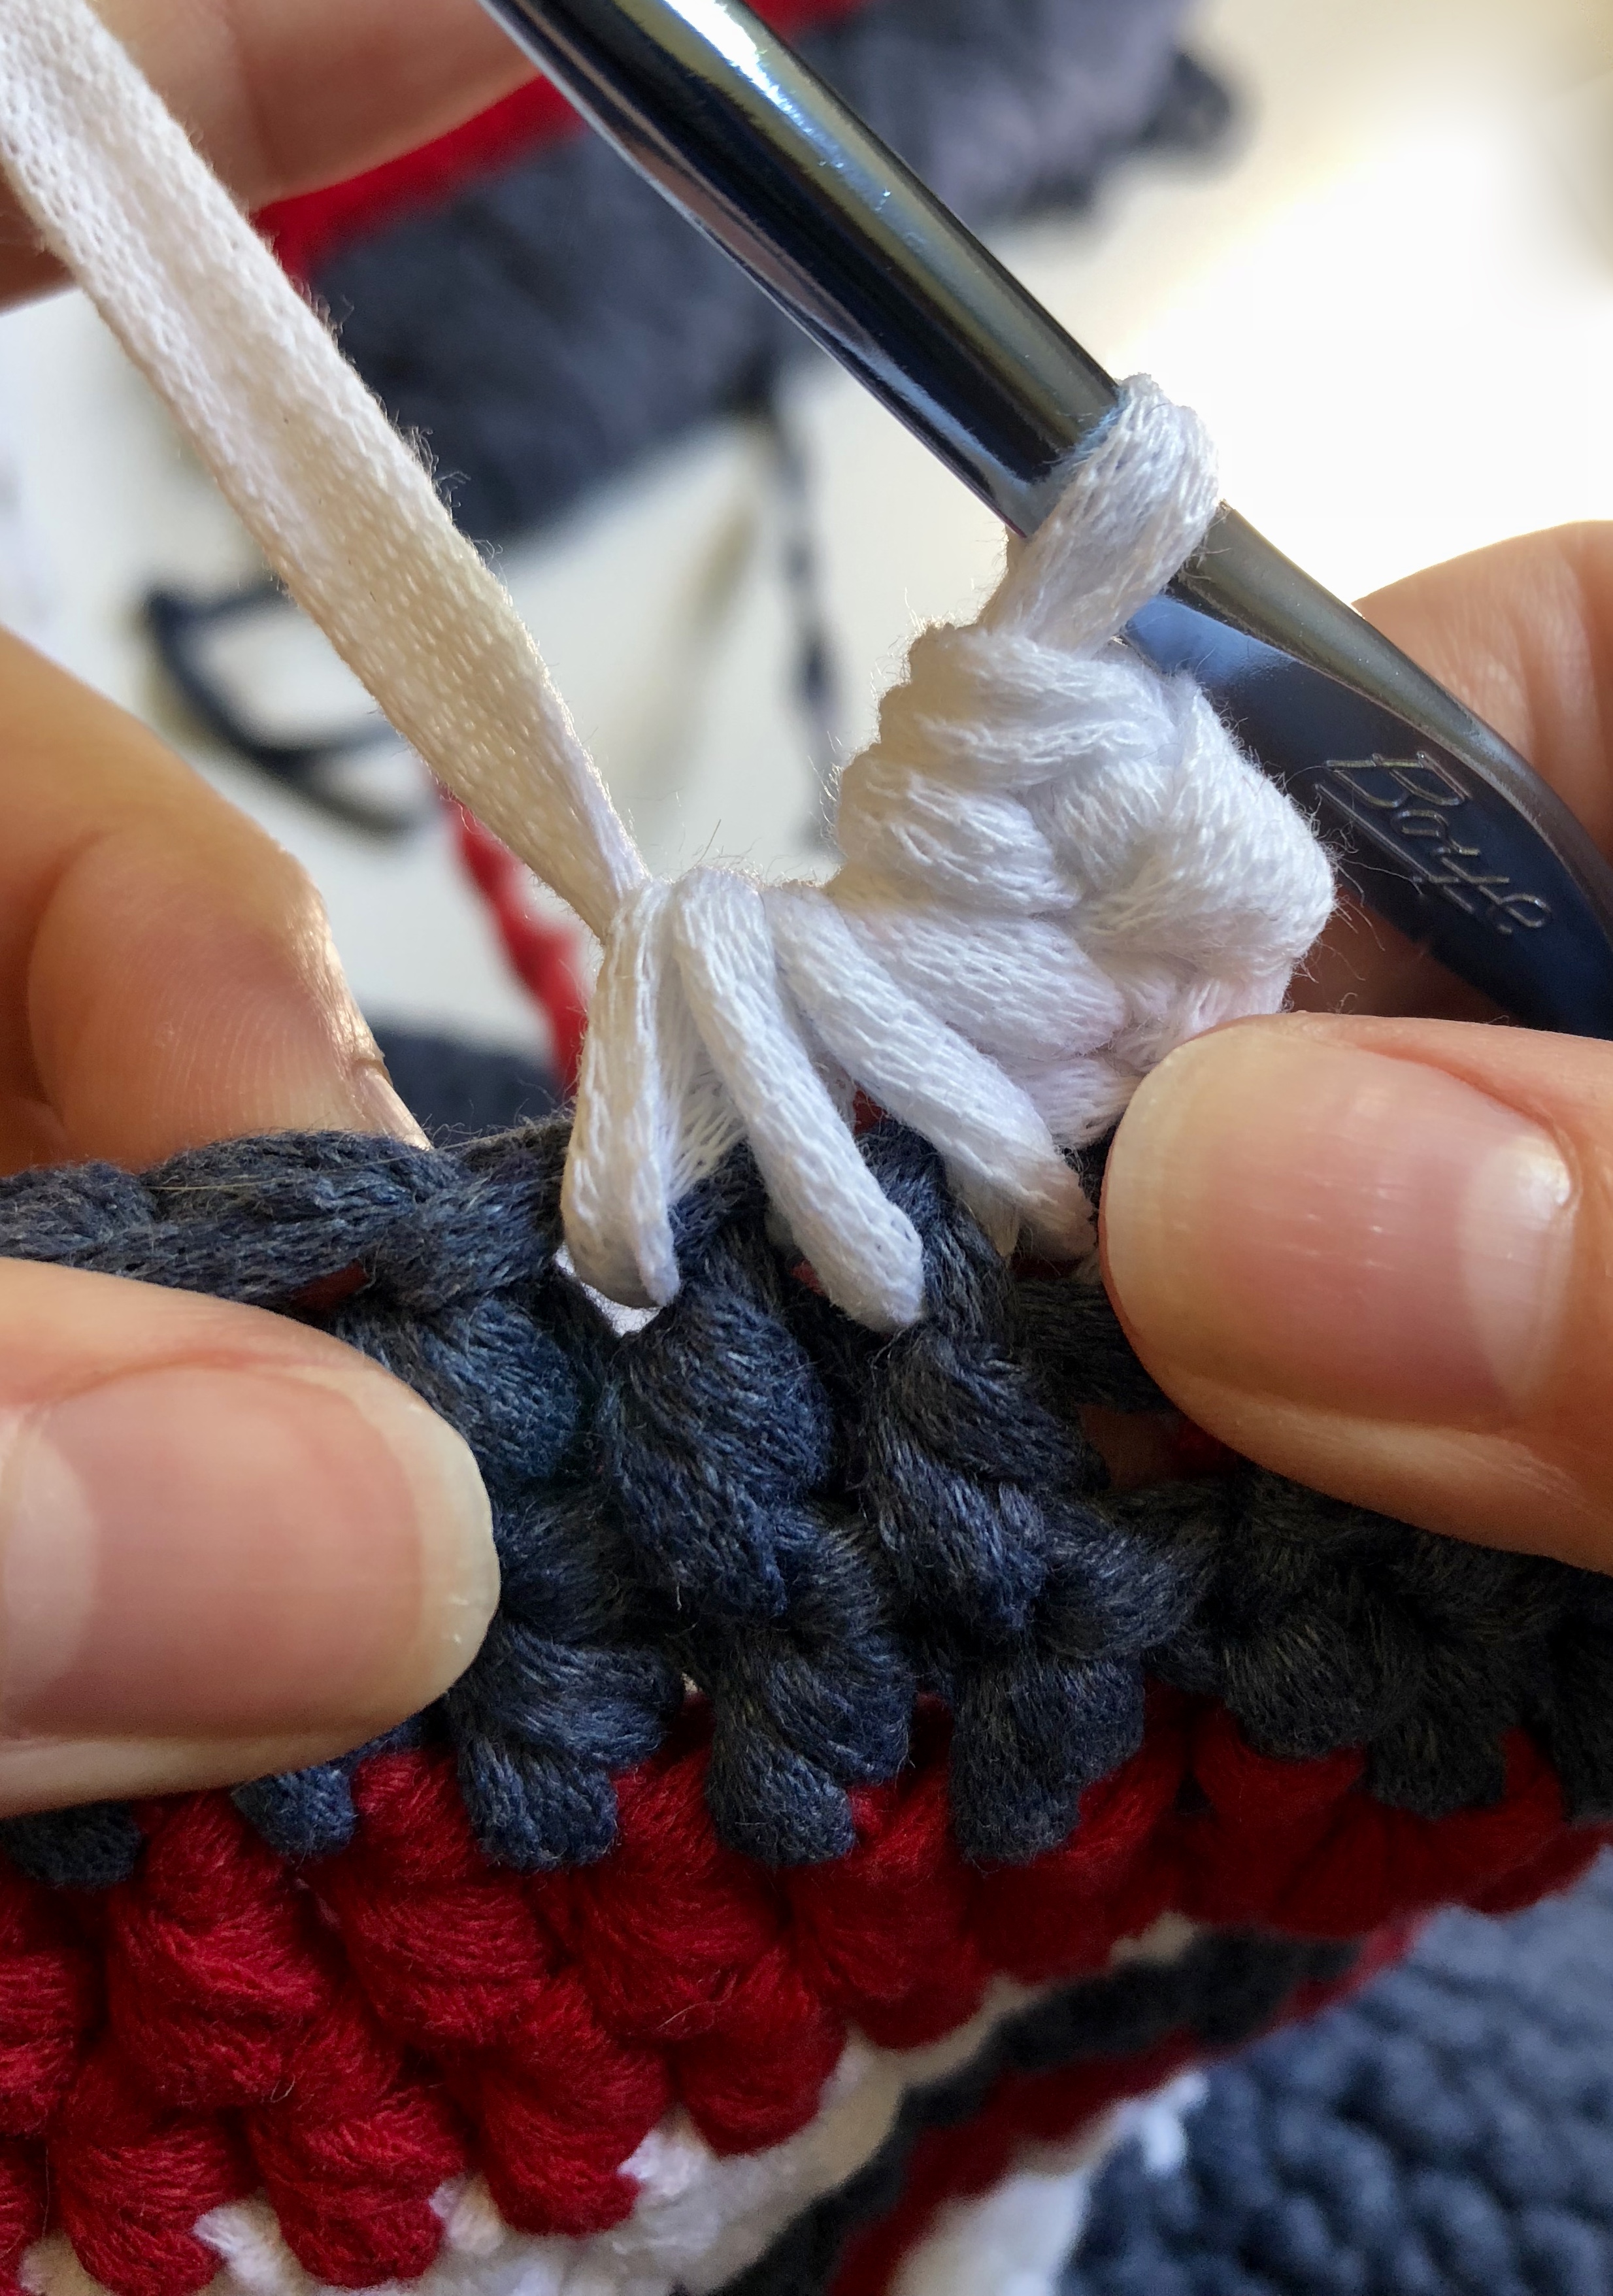
To begin the star stitch, you will chain 3. The star stitch is worked by pulling multiple (6 to be exact) loops onto your hook, and then yarning over and pulling through all 6 loops at once.
To pull up the second loop (you already have one on your hook from the chain), you will insert your hook into the second chain from your hook, yarn over and pull up a loop.
 You will get the third loop on your hook by inserting your hook into the next chain and pulling up a loop.


You will then pick up the next loop by inserting your hook into the stitch at the base of your chains, yarning over and pulling up for a 4th loop.
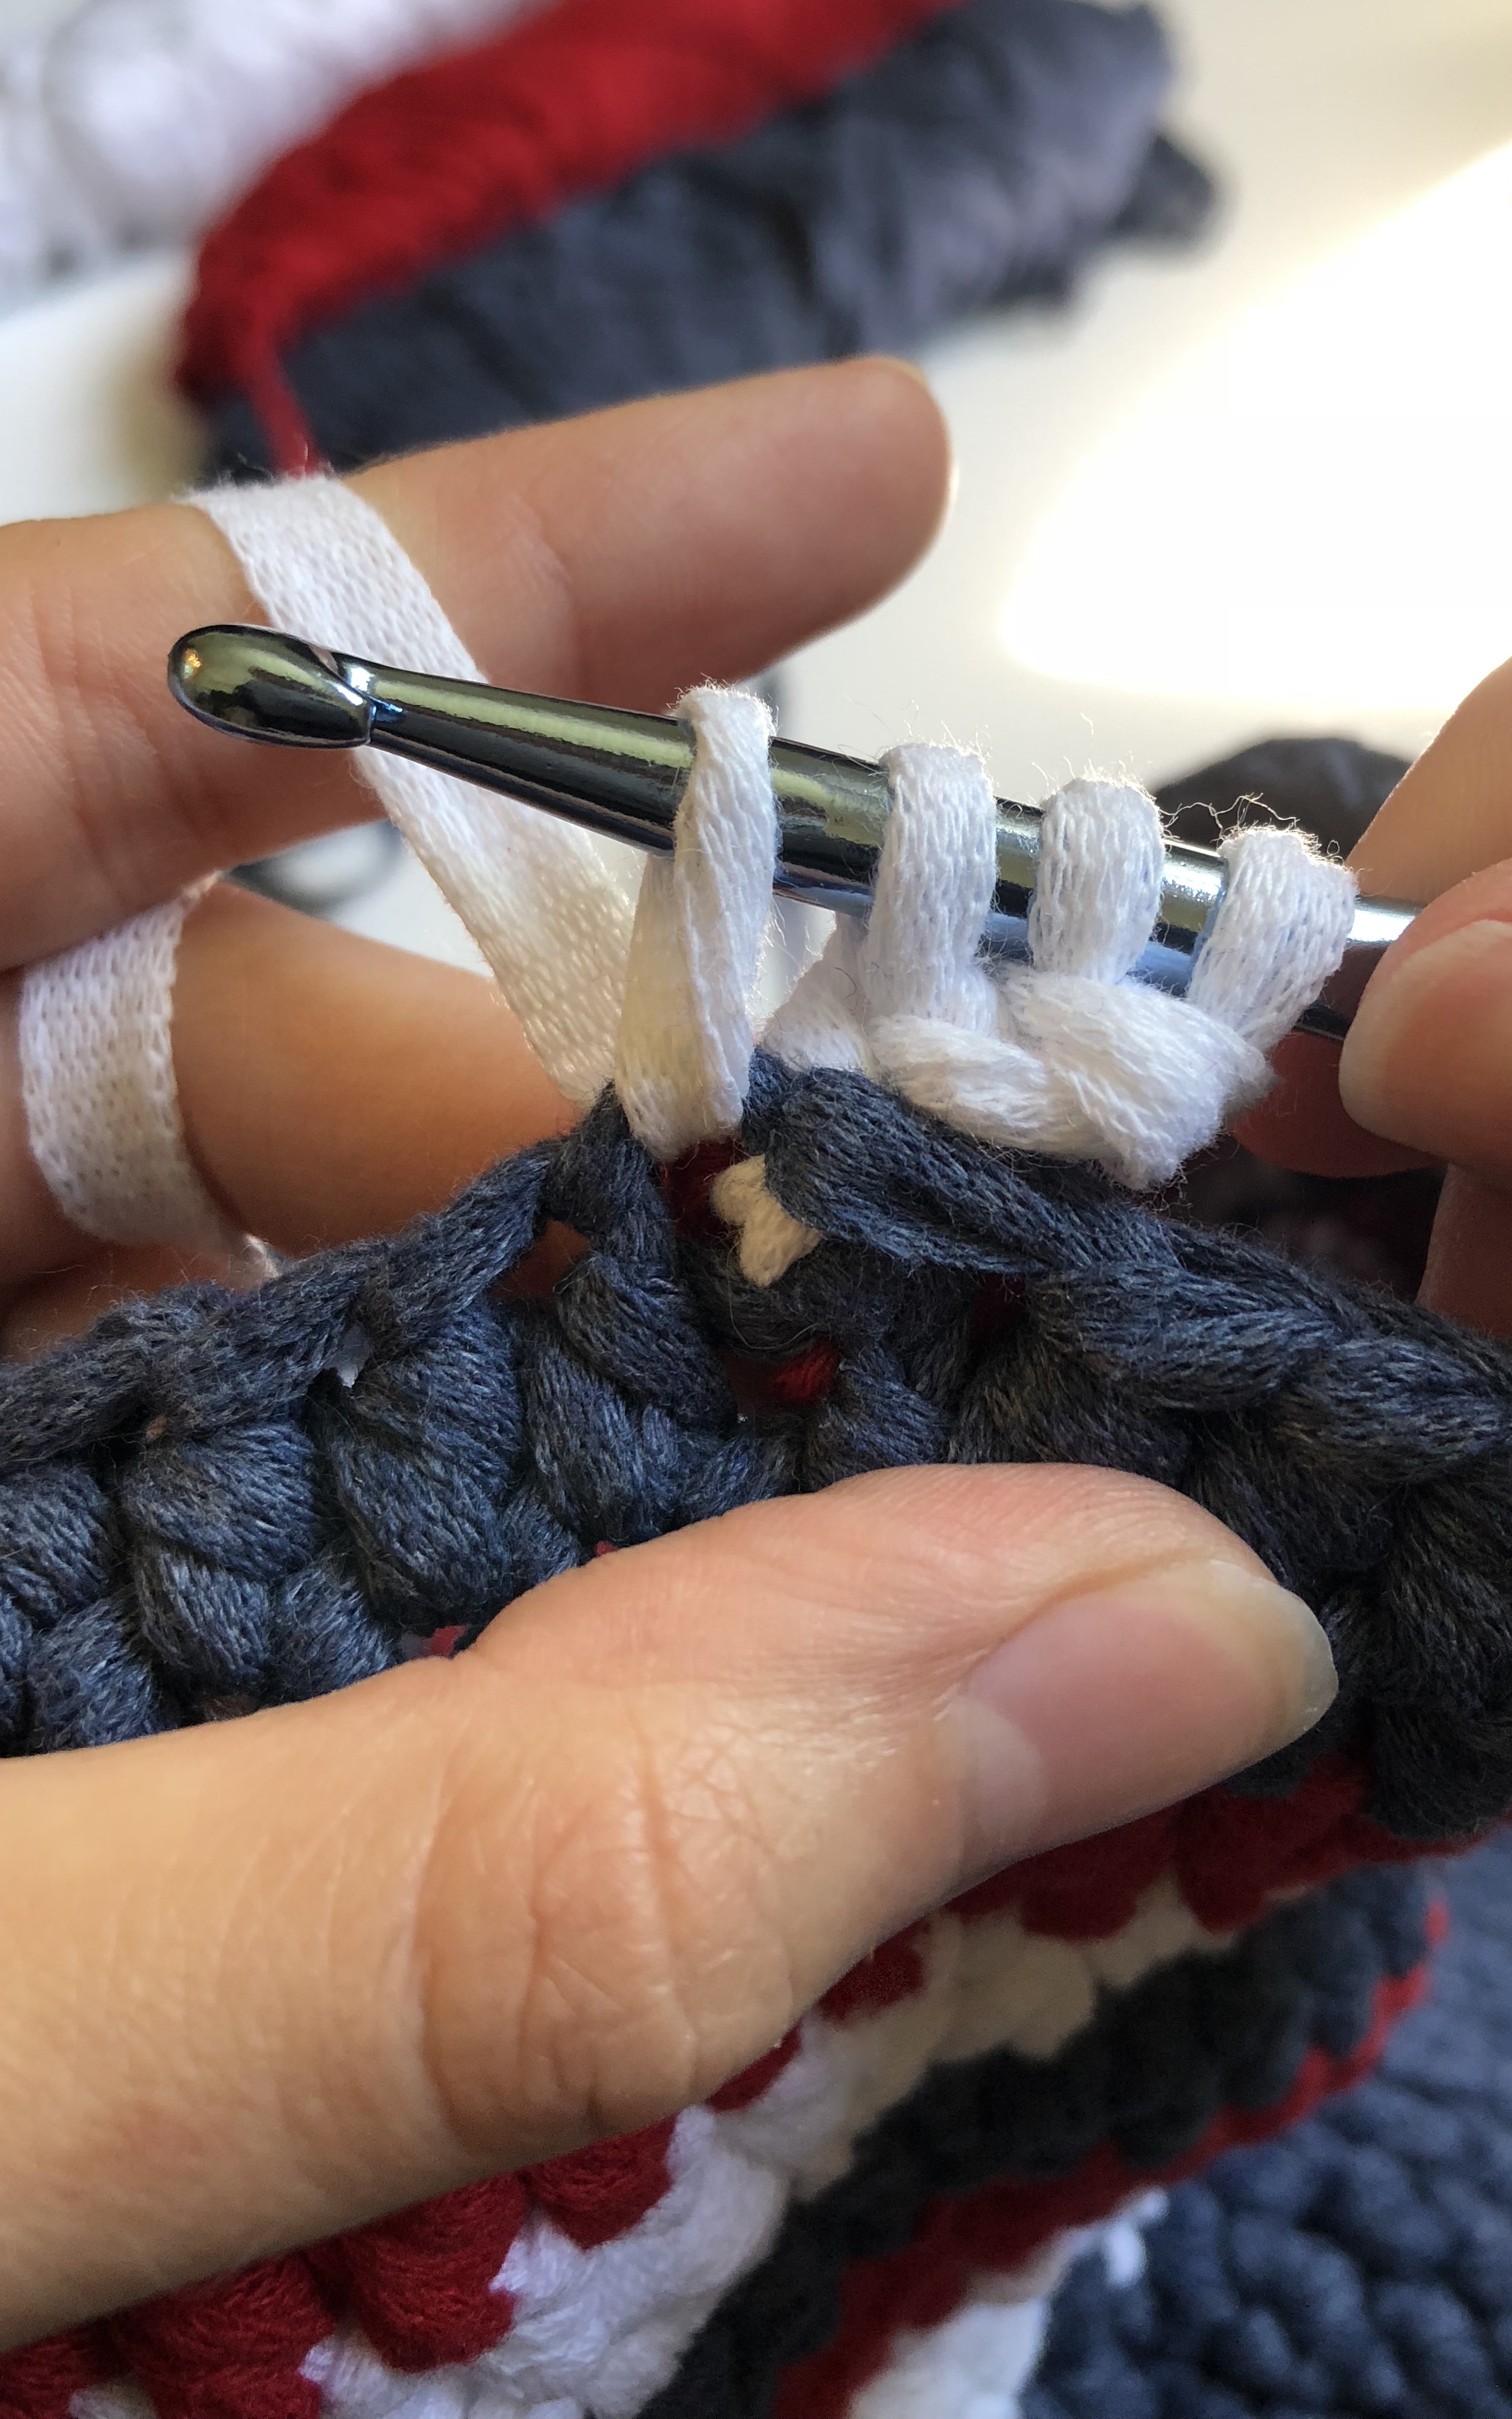
The last two loops will be picked up by inserting your hook into the next two stitches and picking up loops.


Once you have 6 loops on your hook, you will yarn over and draw through all 6 loops.
 To complete the first star, you will yarn over and pull through the loop on your hook. This will create the “eye” of your star which is what you will be working into to start your next star.

To work the next, and each subsequent star; you will start by inserting your hook into the “eye” and pull up another loop (2 loops on your hook).


You will then insert your hook in between the last two spikes of the previous star and pull up another loop (3 loops on your hook).
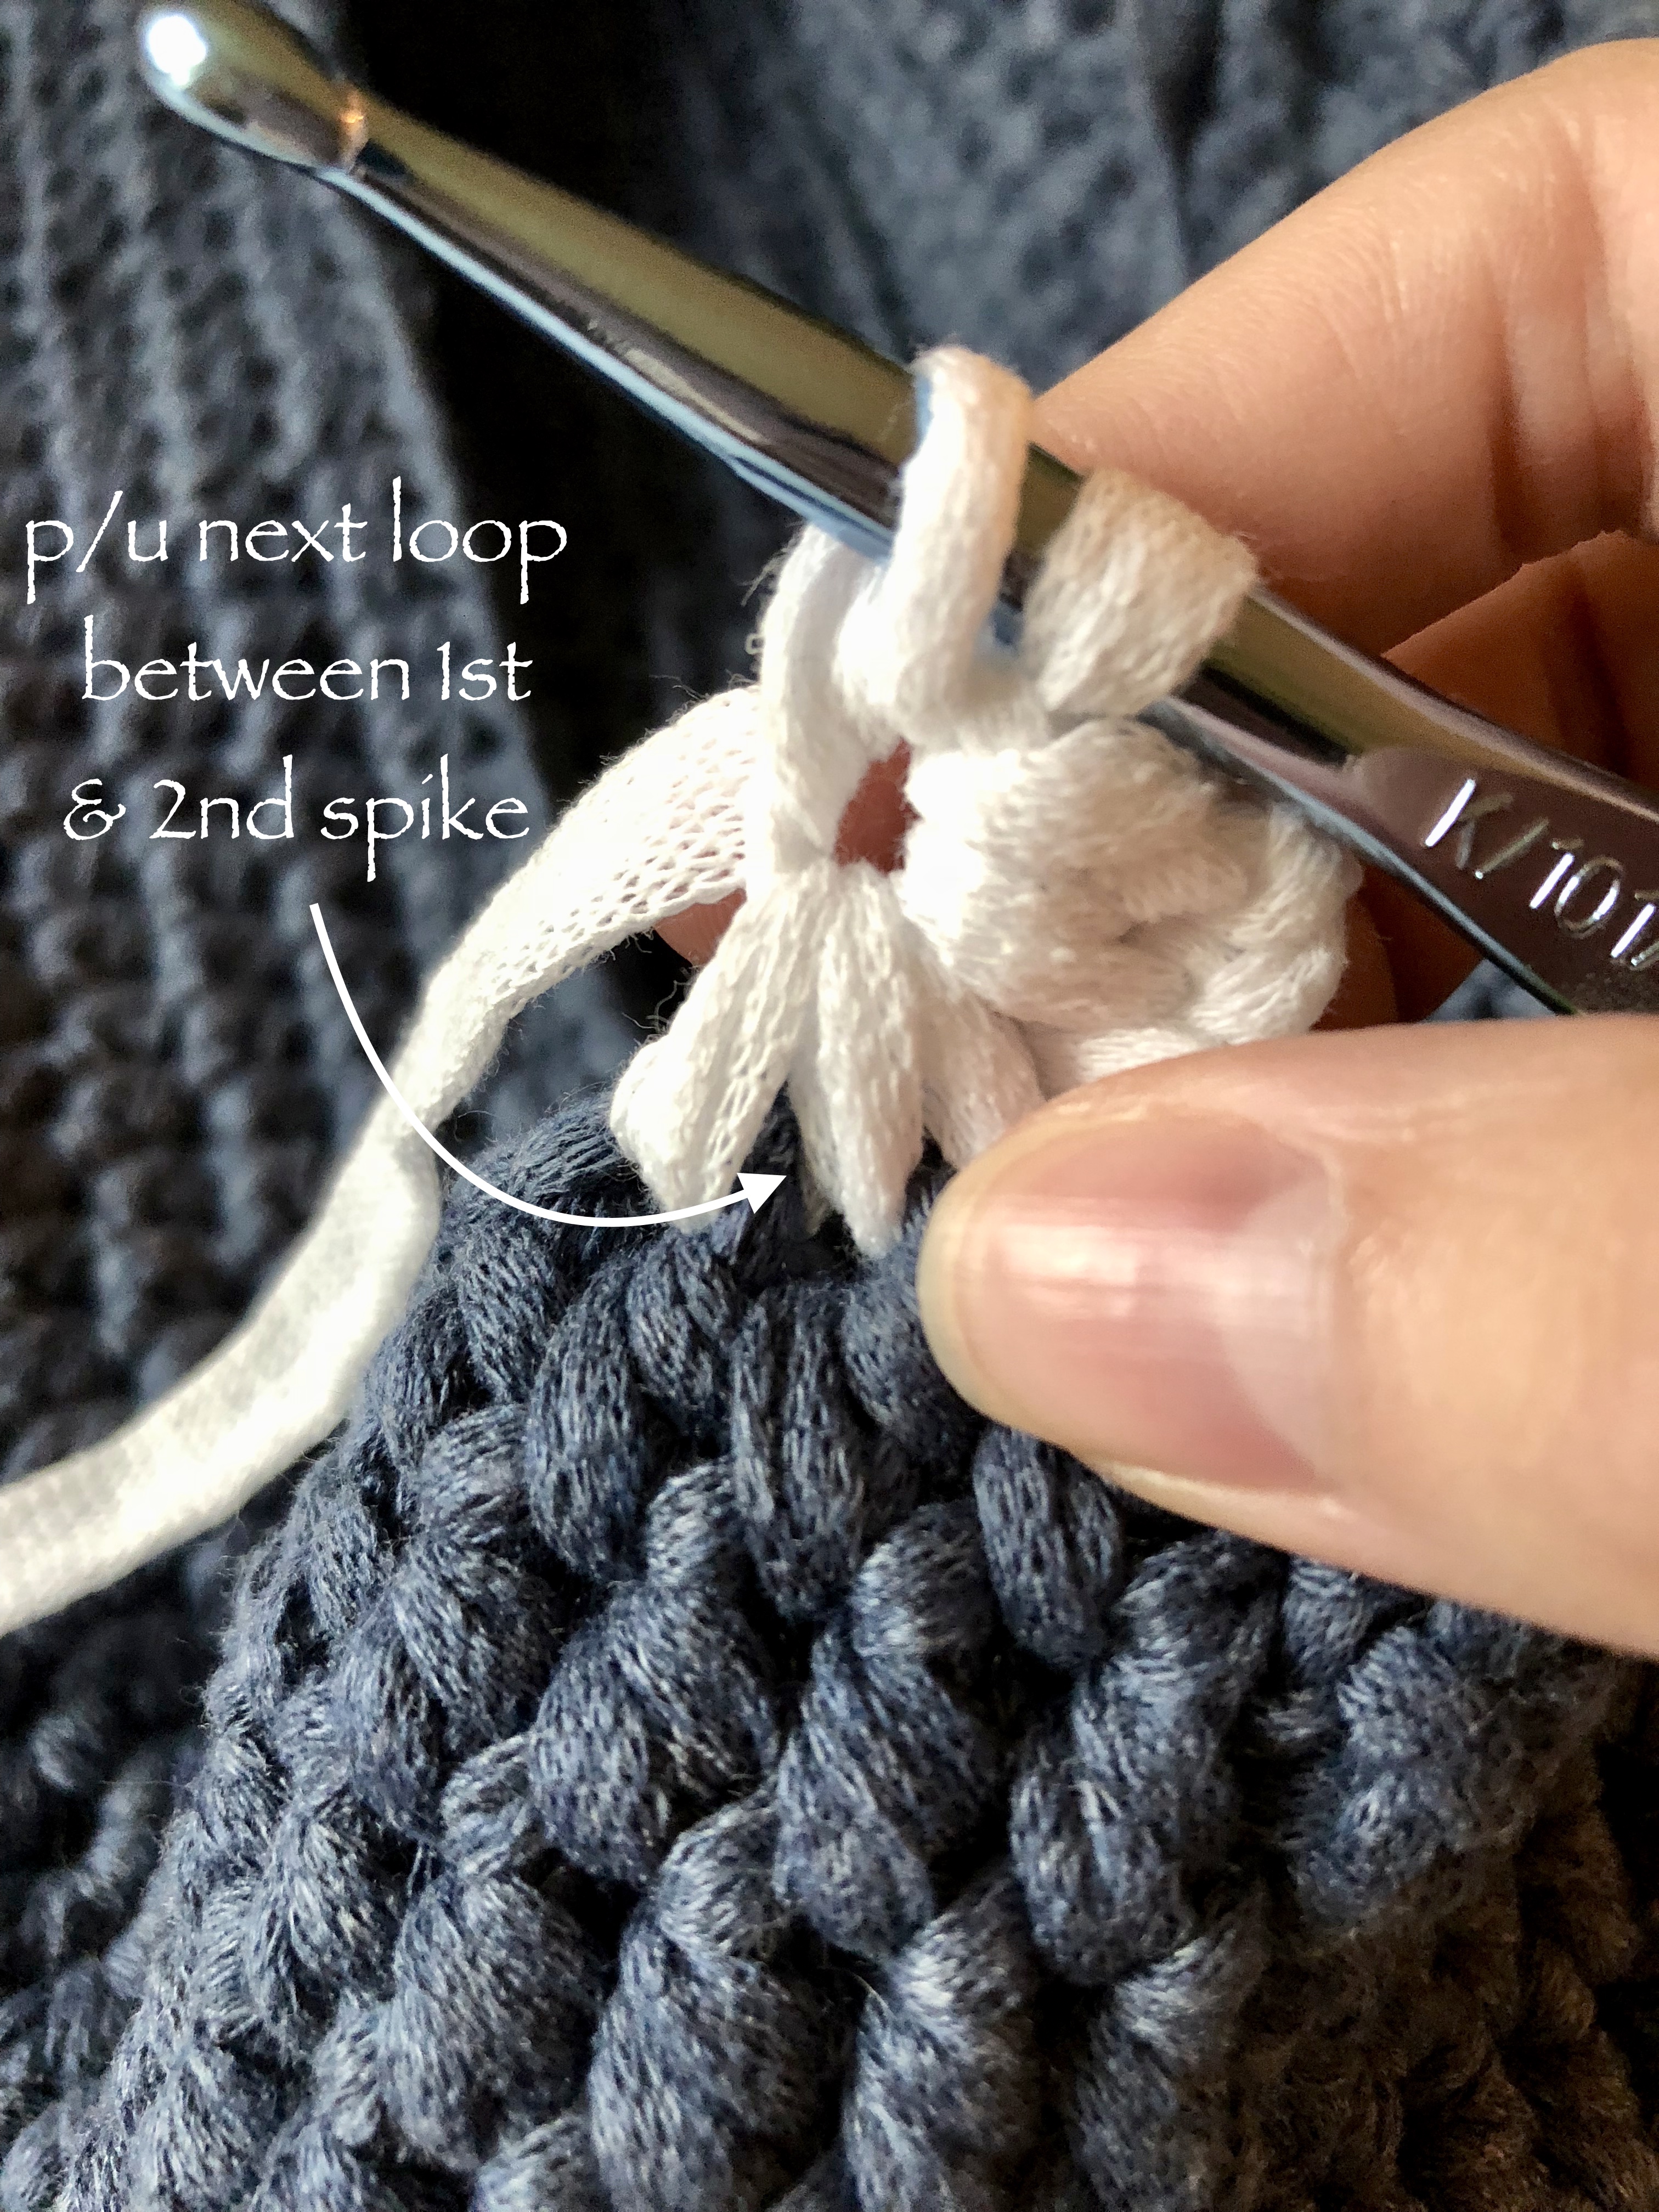
For the 4th loop, you will insert your hook into the same stitch as the last spike of your previous star and pull up.

You will complete in the same fashion as the first star, by picking up the last two loops in the next two stitches, yarning over and pulling through all 6 loops then yarning over and pulling up to close the star.
Repeat this around until you get to the last star. You are going to end the last star a little differently. For the very last step of yarning over and pulling through the 1 loop to close the star, you will instead work a slip stitch into the top of your chain 3 of the first star and use that to close your last star.


The next round is what gives you a completed star (vs. the standard star stitch). You will chain 2 and then begin working 2 half double crochets into the “eye” of each star around.

Once this round is complete, you will switch to your red yarn.
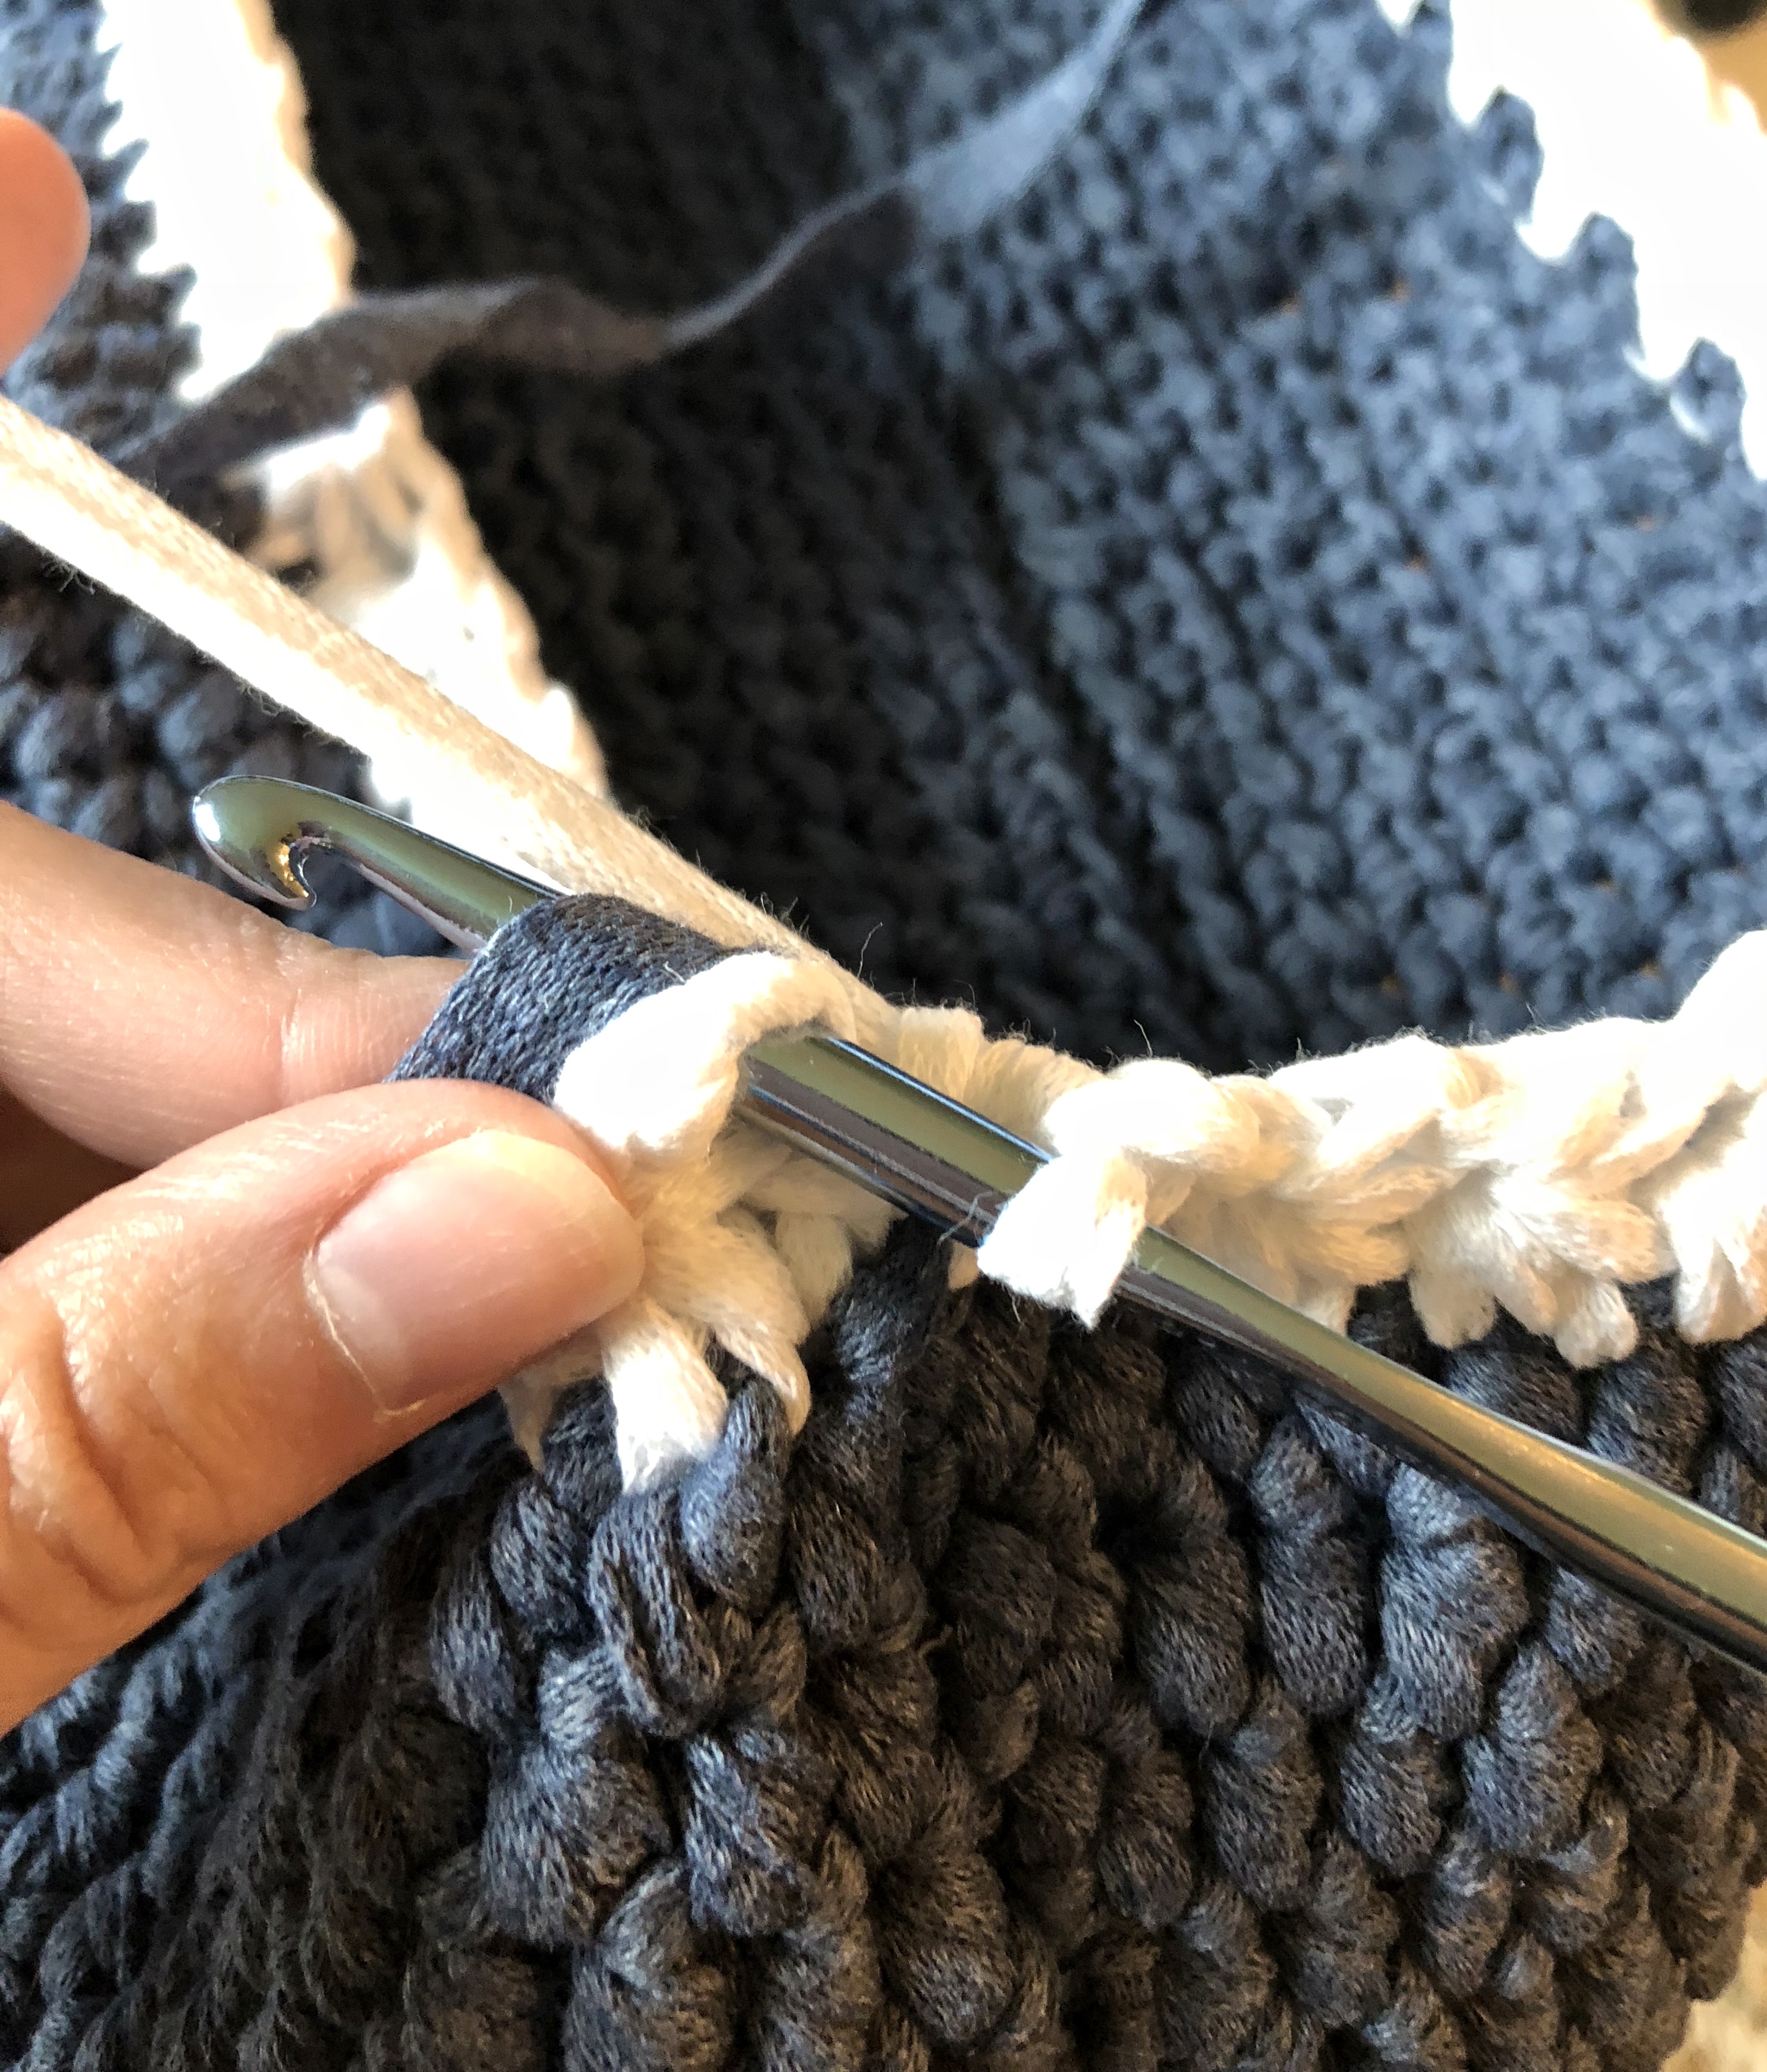
Rather then cutting and reattaching after ever color change, I left each color yarn strand in tact and carried it up and behind the first stitch of every round. To do this, you will just make sure that the yarns you are not currently using are draped behind your working yarn and over your hook as you make your first chain stitch. You can see how my blue is on my hook, but behind my working white strand in the picture below:
To work the red portion, you will simply be working 2 rounds of half double crochets.


You will then switch back to the blue yarn, and work 2 more rounds of half double crochets around.

You will repeat from the white star stitch pattern through to the blue one more time each. This will give you 2 rounds of completed white star stitches, alternated between 2 stripes of the red and the blue.

Once the last blue round is complete, you can fasten off the blue and red strands and either work them into the first few stitches of your next round, or just weave them in.
The remainder of your tote will be worked in white half double crochets and bound off by one round of slip stitches around. This portion is probably the easiest, just don’t forget to alternate between join methods at the end of each round.

To complete your tote, you will be creating the handles using white rope. I used 1/2″ cotton rope, and a hot glue gun. Before cutting the rope, I secured just below where I wanted my ends to be with scotch tape. This will help prevent fraying of the rope prior to gluing it in place.

Once each end was secured with tape, I cut the rope and applied a layer of hot glue to the ends. I also think that using superglue for this would work perfectly!
After the glue had set, I inserted the yarn through my half double crochet stitches. Rather then counting and figuring out an exact stitch of where to place the rope, I simply measured 4 1/2″ from either side of the tote in and found the stitch closest to that. I also made sure that this stitch was 4 rounds up from my last blue round.


It should also be noted, that I pulled the rope through to the front of my tote so that the tie would be on the outside.
Before securing with a knot, I gingerly removed the tape and touched up with glue in any spots where there was loose ends.
Once the glue had set again, I measured the rope about 7″ down through the half double crochet and tied a knot, leaving about a 1″ tail hanging from the knot.

 I repeated this process on the other side of the rope and tote, then again using my second strand of rope to make a handle for the opposite side.

Once all 4 knots are secured, your tote is complete! Again, the free pattern for this tote can be found here.
Happy Crocheting!