Classic Teddy- Free Pattern

**Below you will find the free picture tutorial and pattern for this Classic Teddy. **
Since Audrey’s birth we have received so many stuffed animals as gifts for her. Like we are very quickly running out of space to keep them all.
Now please don’t misunderstand me, we love each one of these stuffed critters so very much and are so grateful for each and every one of them. More importantly, Audrey absolutely adores them. She goes through phases of who her favorites are, but by and large she tends to prefer her teddy bears.
This was my inspiration for my latest pattern, a Classic Teddy. Audrey loves her bears so much, I thought it would be fun to make one for the newest baby member of our small group. I don’t think Audrey was the biggest fan of me giving it away…but this pattern was so much fun to make, I may just make another one for her. 🙂

I loved how Chi Wei of One Dog Woof used Lion Brand’s Homespun yarn for her Classic Stuffed Bunny pattern. It gave such a cuddly and soft look to the bunny that I decided I wanted to go that route for this Teddy.
Chi Wei used Homespun Thick and Quick, but I stuck with the original Homespun line as my local Michaels didn’t have any Thick and Quick available in brown.
A quick note about Homespun yarn… not the easiest to work with for amigurumi. Amigurumi requires tighter stitches and the way this yarn is spun makes it a little difficult to determine your stitches if they are tight.
Before starting your bear, I recommend practicing a swatch sample with the appropriate hook size and yarn. This will give you a better feel for finding your stitches with this yarn. Unlike how you would typically crochet, you will need to do a bit more feeling for your stitches rather then just looking at them.
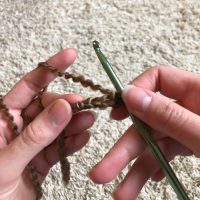
Once you are comfortable with this yarn, the pattern for Teddy is actually quite simple. Almost every body part starts out the same way working stitches into a magic ring. If you are unfamiliar with this technique, I recommend this detailed and helpful tutorial here.


After creating your magic ring, you will slowly start to increase in each round to achieve the width needed for that body part.
The head is the widest body part you will be making so you will have the most amount of increases for that. After working several rows of increases you will switch to working single crochets around (not increasing or decreasing). This will add height to your head without making it wider. After those rounds are complete, you will begin a few rounds of decreases. I figured out the hard way that you will not want to decrease the head too much. If you do the neck will be too wobbly to support the head when connected to the body. From here you will fasten off, leaving a longer tail for attaching to the body later on.

Next I made the head. Again, starting with the magic ring and slowly increasing in the next few rounds. After a good base is formed, you will single crochet around for a few more rounds. Rather then decreasing all at once in the next step, you will slowly decrease with a few rounds of single crochets only in between each round of decreases. This gives the body a tapered look moving up towards the neck. You will switch between a few rounds of single crochet and decreasing rounds a few more times, fastening off after the last round of decreases.

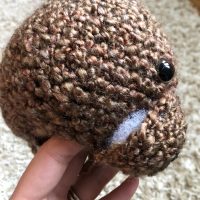
After completing the body, I made the snout. I am relatively good at imagining what something will look like in my head, but was struggling with the face and body of this Teddy pattern so I wanted to work the snout to assure myself it was all looking okay so far. The snout is a simple magic circle followed by 3 rounds of gradual increasing and 2 rounds of single crocheting around. After fastening off, you will want to embroider your nose and mouth.


I went pretty crazy with the embroidery floss as I wanted to make sure the nose would be fat enough and big enough to see once completed. After completing the snout I actually attached it to the head and placed the safety eyes directly above the snout on either side of the head. While attaching the snout, I started to stuff the head to give me a better placement of where to attach each stitch. I also very lightly stuffed the snout as I went, to give it more depth.

Now that the head, body and snout are complete, working the quick and easy limbs are next. The legs and arms are worked almost identical to each other, with the legs being slightly bigger.
You will start out again with the magic ring. From here you will increase a few rounds, followed by a few rounds of single crochets only. You will work 1 round of decreasing to create the hands and feet.


After this round of decreases, you will work single crochets around for several rounds, creating the arms and legs.


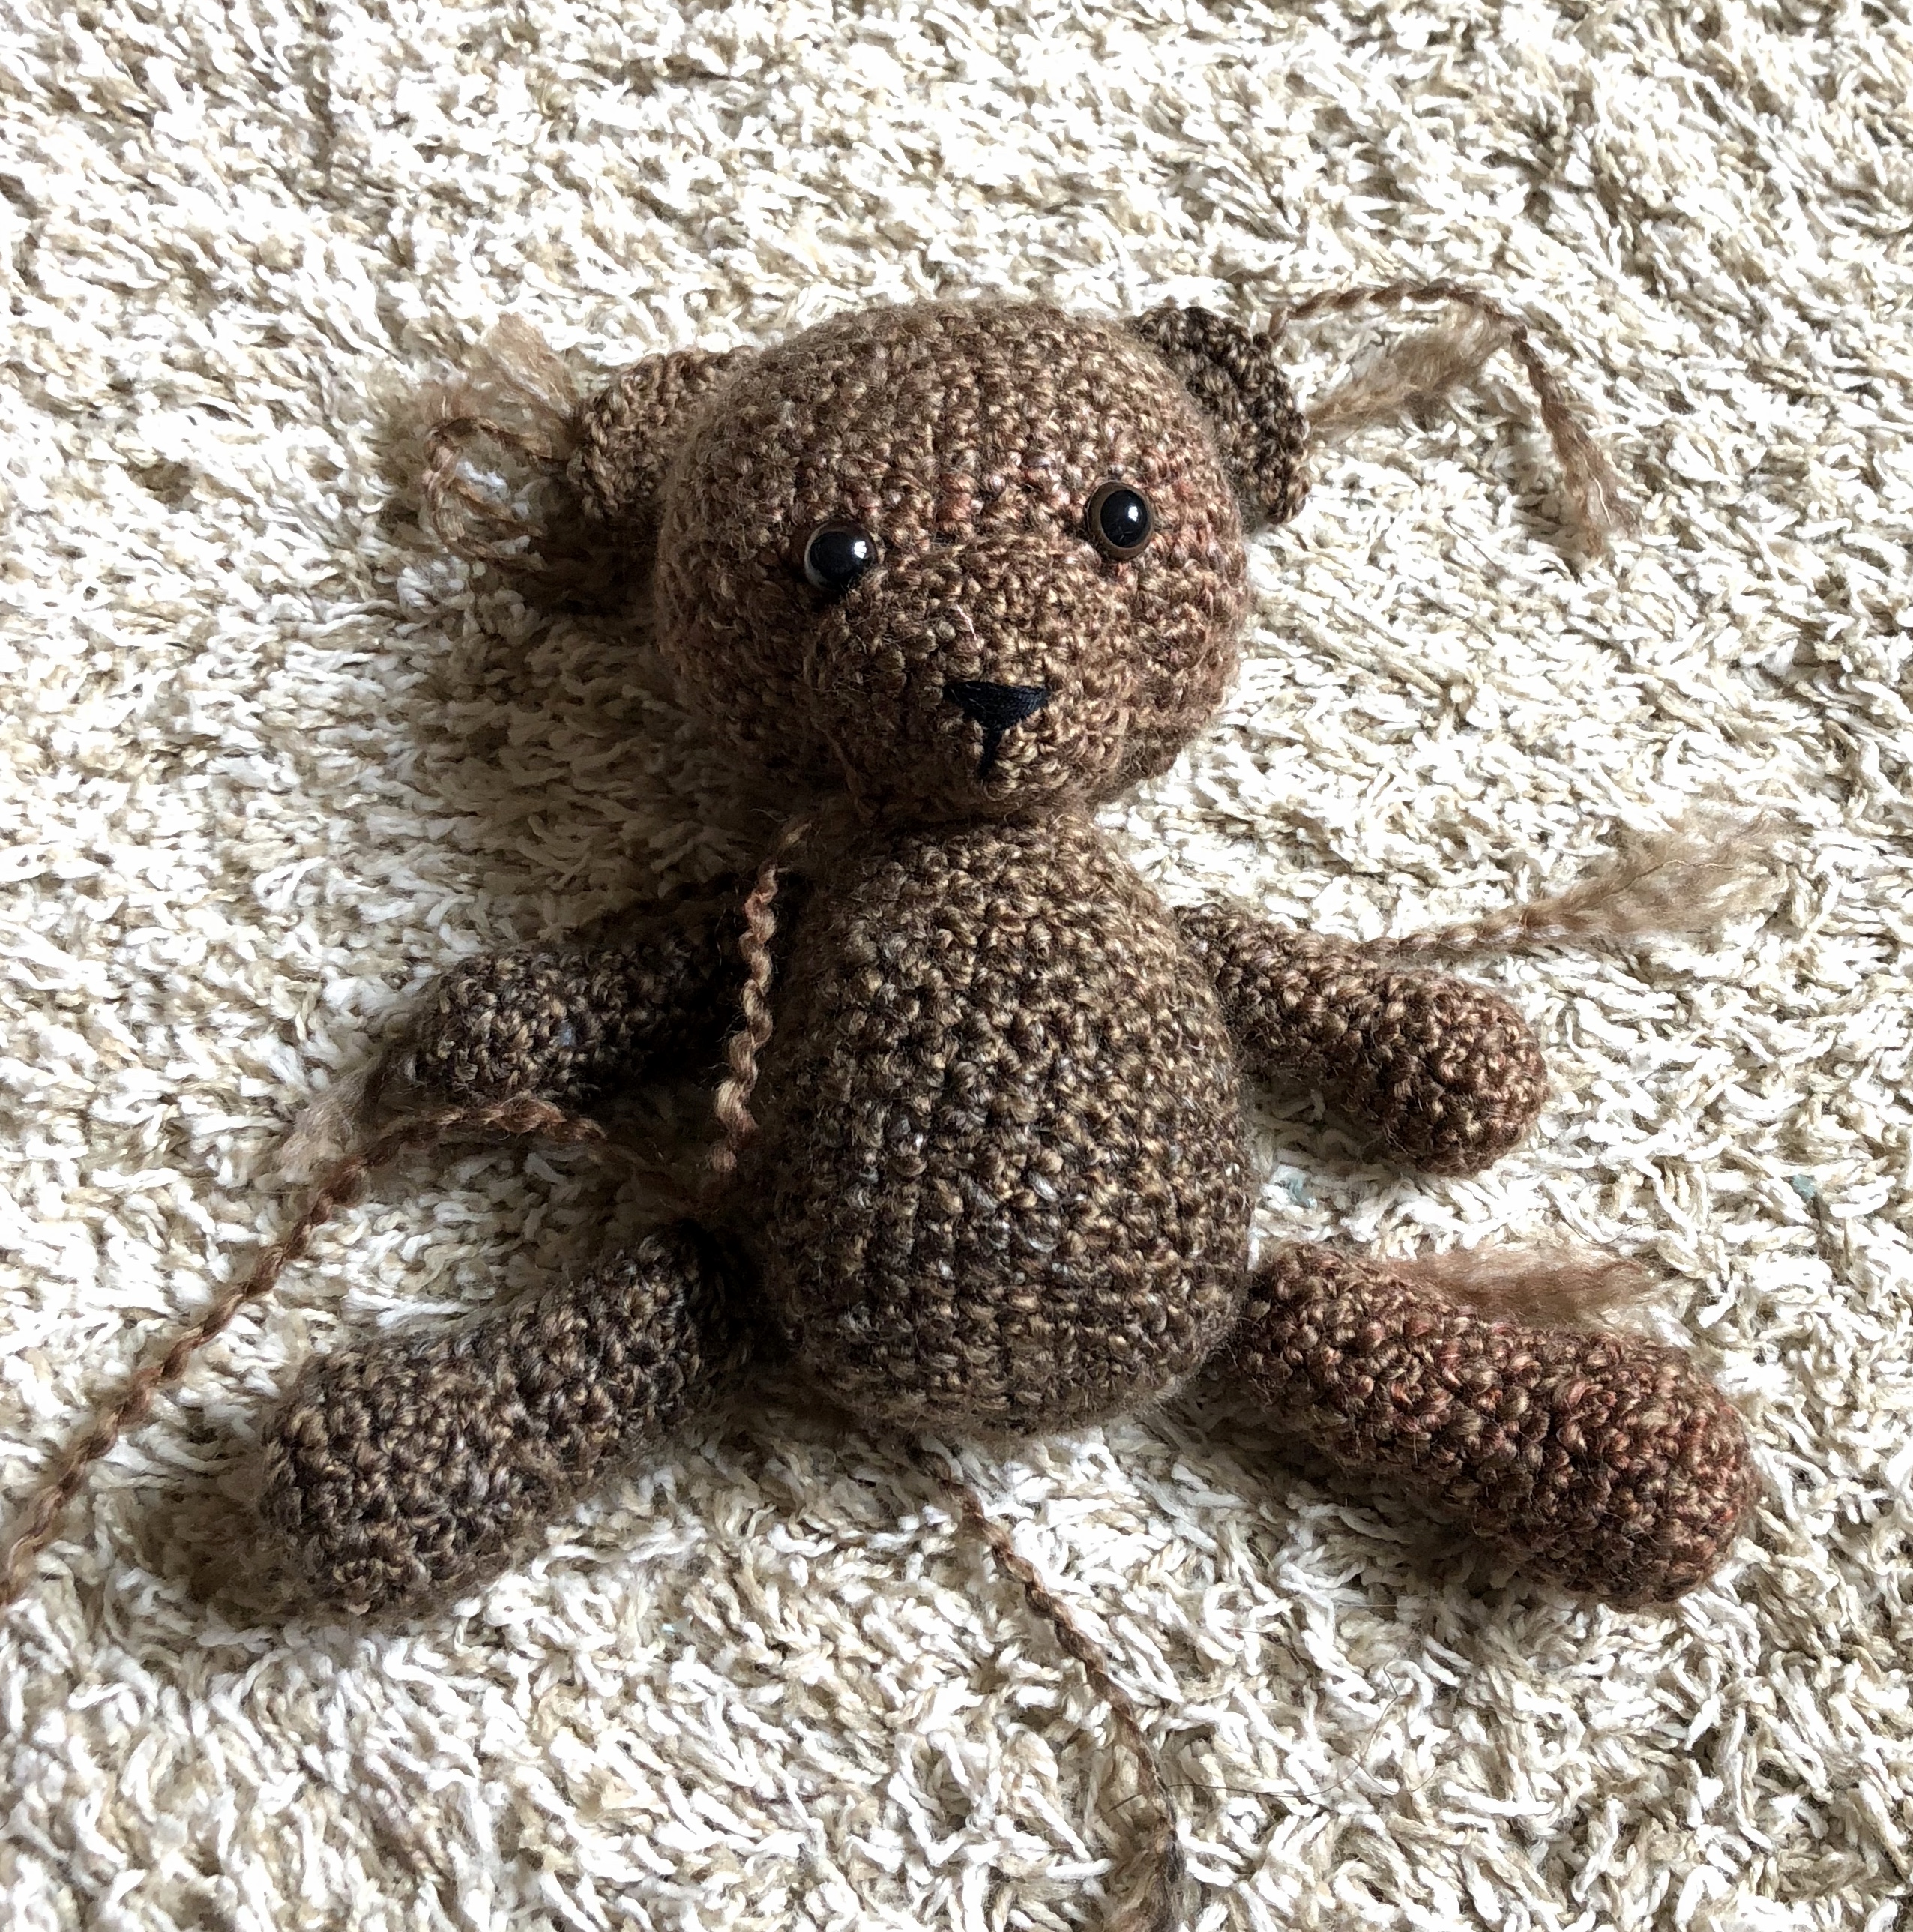
I made a tail next. The tail is a very small detail that you can certainly omit if you so choose. I actually added the tail on as a last minute thought to give the bear some additional support while sitting.
The tail once again starts in the magic ring. I only worked 1 quick round of increases, followed by 2 rounds of single crochet only before fastening off.
All that’s left now is to make the ears, assemble and accessorize. 😀


The ears are actually the ONLY part of this teddy that will not being in the magic ring. For the ears you are actually going to be making a half circle, so the gradual increases will seem familiar. You will just be turning your work instead of working in the round as you did with all the other body parts. All it takes is to start out with a short row, followed by 3 rows of gradual increases creating a crest.
If you plan to add fabric to your bear for some added details, you will want to cut that fabric now, before assembly. This will make it easier to trace the shape and sizes you’ll need for each part.
Since I added fabric to the palms of the hands, feet and inside the ears, I just traced around the widest part of each onto the back of my fabric. You can always cut the fabric smaller later, if needed. I attached the fabric to my ears before attaching the ears to the head to make it easier to sew into place. If you plan on gluing the fabric on, you could also do this after assembly, if you’d rather.
Now onto assembly! Since your snout is already attached to your head, you will want to attach the ears to your head next. I placed my ears closer to the front of the head but still on top on either side. After your head is all assembled, you will want to attach it to your body.

Attaching the limbs comes next. I placed my Teddy’s arms directly below the neck and the legs right around where you stopped your increases on either side of the body towards the back side. If you made it, you will want to add your tail directly between the two legs to offer extra support.
Before calling it done, I wanted to give mine some extra details so I added more fabric to the hands and feet, as I mentioned earlier. I also added on a bow around the neck since this bear was a gift, I felt that would be appropriate.

And there you have it! Your very own homemade, Classic Teddy! I hope yours gets as much loving as mine did.
What You’ll Need
1 skein of Lion Brand’s Homespun yarn (I used Barley) –approximately 108 grams
1 5.5 MM crochet hook
2 15MM safety eyes
Black Embroidery Floss
Fiber Fill
1 sheet of patterned fabric (optional)
Needle and thread or fabric glue (optional)
1 piece of ribbon (optional)
My Amazon Picks
Completed Measurements
10″ tall
9″ across by arms
10″ across by feet
Abbreviations Used
sc= Single Crochet
fo= Fasten Off
st= Stitch
ch= Chain
Special Stitches
Increase: single crochet 2 into one stitch
Decrease: single crochet 2 together (insert hook, yarn over, pull up, insert hook into next stitch, yarn over pull up, yarn over and pull through all three loops on hook.
Pattern for the Head
**Please note that this entire pattern is worked in continuous rounds (vs. joined rounds) **
Foundation: work 6 into the magic ring (6)
Round 1: sc 2 in each around (12)
Round 2: *sc, increase*, repeat from * around (18)
Round 3: *sc 2, increase*, repeat from * around (24)
Round 4: *sc 3, increase*, repeat from * around (30)
Round 5: *sc 4, increase*, repeat from * around (36)
Round 6: *sc 5, increase*, repeat from * around (42)
Round 7-13: sc around (42)
Round 14: *sc 5, decrease*, repeat from * around (36)
Round 15: *sc 4, decrease*, repeat from * around (30)
Round 16: *sc 3, decrease*, repeat from * around (24)
Round 17: *sc 2, decrease*, repeat from * around, fo (18)
Pattern for the Body
Foundation: work 6 into the magic ring (6)
Round 1: sc 2 in each around (12)
Round 2: *sc, increase*, repeat from * around (18)
Round 3: *sc 2, increase*, repeat from * around (24)
Round 4: *sc 3, increase*, repeat from * around (30)
Round 5-12: sc around (30)
Round 13: *sc 3, decrease*, repeat from * around (24)
Round 14-15: sc around (24)
Round 16: *sc 2, decrease*, repeat from * around (18)
Round 17-18: sc around, fo. (18)
Pattern for the Snout
Foundation: work 5 into the magic ring (5)
Round 1: sc 2 in each around (10)
Round 2: *sc, increase*, repeat from * around (15)
Round 3: *sc 2, increase*, repeat from * around (20)
Round 4-5: sc around, fo. Embroider on nose and snout using black embroidery floss (20)
Pattern for the Arms (make 2)
Foundation: work 4 into the magic ring (4)
Round 1: sc 2 in each around (8)
Round 2: *sc, increase*, repeat from * around (12)
Round 3-4: sc around (12)
Round 5: *sc, decrease*, repeat from * around (8)
Round 6-13: sc around, fo (8)
Pattern for the Legs (make 2)
Foundation: work 6 into the magic ring (6)
Round 1: sc 2 in each around (12)
Round 2: *sc, increase*, repeat from * around (18)
Round 3-5: sc around (18)
Round 6: *sc, decrease*, repeat from * around (12)
Round 7-13: sc around, fo (12)
Pattern for the Ears (make 2)
Foundation: ch 4 working in 1st ch from hook sc 3 across, turn (3)
Row 1: ch 1, increase in each st across, turn (6)
Row 2: ch 1, *sc, increase*, repeat from * across, turn (9)
Row 3: ch 1, *sc 2, increase*, repeat from * across, fo (12)
Pattern for the Tail (optional for sitting support)
Foundation: work 4 into the magic ring (4)
Round 1: sc 2 in each around (8)
Round 2-3: sc around, fo (8)
 Assembly
Attach the snout to the head so that the bottom of the snout is lined up with the opening of the base of the head. Gradually stuff the snout and head with fiberfill as you go. Before stuffing the head completely, you will want to add the safety eyes on. Place them on either side of the top of the snout. Firmly stuff the rest of the head, but not so much that the fiberfill is seen in between the stitches.
If you are adding fabric, add it to the ears now and attach each ear to either side of the top of the head. I placed mine more towards to the front, rather than the middle or back of the head.
Stuff the body firmly, but not so much that the fiberfill is seen in between the stitches. Attach the head to the body as securely as possible.
Stuff the limbs (arms and legs) with fiberfill. Attach arms to either side of the body, connecting the opening of the arms to the neck area of the body. Add on fabric to the palms, as desired.
Attach legs to either side of the body, attaching so that the bottom of the legs line up with the last round of increases of the body. In other words, try to attach the legs so that they line up with the bottom of the body while the body is in sitting position. The opening of the legs should be attached closer to the back of the body, leaving a sizable gap in between for the tail. I attached the legs securely to the sides of the body as well (not just at the back). Add on fabric to the feet, as desired.
Attach tail to the very back and bottom of the body in between where both legs were attached.
Finish with a pretty bow of your favorite ribbon and there you have it!
