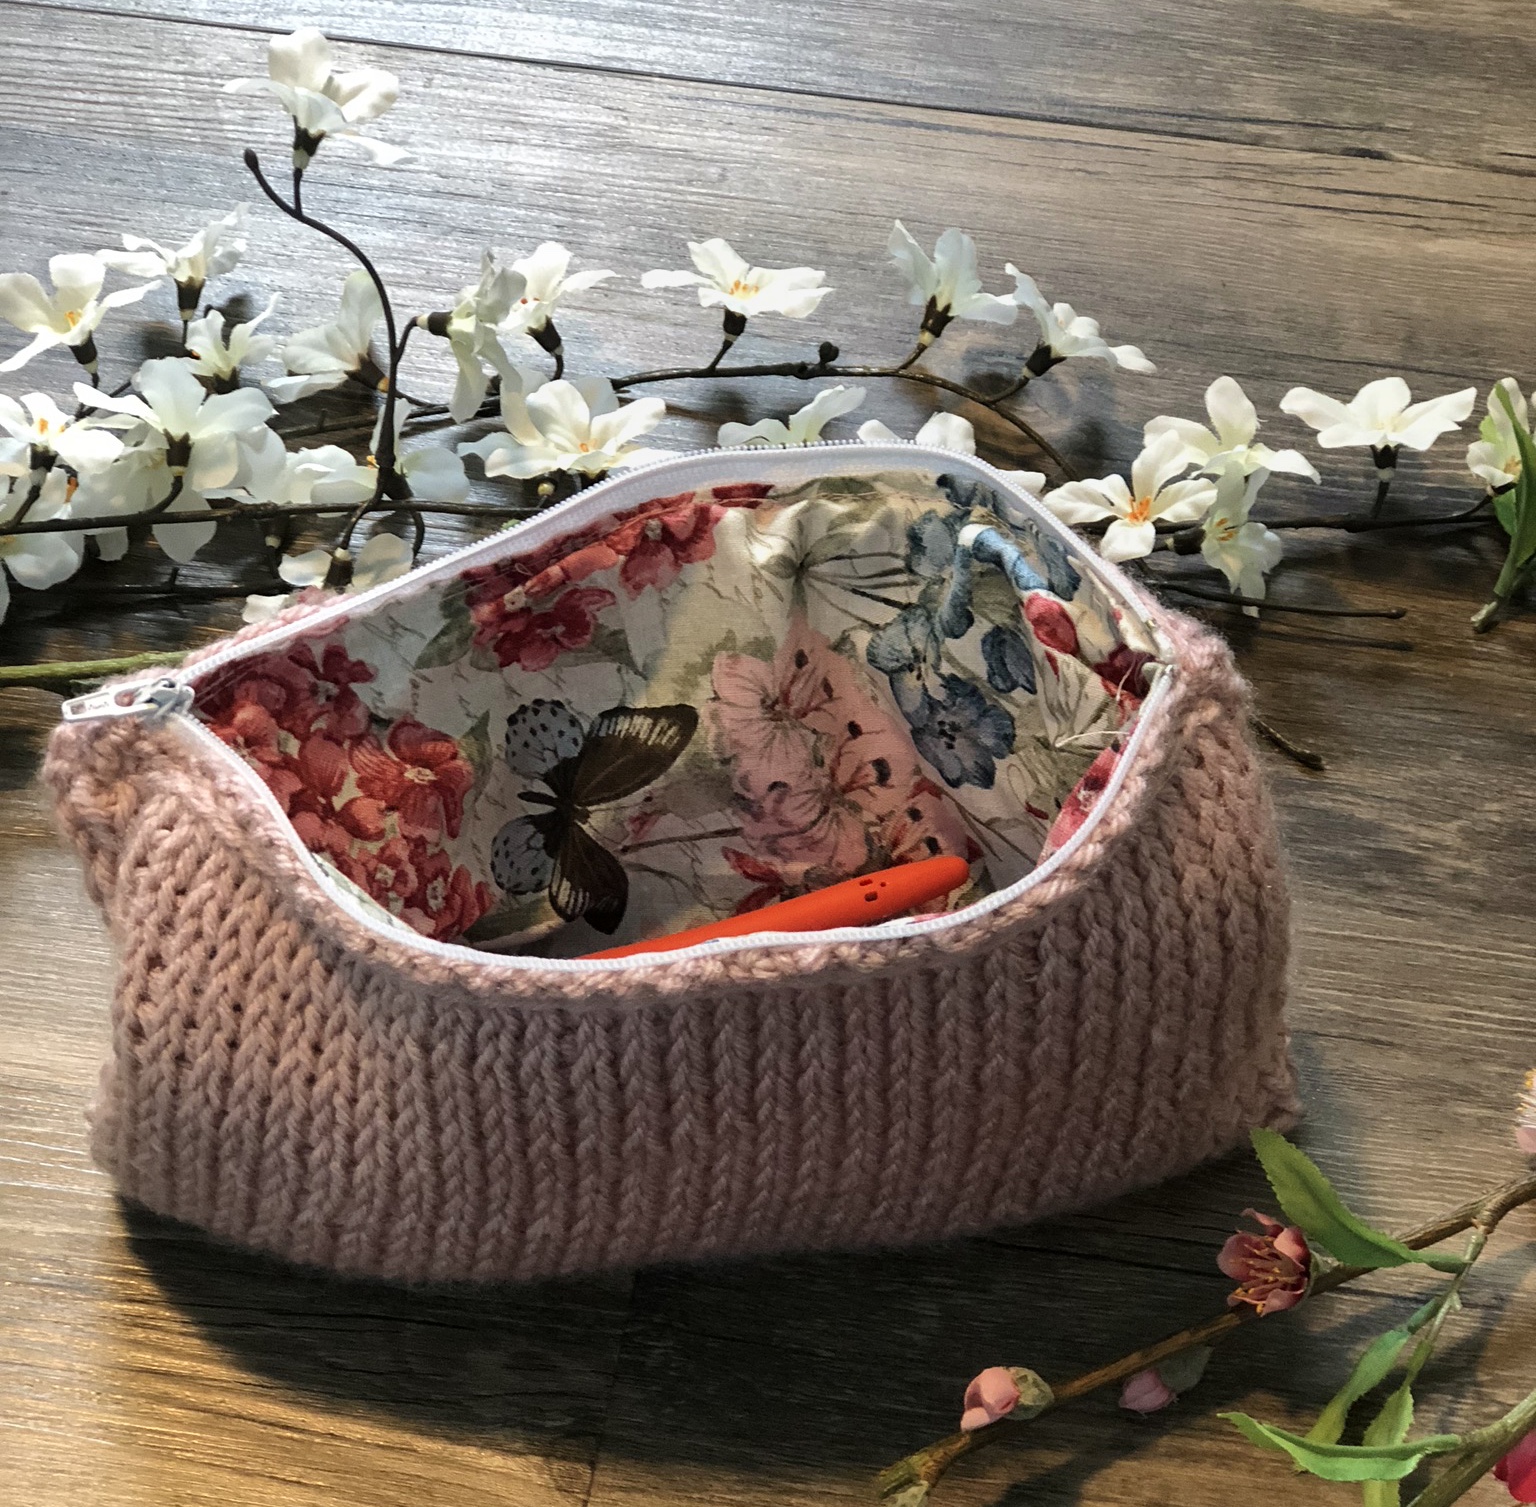
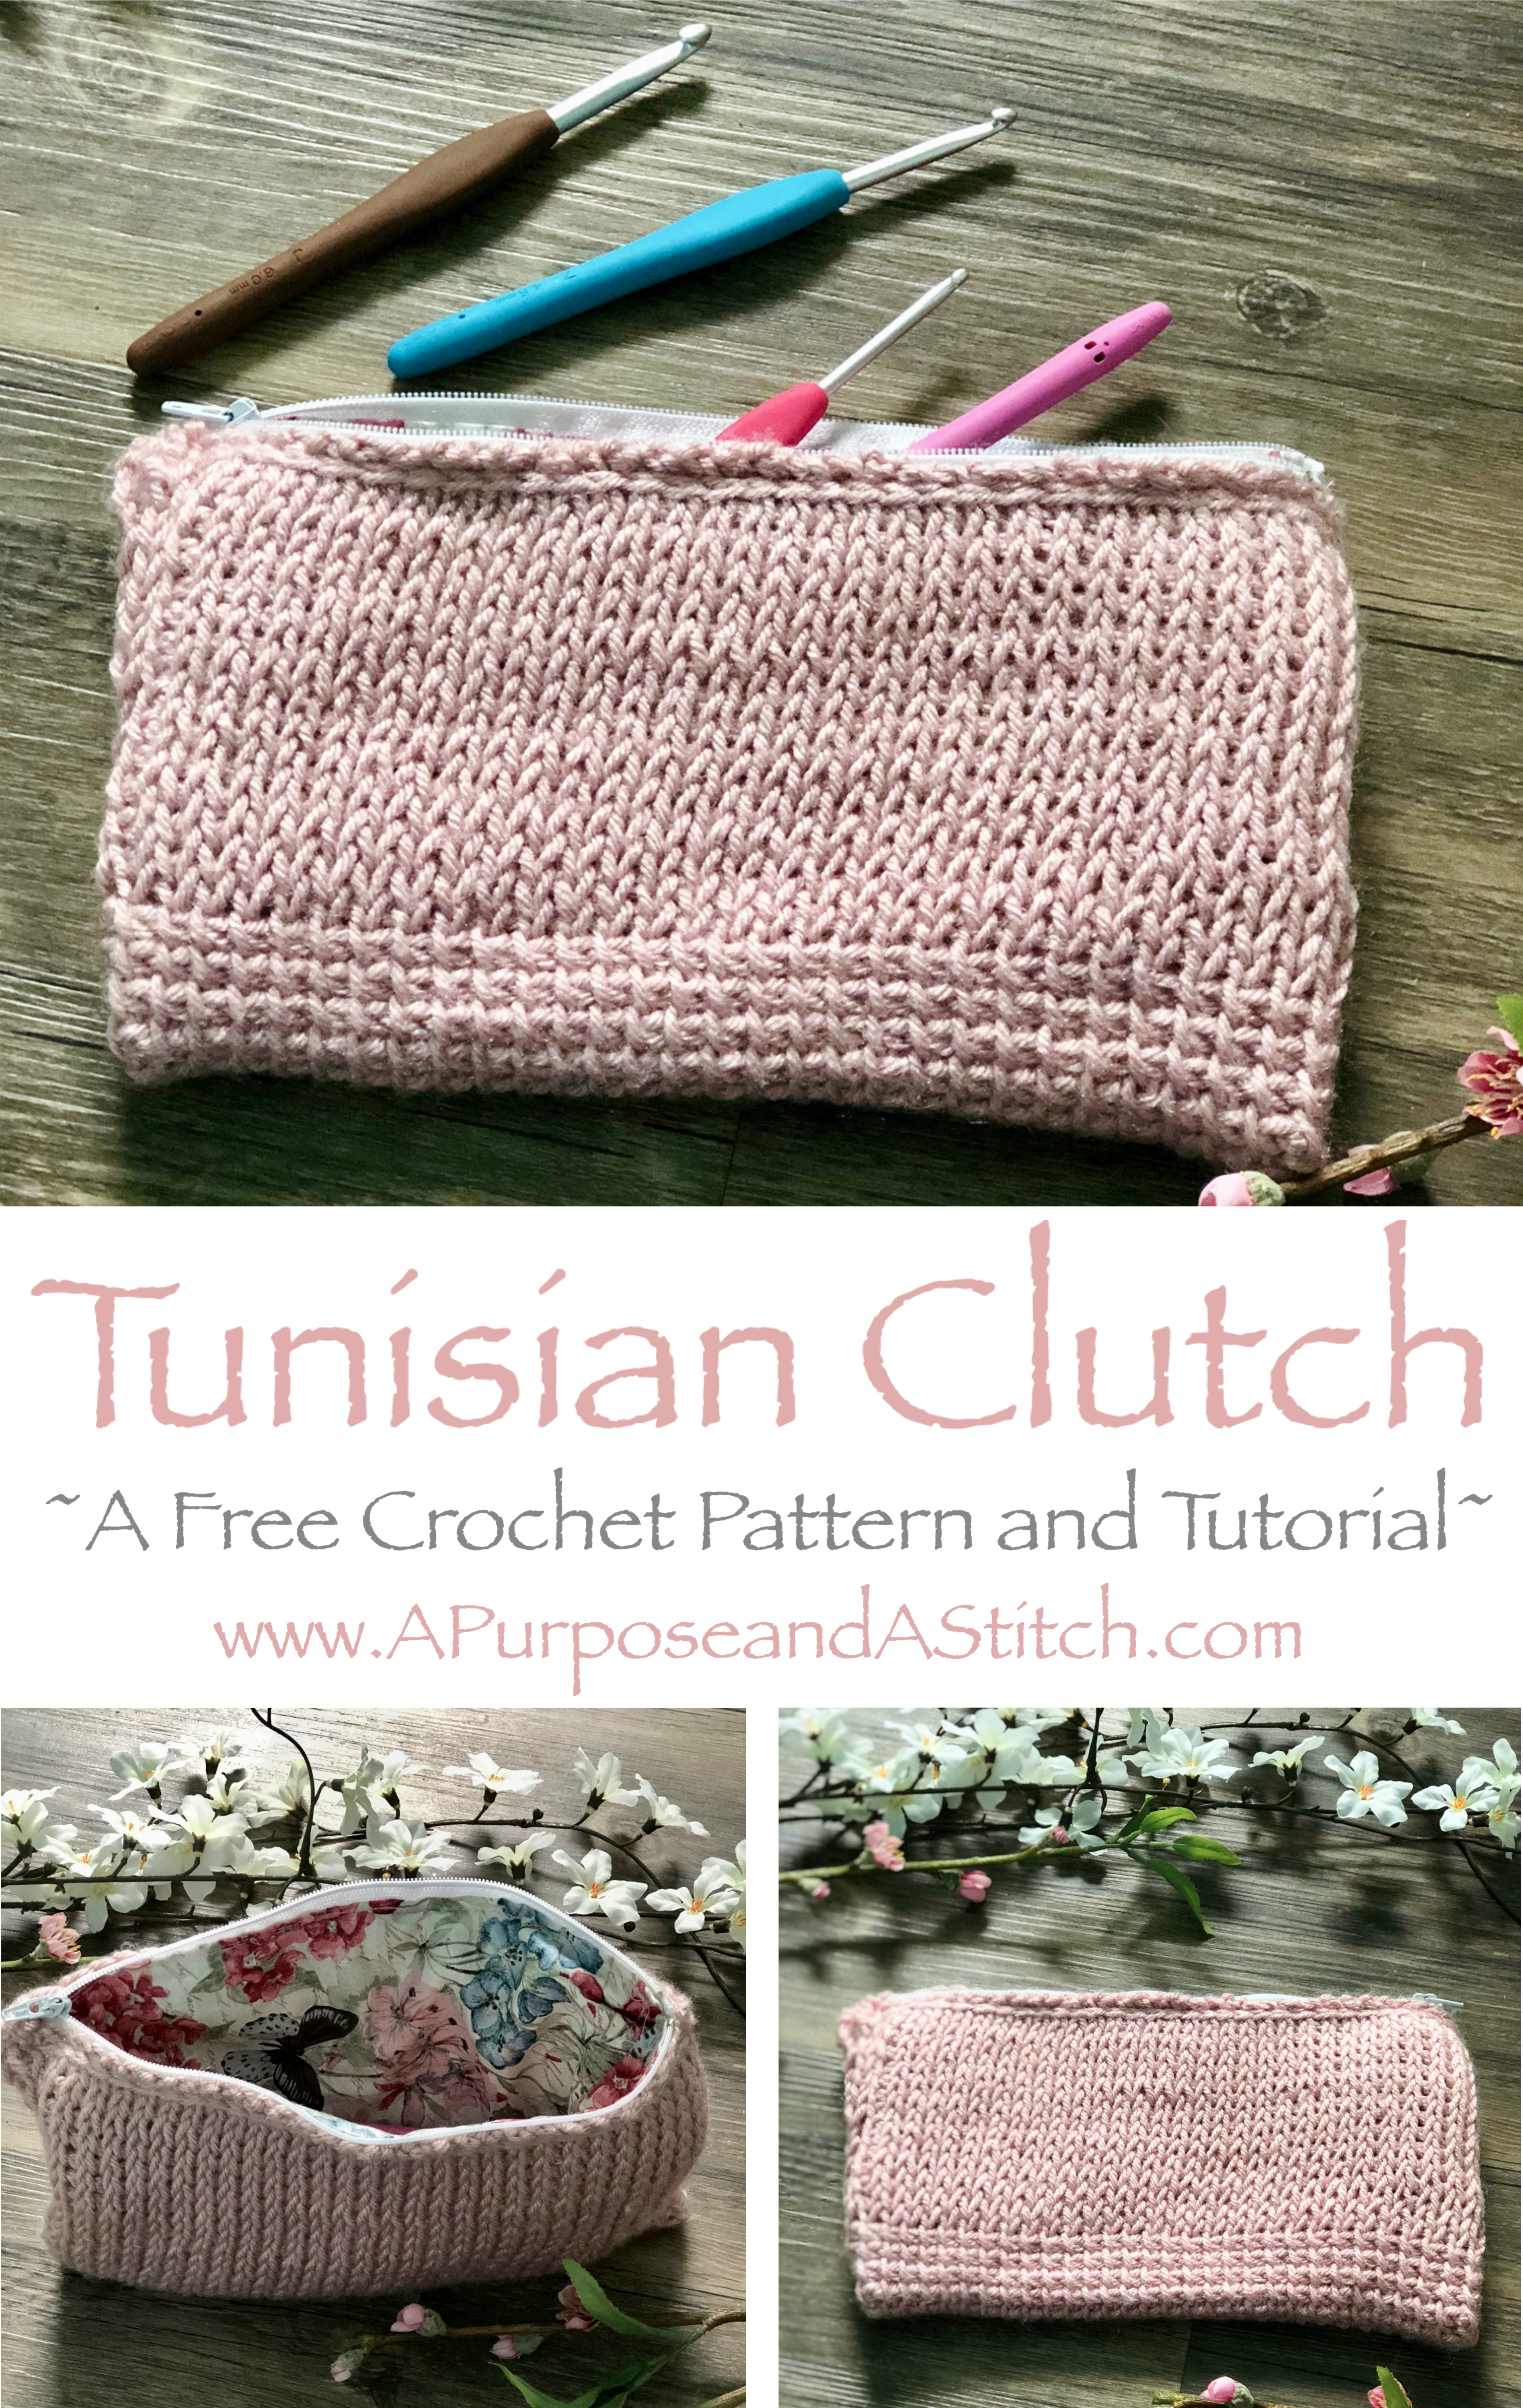
Tunisian Clutch

I first stumbled across Tunisian crochet about 2 years ago when I was looking for new crochet stitches to learn. I was immediately attracted to the clean and unique look of the simple Tunisian stitch and went out and bought a Tunisian crochet hook the very next day.
A few months ago I was trying to think of a fun pattern I could make for the summer months and quickly came to the conclusion that I wanted to make something using the Tunisian crochet technique. I’m here today to share with you the result of that brainstorming session, the Tunisian Clutch.
Tunisian crochet might seem daunting if you are unfamiliar with it, but I promise, its actually a lot easier then you might think. I once read the analogy of thinking of Tunisian crochet as the same as single crochet, but rather then doing the whole stitch at once, you do part one of the stitch in your forward pass, and part two of your stitch in your return pass.
Once you’ve got your brain set to that mindset, the only other hurdle is figuring out the placement of your hook for each stitch. Luckily, I’ve got a lot of step-by-step pictures to help walk you through it.
One other thing you should be aware of before you start, is that Tunisian Crochet has a very nasty habit of curling… like a lot. The best ways to alleviate the curl are to block and to adjust your gauge for looser stitches.
The first several rows of my clutch are worked in the Tunisian Knit Stitch. It looks almost identical to a knit stockinet stitch, but is made using your Tunisian (Afghan) hook. I love it!

To start things out, you will create a chain row the same way you would any other crochet project. Following your chain row, you will begin to pull up a row of loops onto your hook to establish the base for your Tunisian stitch rows that will follow.

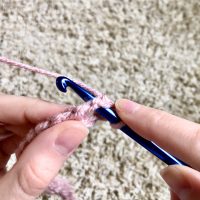
To do this, you will insert your hook into the 2nd chain from your hook, yarn over, and pull up a loop on your hook. You will repeat this method by inserting your hook into each consecutive chain and pulling up a loop across the entire chain row.
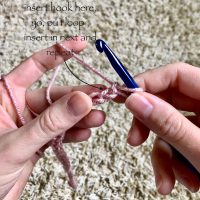


Now is when the fun begins. You will begin with a return pass to get you back to your starting point before working your first forward pass of Tunisian crochet. The return pass is worked the same for both the Tunisian Knit Stitch and the Tunisian Simple Stitch. You will begin by yarning over, and pulling your loop back through the loop closest to the end of your hook. 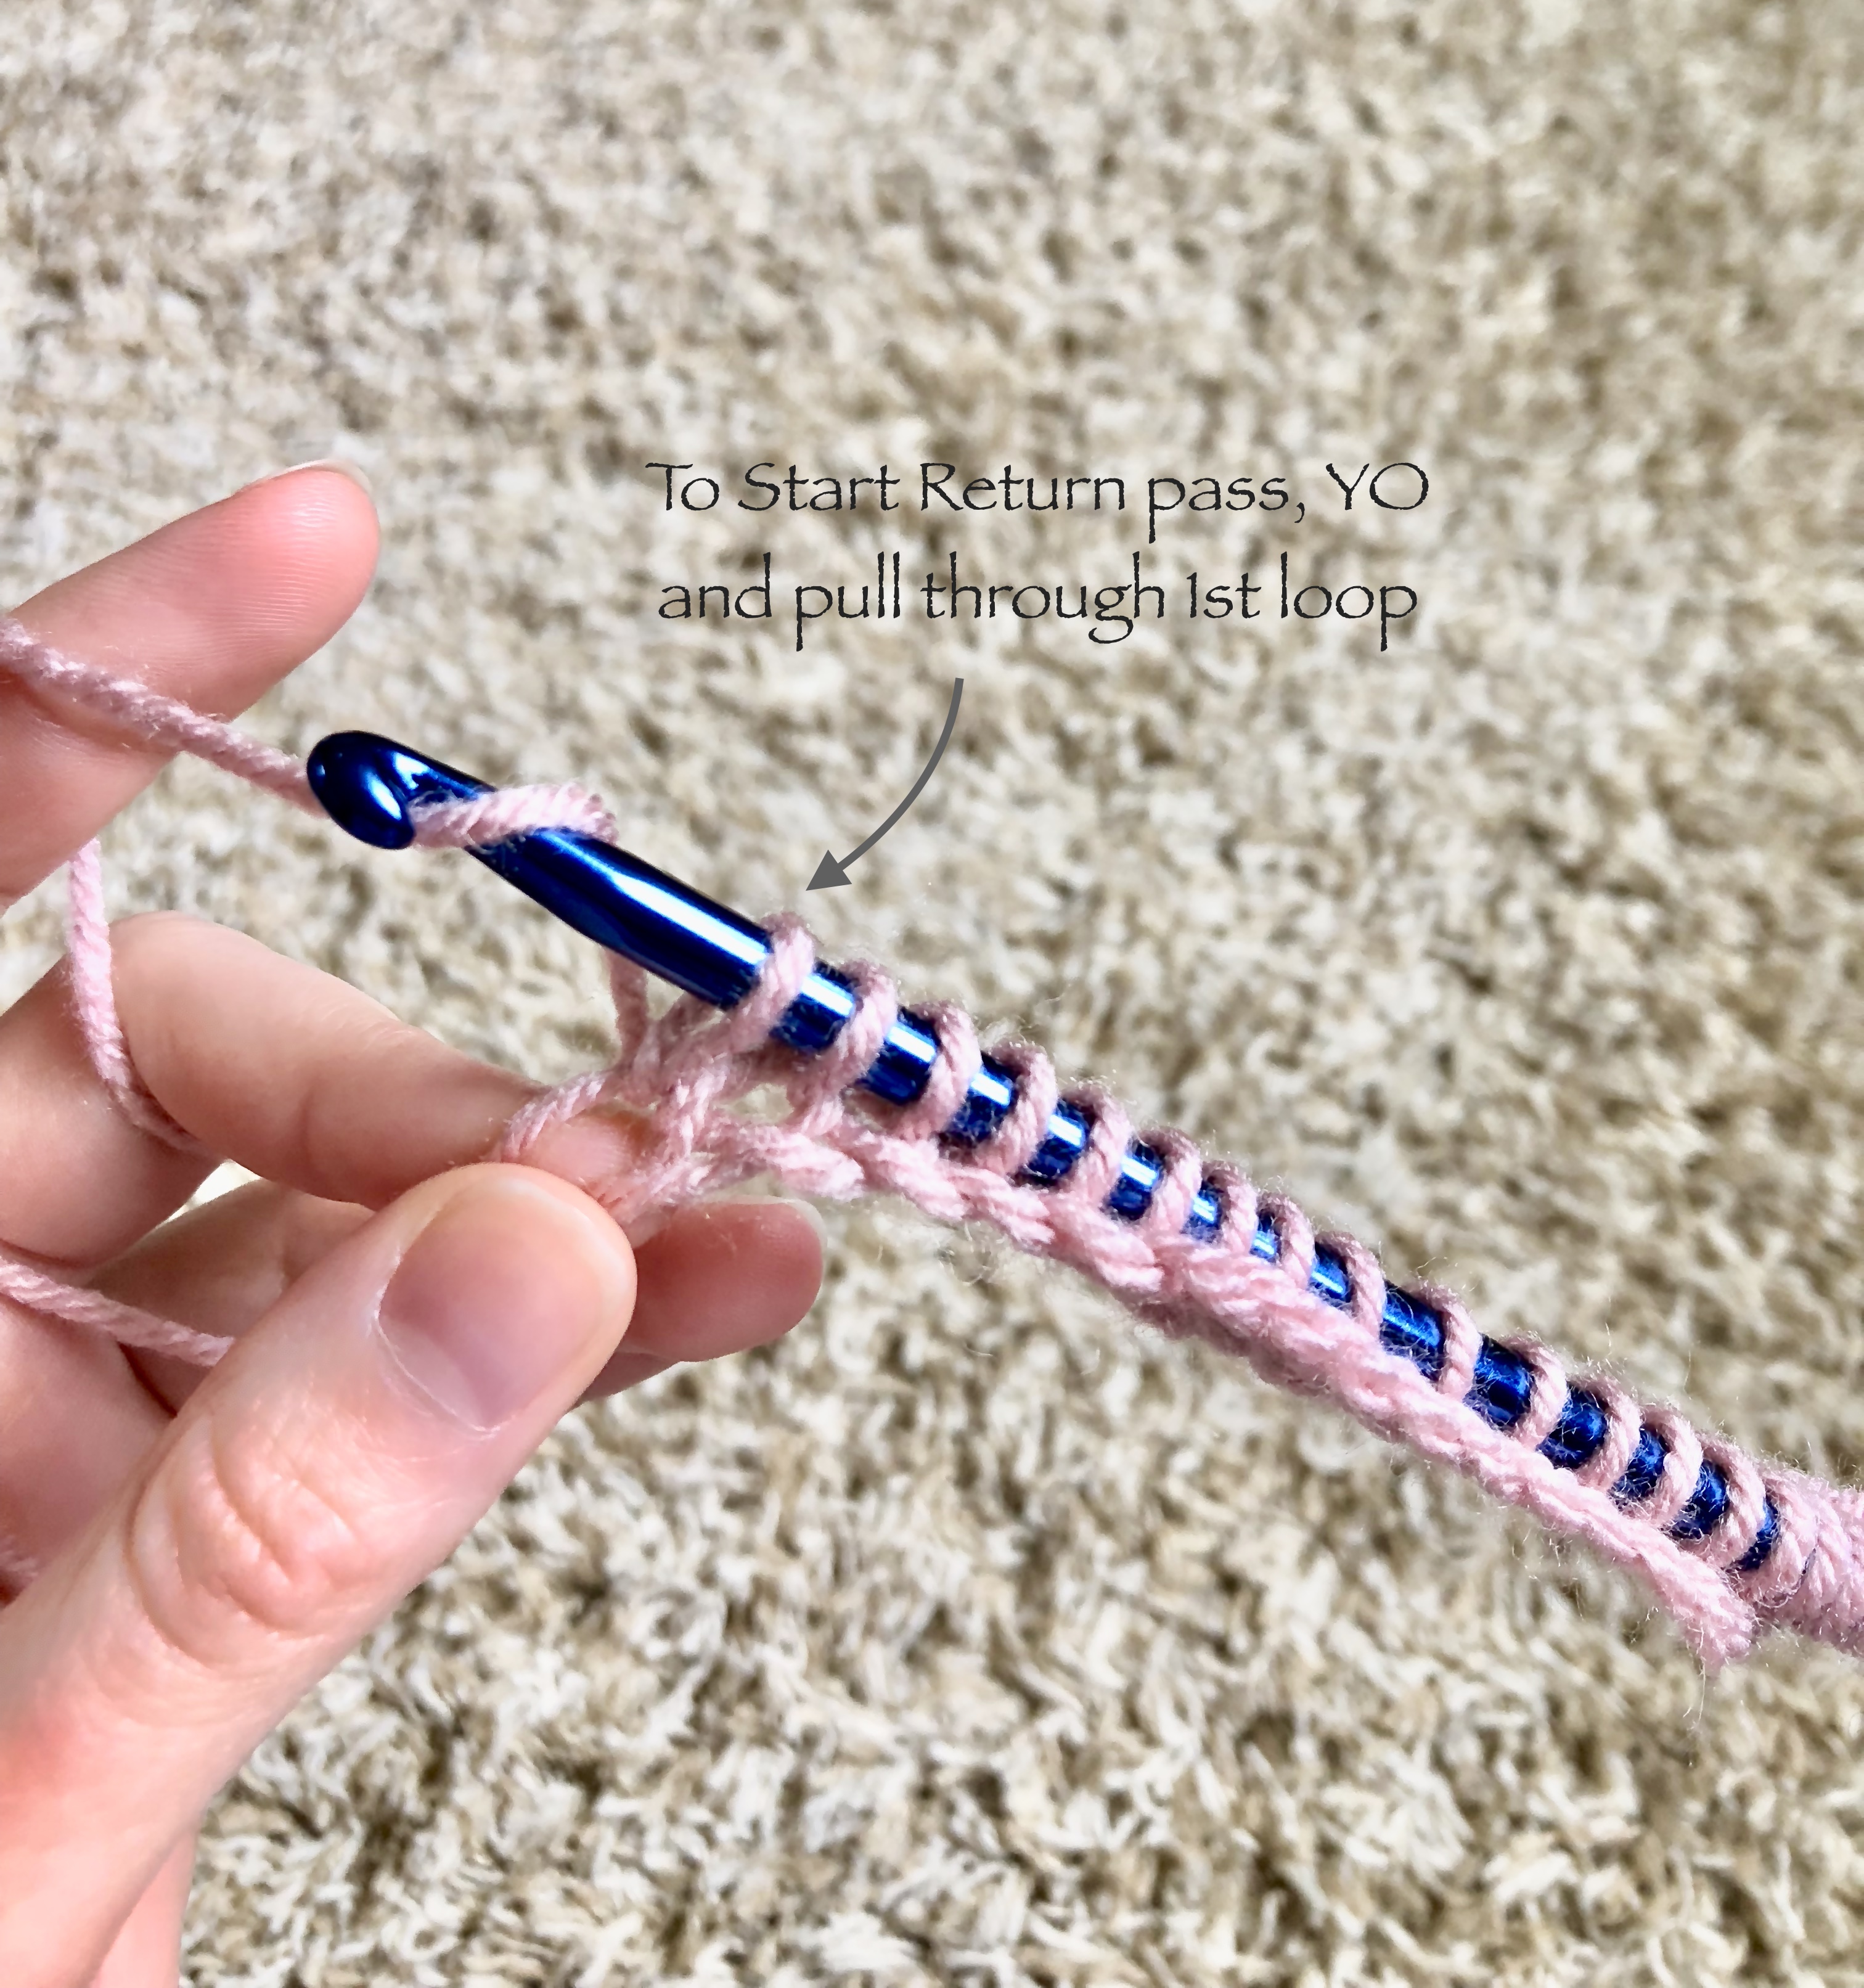
You will yarn over again and pull through the next two loops. You will continue to yarn over and pull through the next 2 loops until you reach the end of your row, leaving one loop on your hook.
Once you are back to your starting point, you will begin to work the rows of the Tunisian Knit Stitch. Each row consists of one forward pass and one return pass.
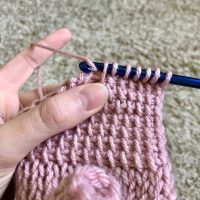
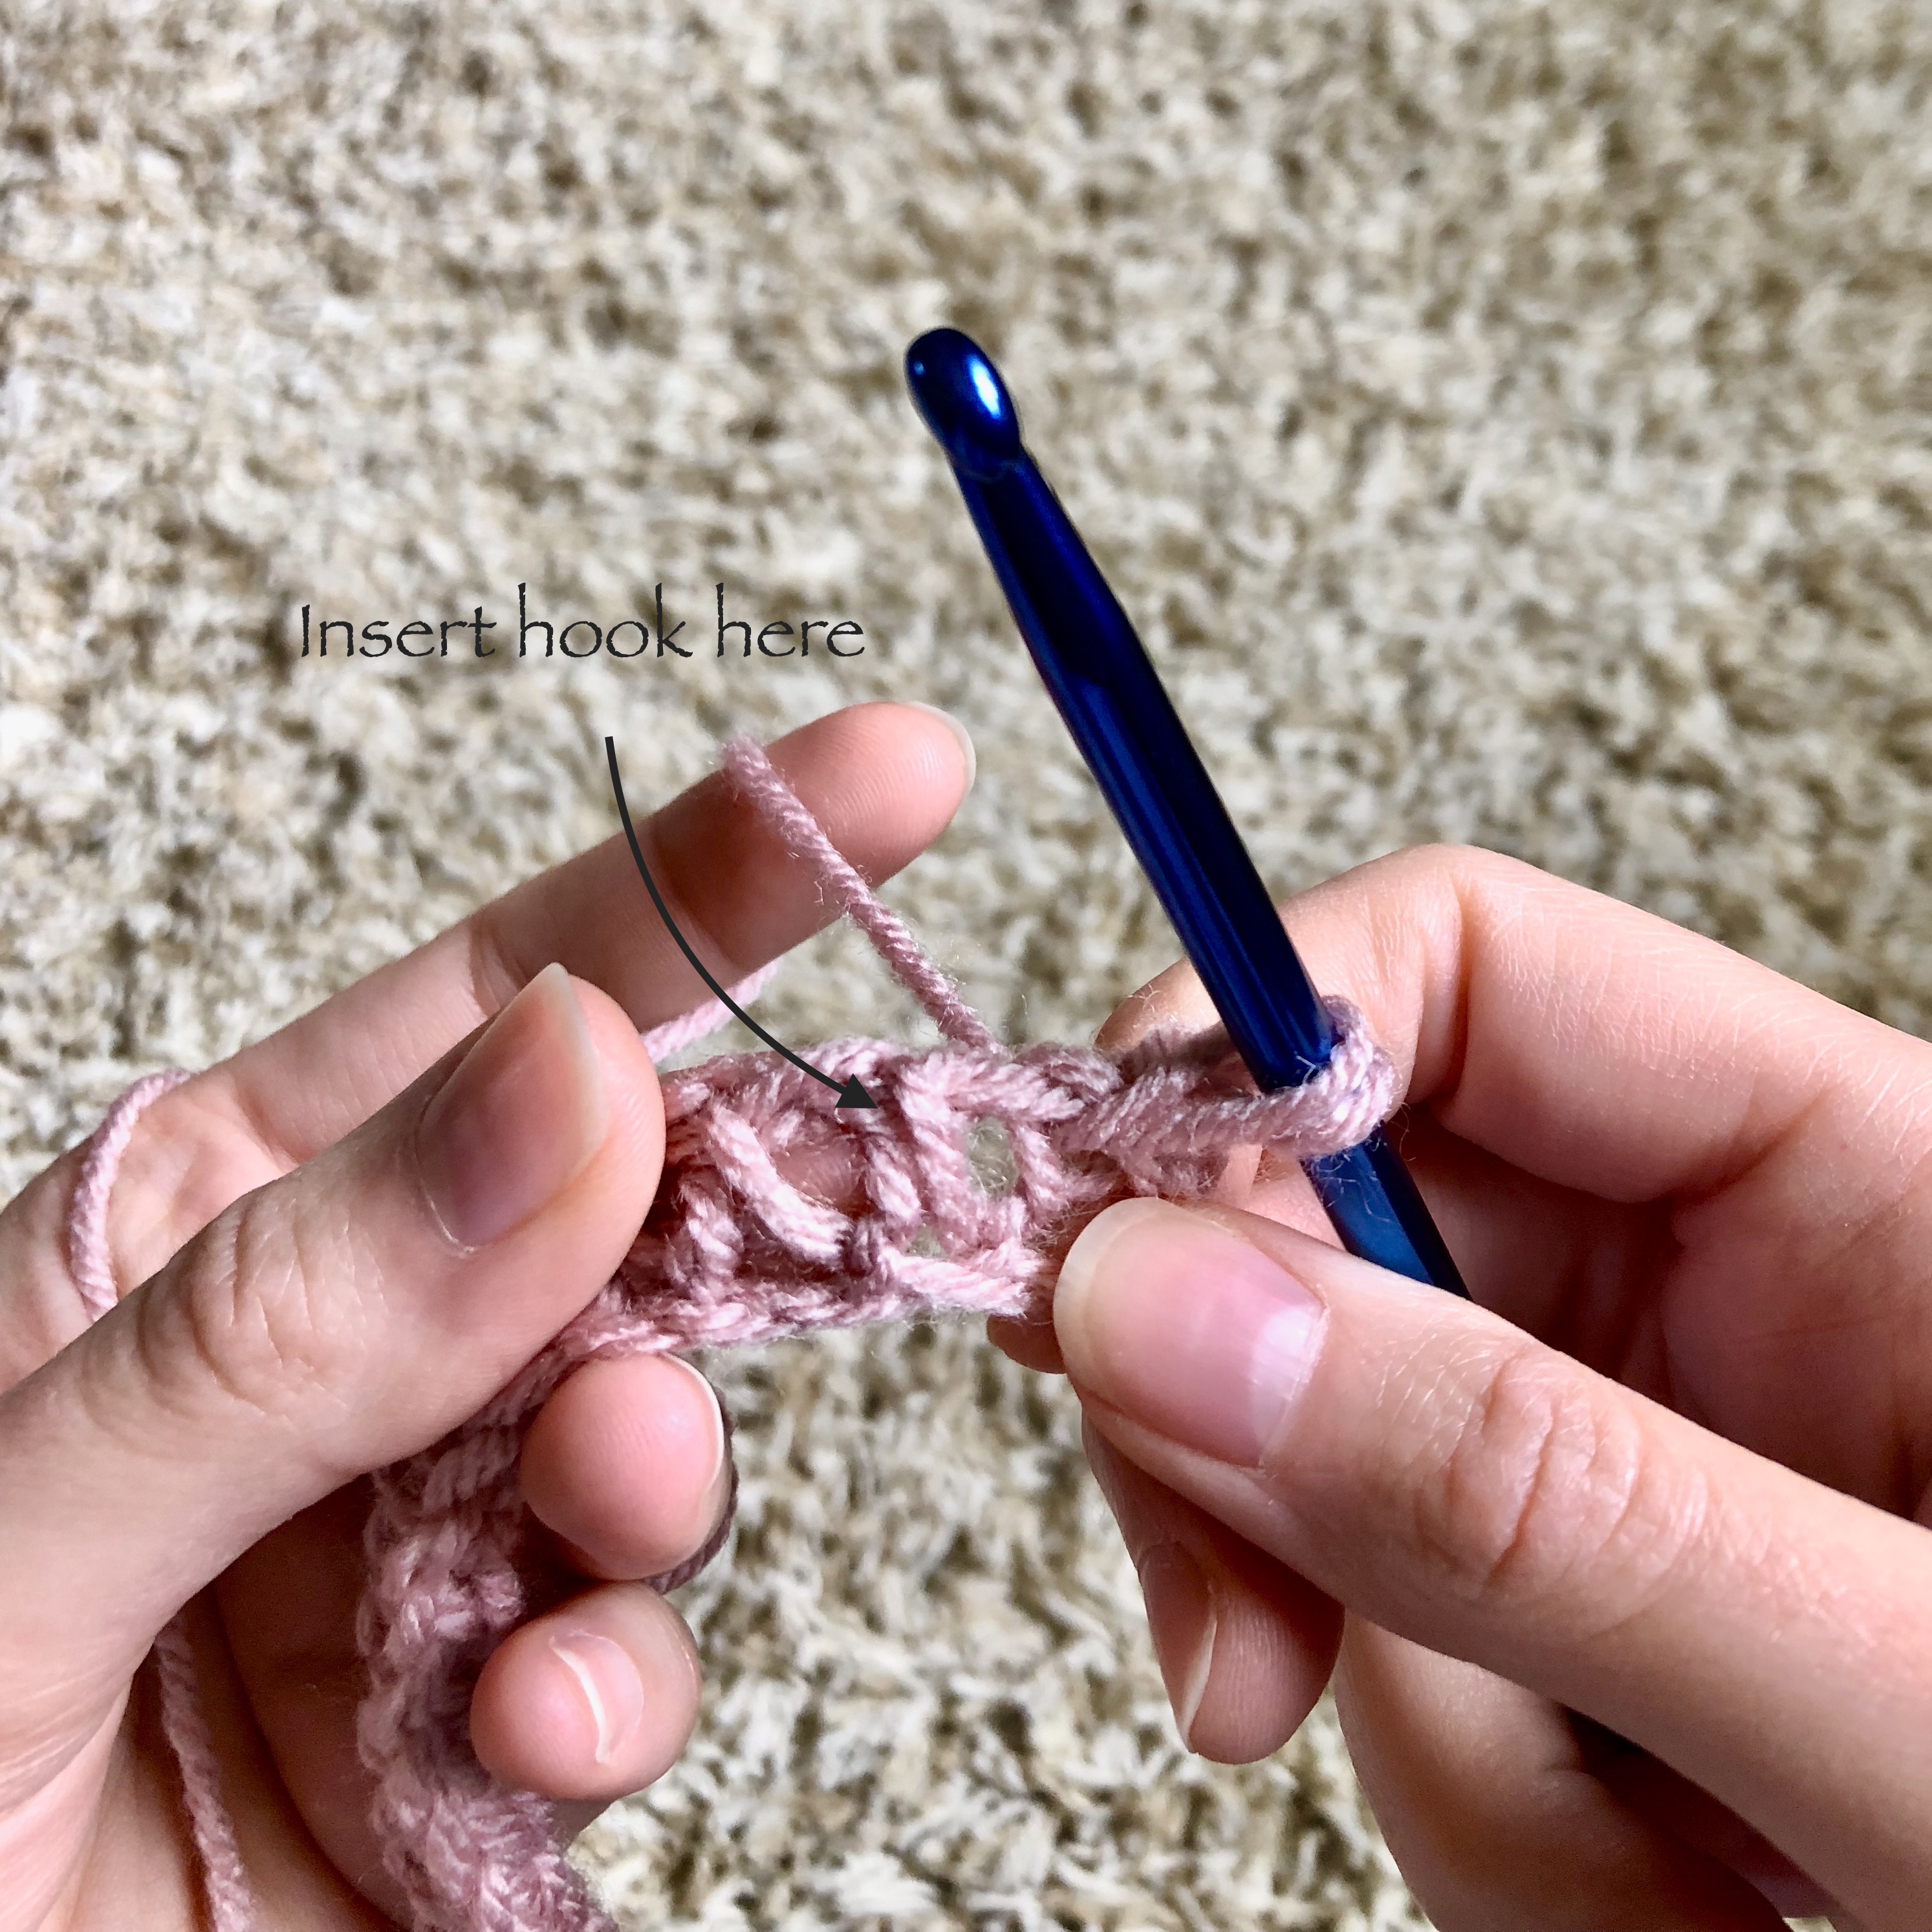
For the Tunisian Knit stitch, stitches are worked in between the 2 vertical bars created for each stitch in the return pass.
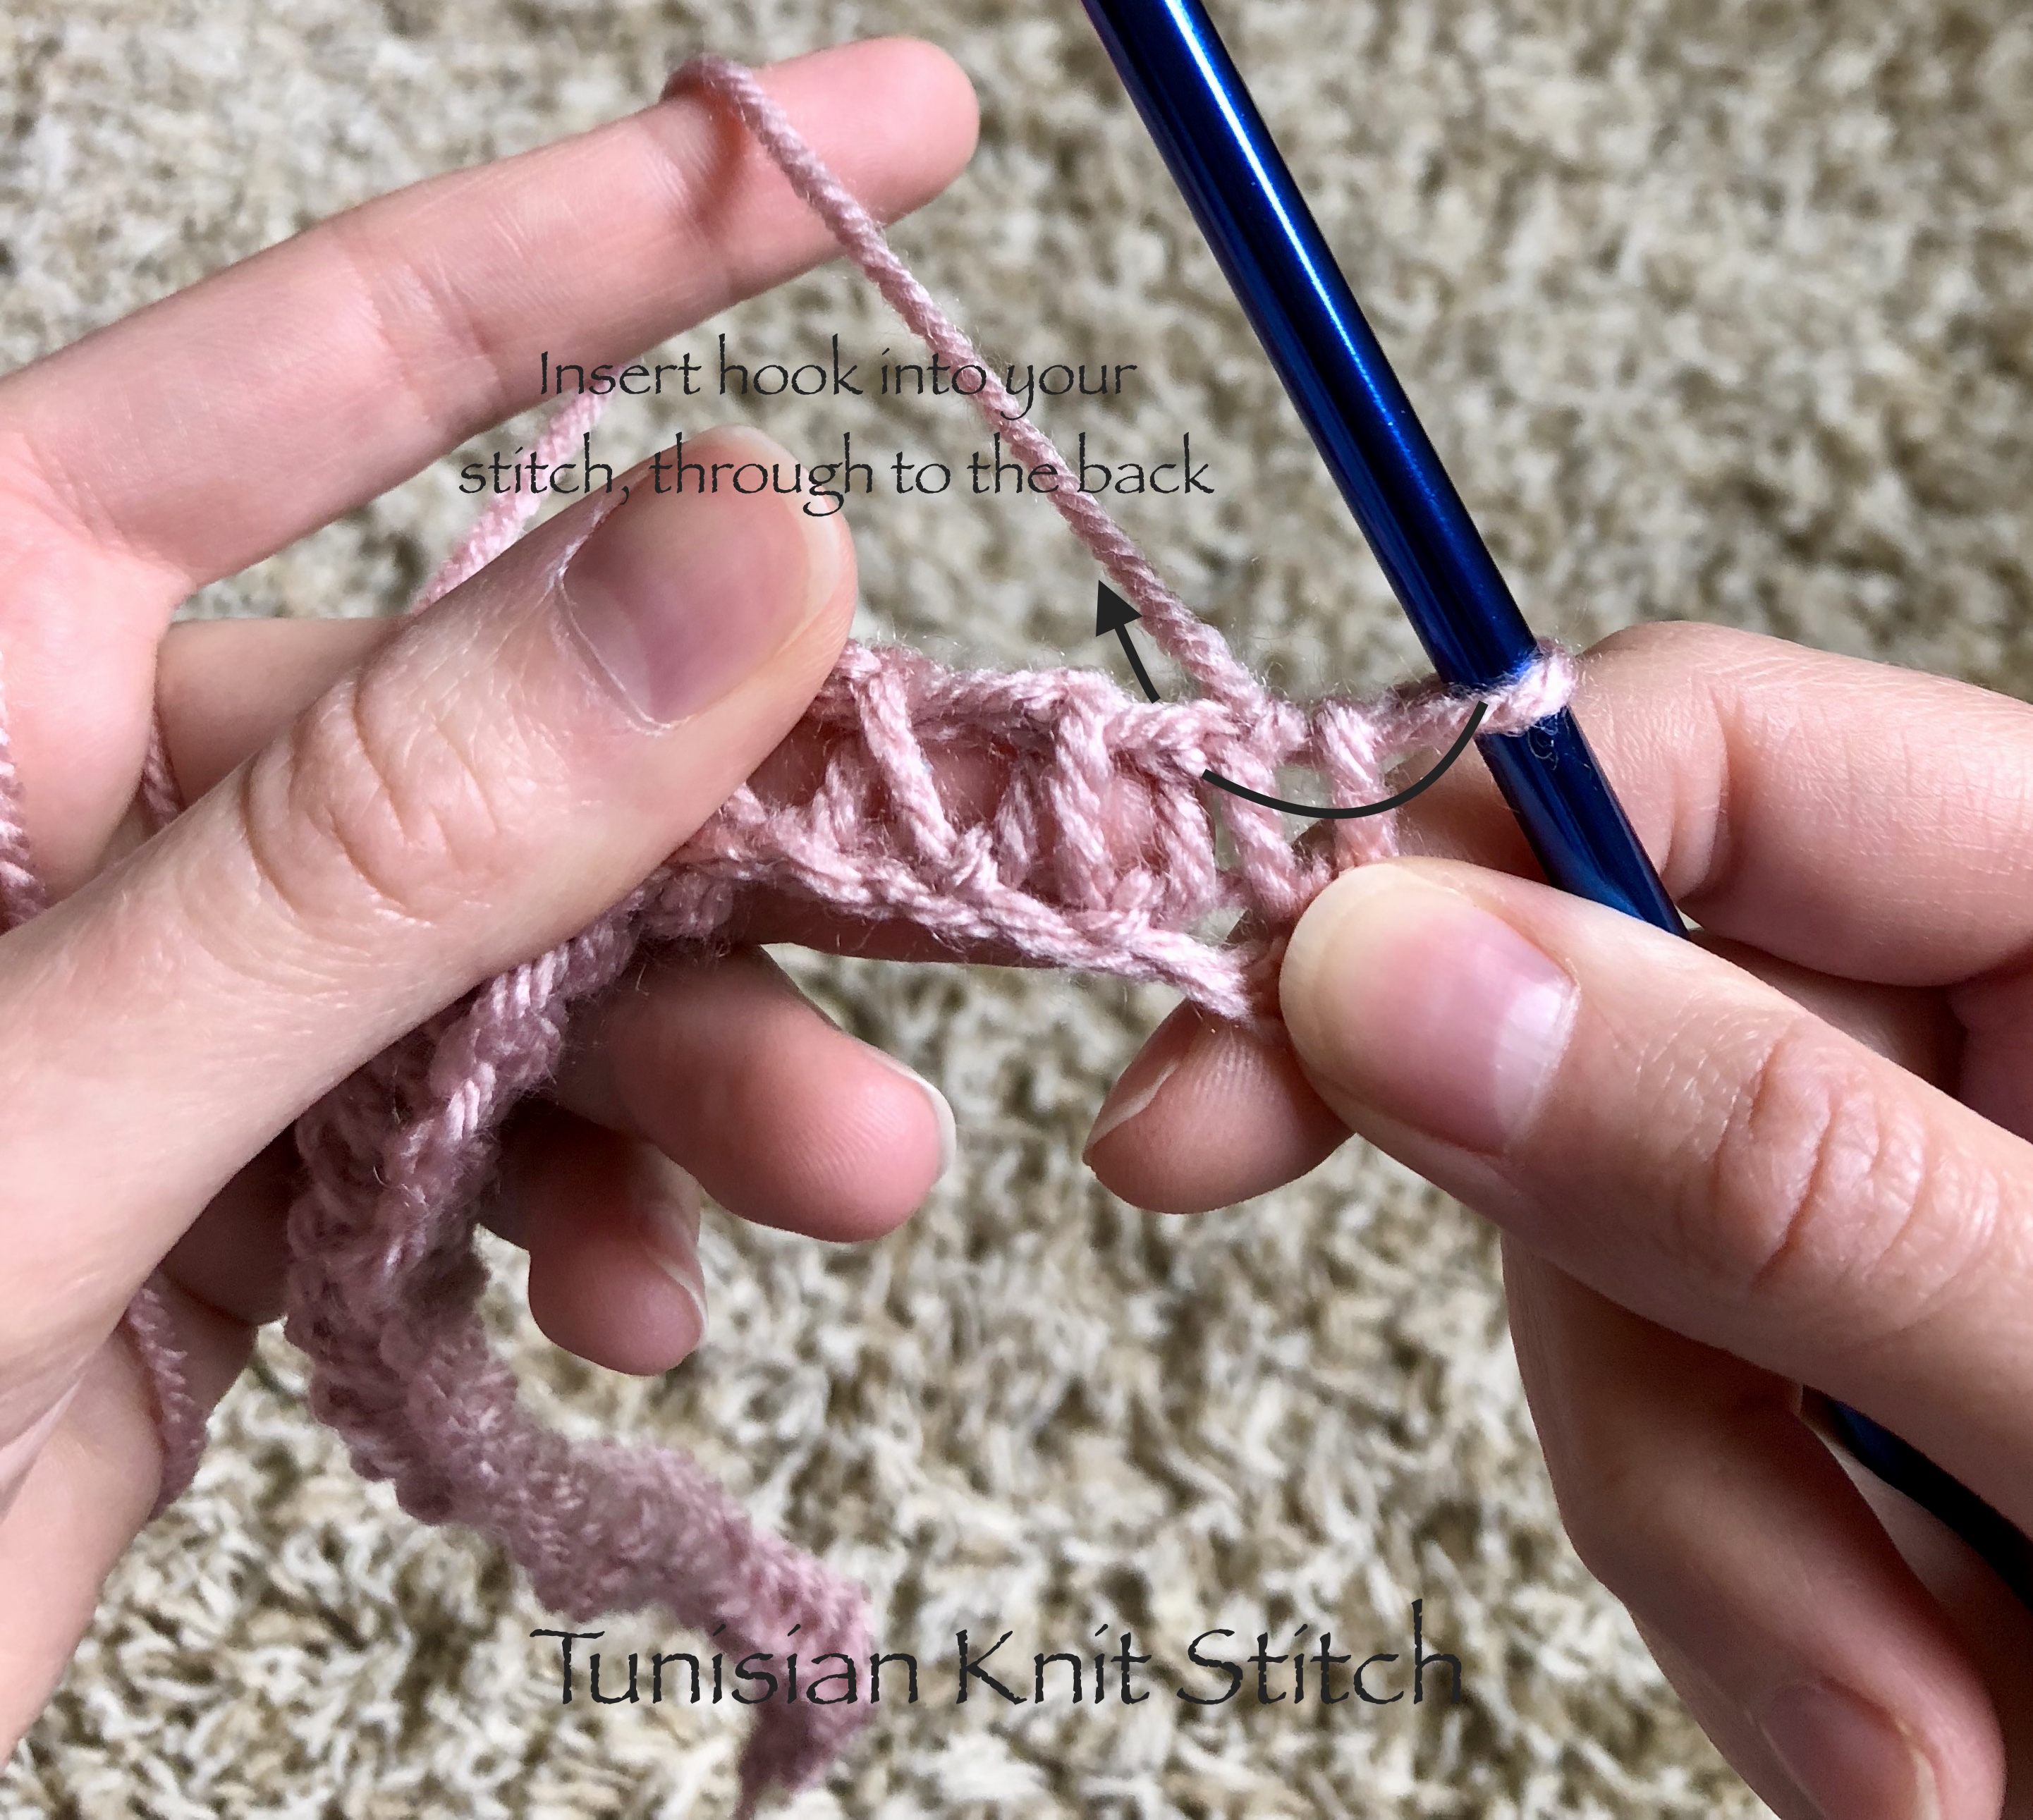
You will be inserting your hook through the two vertical bars, pushing it through to the back of your project. You will then yarn over, and pull up a loop through to the front, leaving that loop on your hook, you will repeat across the row.


When you reach the last vertical bar, you will simply insert your hook behind it and pull up the last loop onto your hook.


Now that the first Tunisian Knit Stitch forward pass is complete, you will work another return pass.You’ll repeat this process for the first section of your clutch.
I wanted the base of my clutch to have a slightly different look, so after several rows of working the Tunisian Knit Stitch, I switched gears and began to work the Tunisian Simple Stitch.
This stitch looks so unique, and crisp and clean. It was the first Tunisian stitch I learned and it still has a very special place in my heart. If you were able to grasp the Tunisian Knit Stitch, fret not, the Tunisian Simple stitch will be… well… simple. 😉
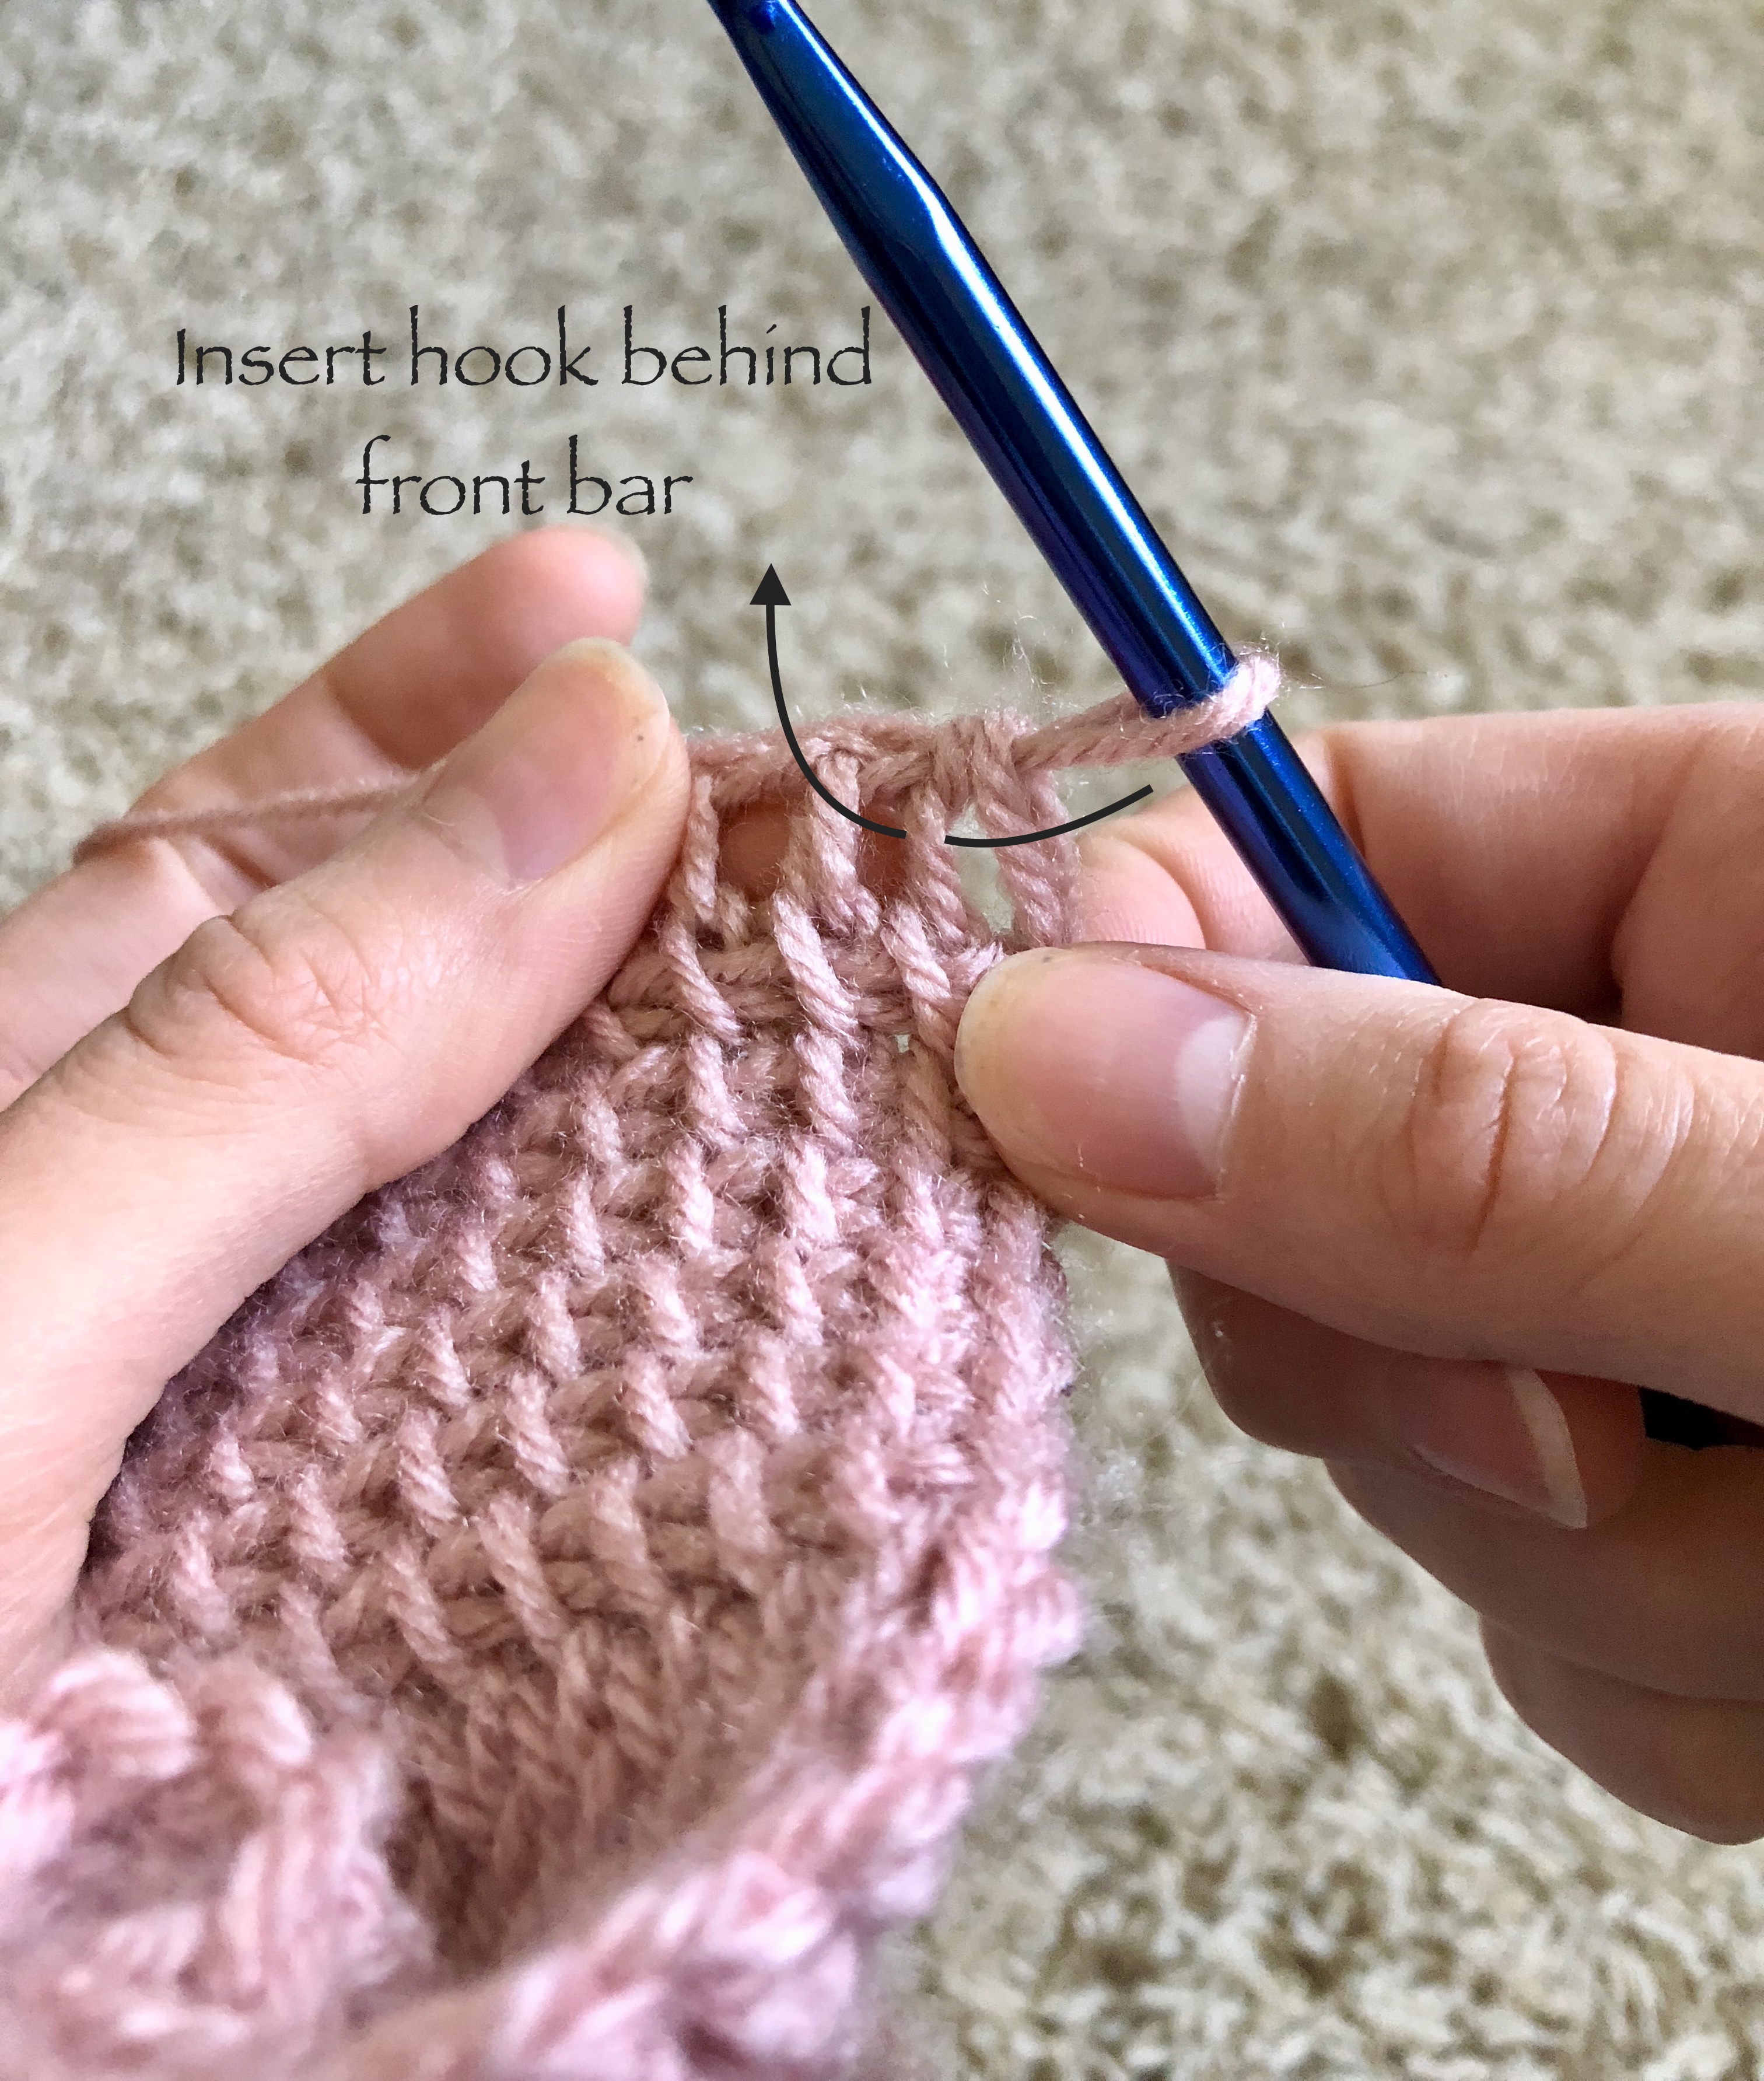
As I stated earlier, the return pass will remain the same. The only thing that changes for the Tunisian Simple Stitch, is the placement of your hook on the forward pass.
Instead of inserting between the two vertical bars, you will insert your hook behind the forward most facing bar only. Think ‘back post stitches’ in normal crochet, but around a single strand of yarn instead of an actual post.


You’ll continue to pull up loops across your row and repeat for 10 rows total. Once there is a good base of Tunisian Simple Stitch rows, you’ll be switching back to working the Tunisian Knit stitch to finish off.
Binding off in Tunisian crochet is also easier then you might think. You’ll end on a return pass, followed by a row of slip stitches across in the forward pass direction. These are worked in the same fashion you would work slip stitches for any other crochet project, once you reach the end all you have to do is fasten off.

At this point you may be noticing the curl I mentioned. That’s perfectly normal and okay, you wont even remember it was there by the time your clutch is blocked and all stitched up.
I steam blocked my piece twice. Once while it laid flat and and once folded to the shape I would later sew it in.

As you can see below, blocking will take out 99% of the curl. Yay for blocking! 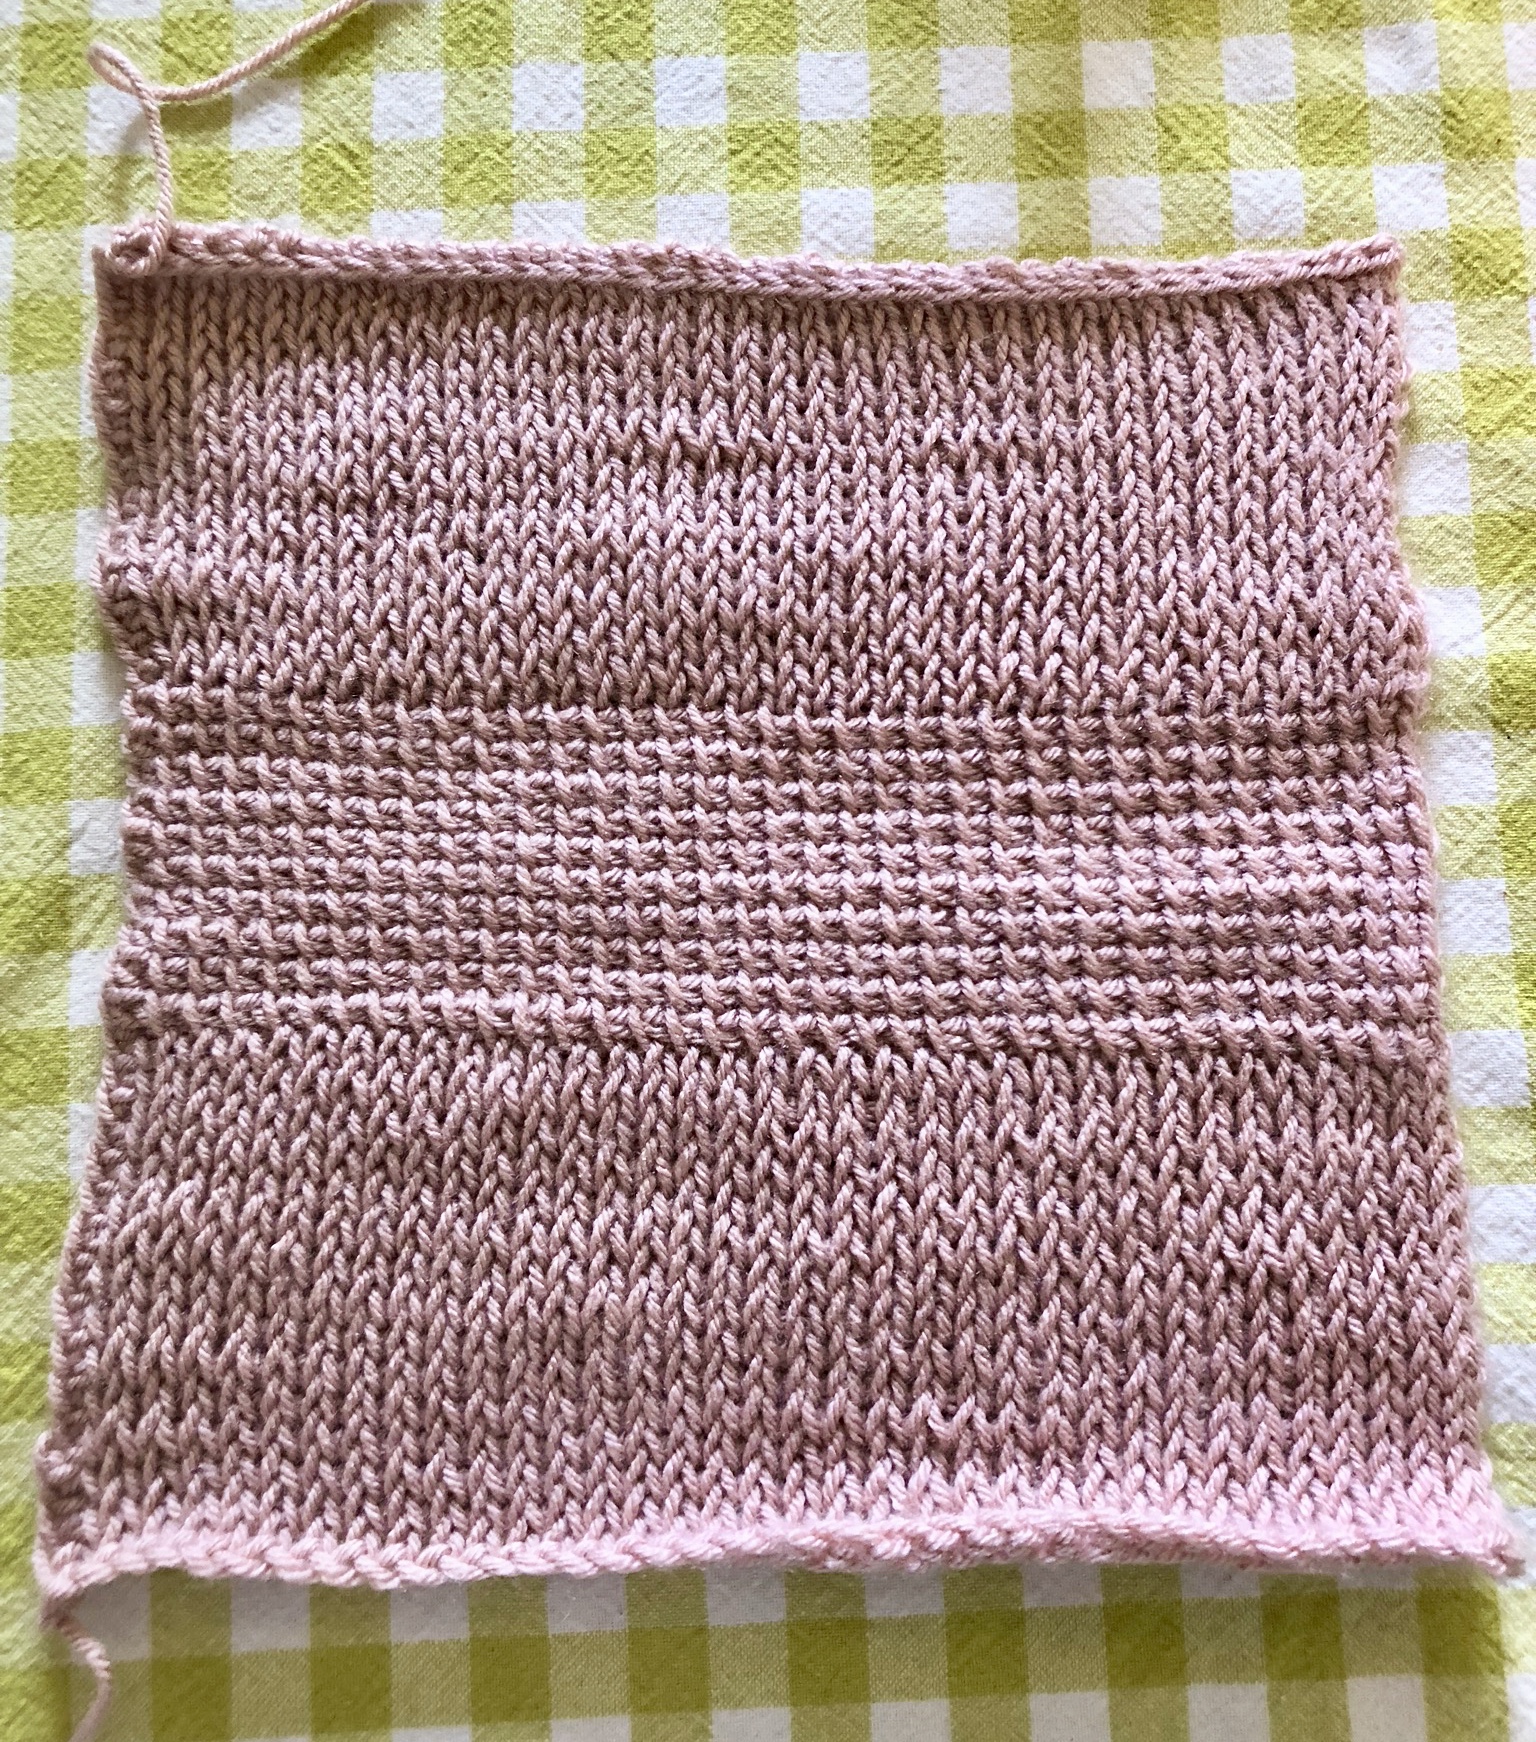
Once the base of my clutch was complete, I decided to create a fabric pouch that would fit inside and line my clutch. You can skip this step if you are not a big fan of sewing, or want to save some time, but I think it helps add some stability to the clutch and a whole lot of beauty to the inside of it! 🙂
To create the pouch, you will want a piece of fabric that measures slightly larger then your clutch. I just laid my clutch over my fabric and cut, leaving about a 1/2″ border on all sides.
From here, I recommend that you iron your fabric into place. You will be stitching the top of the pouch and the sides of the pouch, as well as a zipper along the top opening. I folded my fabric so that the right sides were facing in, ironed the top and side borders, folding down about 1/2-3/4″ on all edges.

Once it is all laying nice a flat, I began to sew using my sewing machine along the top and sides of my pouch. While sewing the top of pouch in place, I also sewed one sided of my zipper on. Make sure you sew your zipper so that the top of the zipper is laying on top of your fabric right side up.
Once my pouch was mostly complete, I stitched up the sides of my clutch using my sewing machine. You can stitch up the sides using yarn and a darning needle if you rather, but since I already had my sewing machine out, it was quicker for me to use that.
 You will want to fold your clutch in so that the wrong side is facing out before stitching up the sides. This will give a cleaner look to the sides and corners of your clutch when you turn it back right side out.
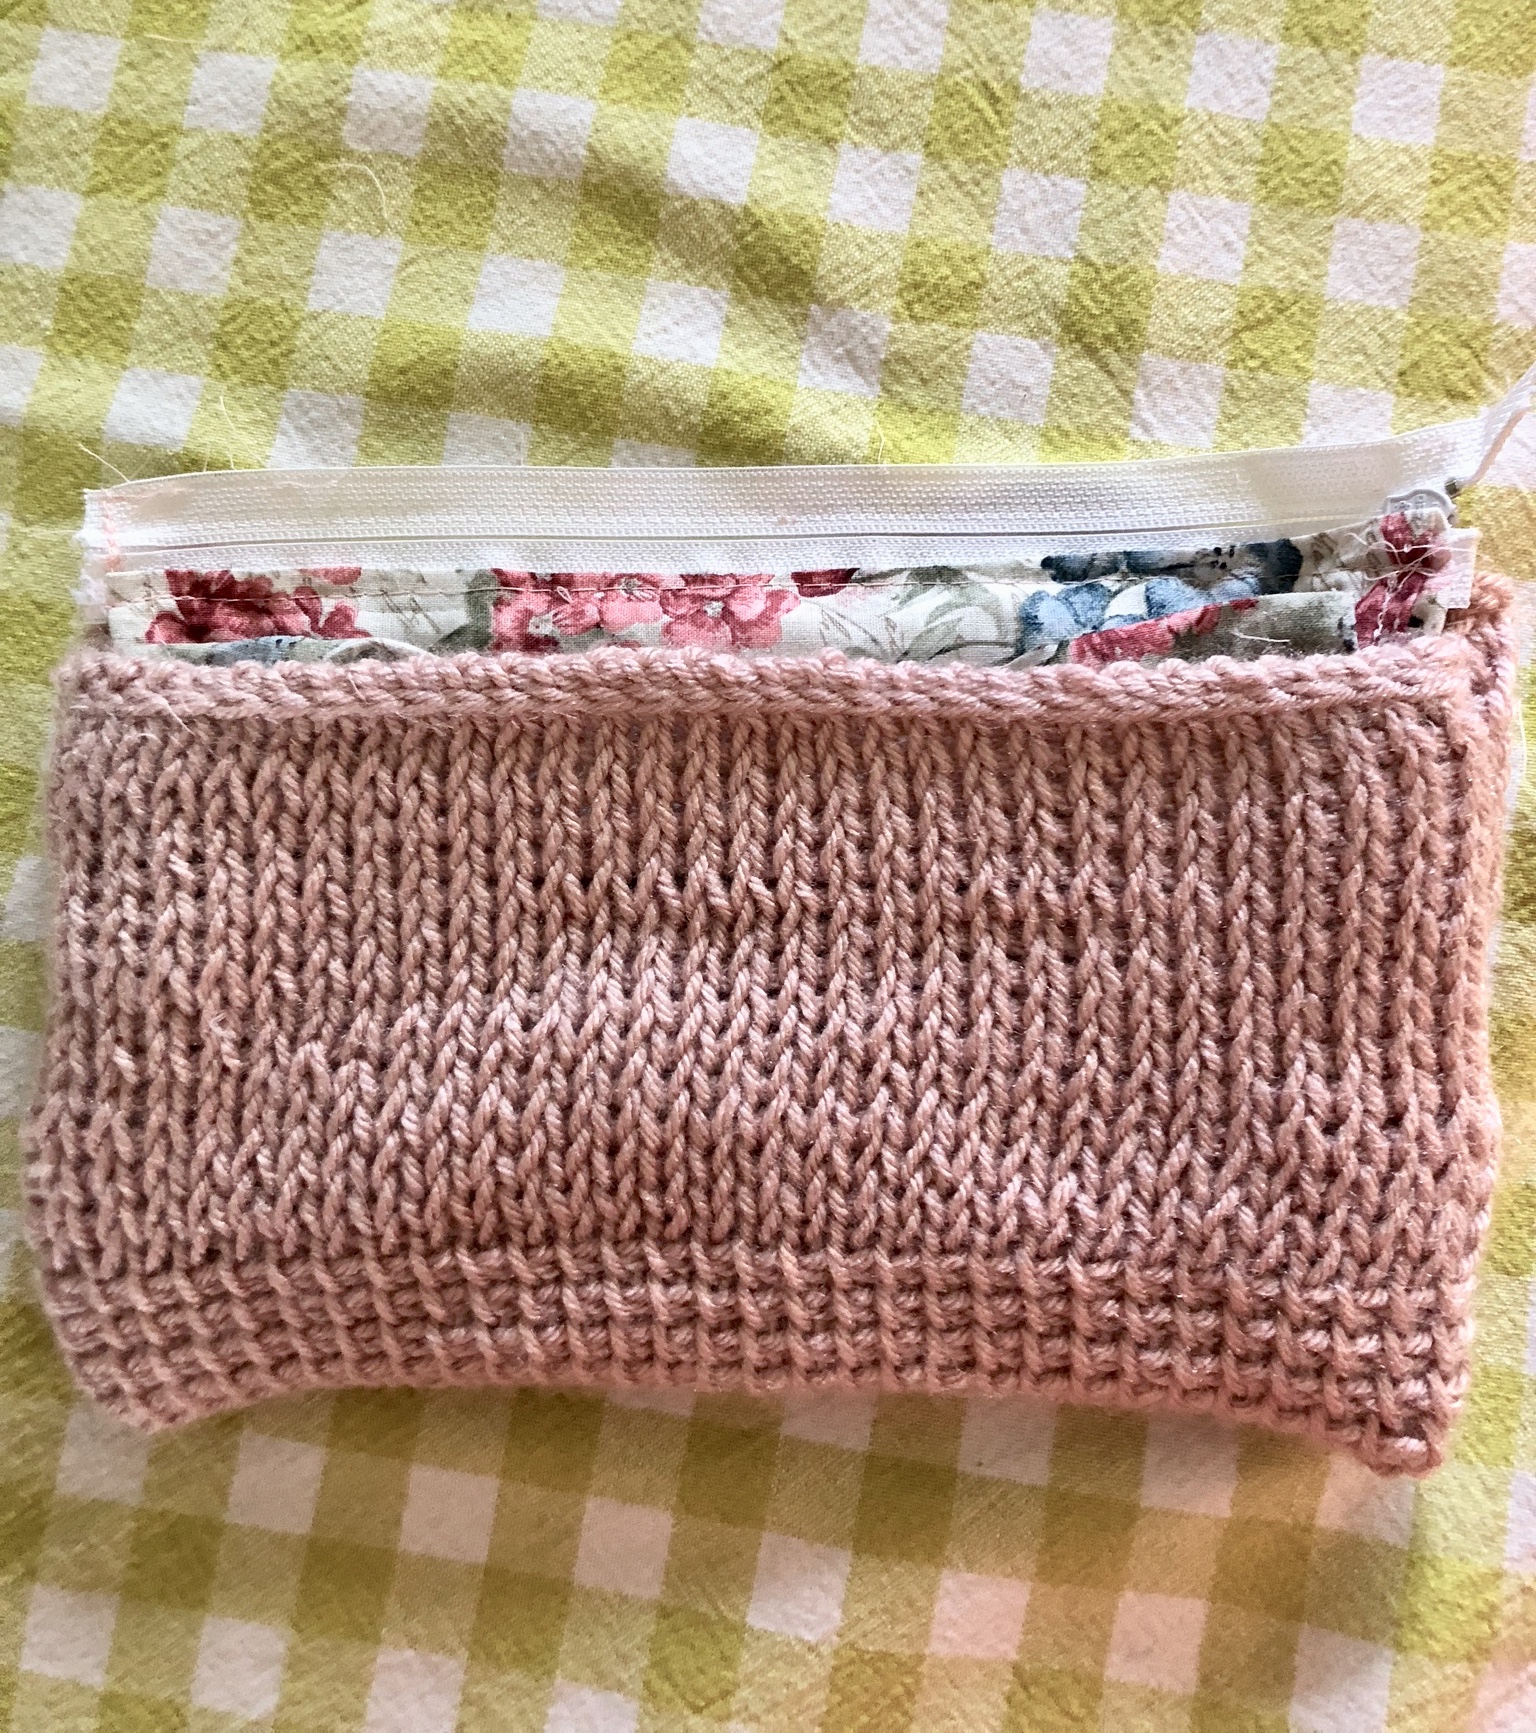 Next, I added my pouch to my clutch. I placed the pouch into the clutch (wrong side of the fabric still facing out), then hand sewed into place the other side of the zipper and top side of the fabric onto the top of my clutch. I continued to hand sew along the other side of the top of my pouch as well to make sure it was secured to the clutch on both sides of my top opening.
Once the pouch is sewed into place and the zipper secure, you’re all done! Just trim up and strangling thread and or yarn and there you have it!

A simple, elegant and unique Tunisian Clutch of your very own!


What You’ll Need
1 6.0mm (US size J) Tunisian/Afghan crochet hook
1 skein of medium worsted weight 4 yarn
1 Zipper
A piece of fabric (optional for the pouch)
Needle and thread (optional for the pouch)
Completed Measurements
9″ wide
5″ tall
Gauge
12 TKS =4″
16 rows =4″
Abbreviations Used
ch= Chain
yo= Yarn Over
pu= Pull Up
RetP= Return Pass
FwdP= Forward Pass
ss= Slip Stitch
st= Stitch
fo= Fasten Off
Special Stitches
Tunisian Knit Stitch (TKS)
Return Pass (RetP): YO, pull through 1st loop on hook. *YO, pull through next 2 loops on hook. Repeat from * across, ending with one loop on your hook.
Forward Pass (FwdP): skipping the first two (front and back) vertical bars, *insert hook in between the next 2 vertical bars, pushing your hook through to the back of your work. Yarn over, pull up a loop through to the front of your work as you go. Leaving the loop on your hook*, repeat from * across, to the end of your row.
Tunisian Simple Stitch (TSS)
Return Pass (RetP): YO, pull through 1st loop on hook. *YO, pull through next 2 loops on hook. Repeat from * across, ending with one loop on your hook.
Forward Pass (FwdP): *insert your hook behind the next front vertical bar (ignoring the back vertical bar) through to the other side, staying in front of your work. Yarn over and pull up one loop. Leaving the loop on your hook*, repeat from * across to the end of your row.
Pattern
Foundation: Ch 35, insert your hook into 2nd ch from your hook, yo, pu a loop, leaving that loop on your hook, *insert your hook into the next ch, yo, pu a loop, leaving the loop on your hook* repeat from * across the row, work one RetP
Row 1-15: beginning TKS, RetP across (35)
Row 16-25: beginning TSS, RetP across (35)
Row 26-40: beginning with TKS, RetP across (35)
Row 41: bind off by ss using the TKS method. (you will still be inserting your hook into the same space, but rather then gathering loops as you go, you will ss in each st across, fo. (35)
Assembly
Block your rectangle before proceeding. This will help to get the infamous Tunisian crochet curl out (I used a steam block method).
Once your piece is blocked, measure and cut a rectangle piece of fabric that has about a 1/2″ border on all sides of your crocheted piece.
Fold your rectangle in half with right sides facing in towards each other and the wrong side facing you. The TSS rows should be at the base of your fold. Stitch up the sides using whichever method you prefer (since I already had my sewing machine out, I just sewed up the sides. You can stitch up using yarn or sew by hand if you prefer).
To make your pouch
With the wrong side of the fabric facing you, fold about 1/2″-3/4″ of fabric down on both sides and the top so that the right side of the fabric for that folded area is now facing you. Iron and or pin in place before sewing. Fold fabric in half with right sides facing in. Sew one side of your zipper to one side of the top of your pouch so that the zipper is laying on top of the fabric, and the zipper is facing you. Sew along the sides of the pouch. Place your pouch into your clutch and hand sew the top of the pouch to the top of the clutch on either side of the opening. While sewing on the side that does not yet have the zipper attached, sew the zipper and fabric in place as you go.
Your Clutch is now complete! Enjoy!
Love this! I started with Tunisian crochet before jumping into regular. I still enjoy doing it very much.
Oh yay! Tunisian is so much fun! And I love how pretty and neat the stitches look. More Tunisian patterns are in the work 😁