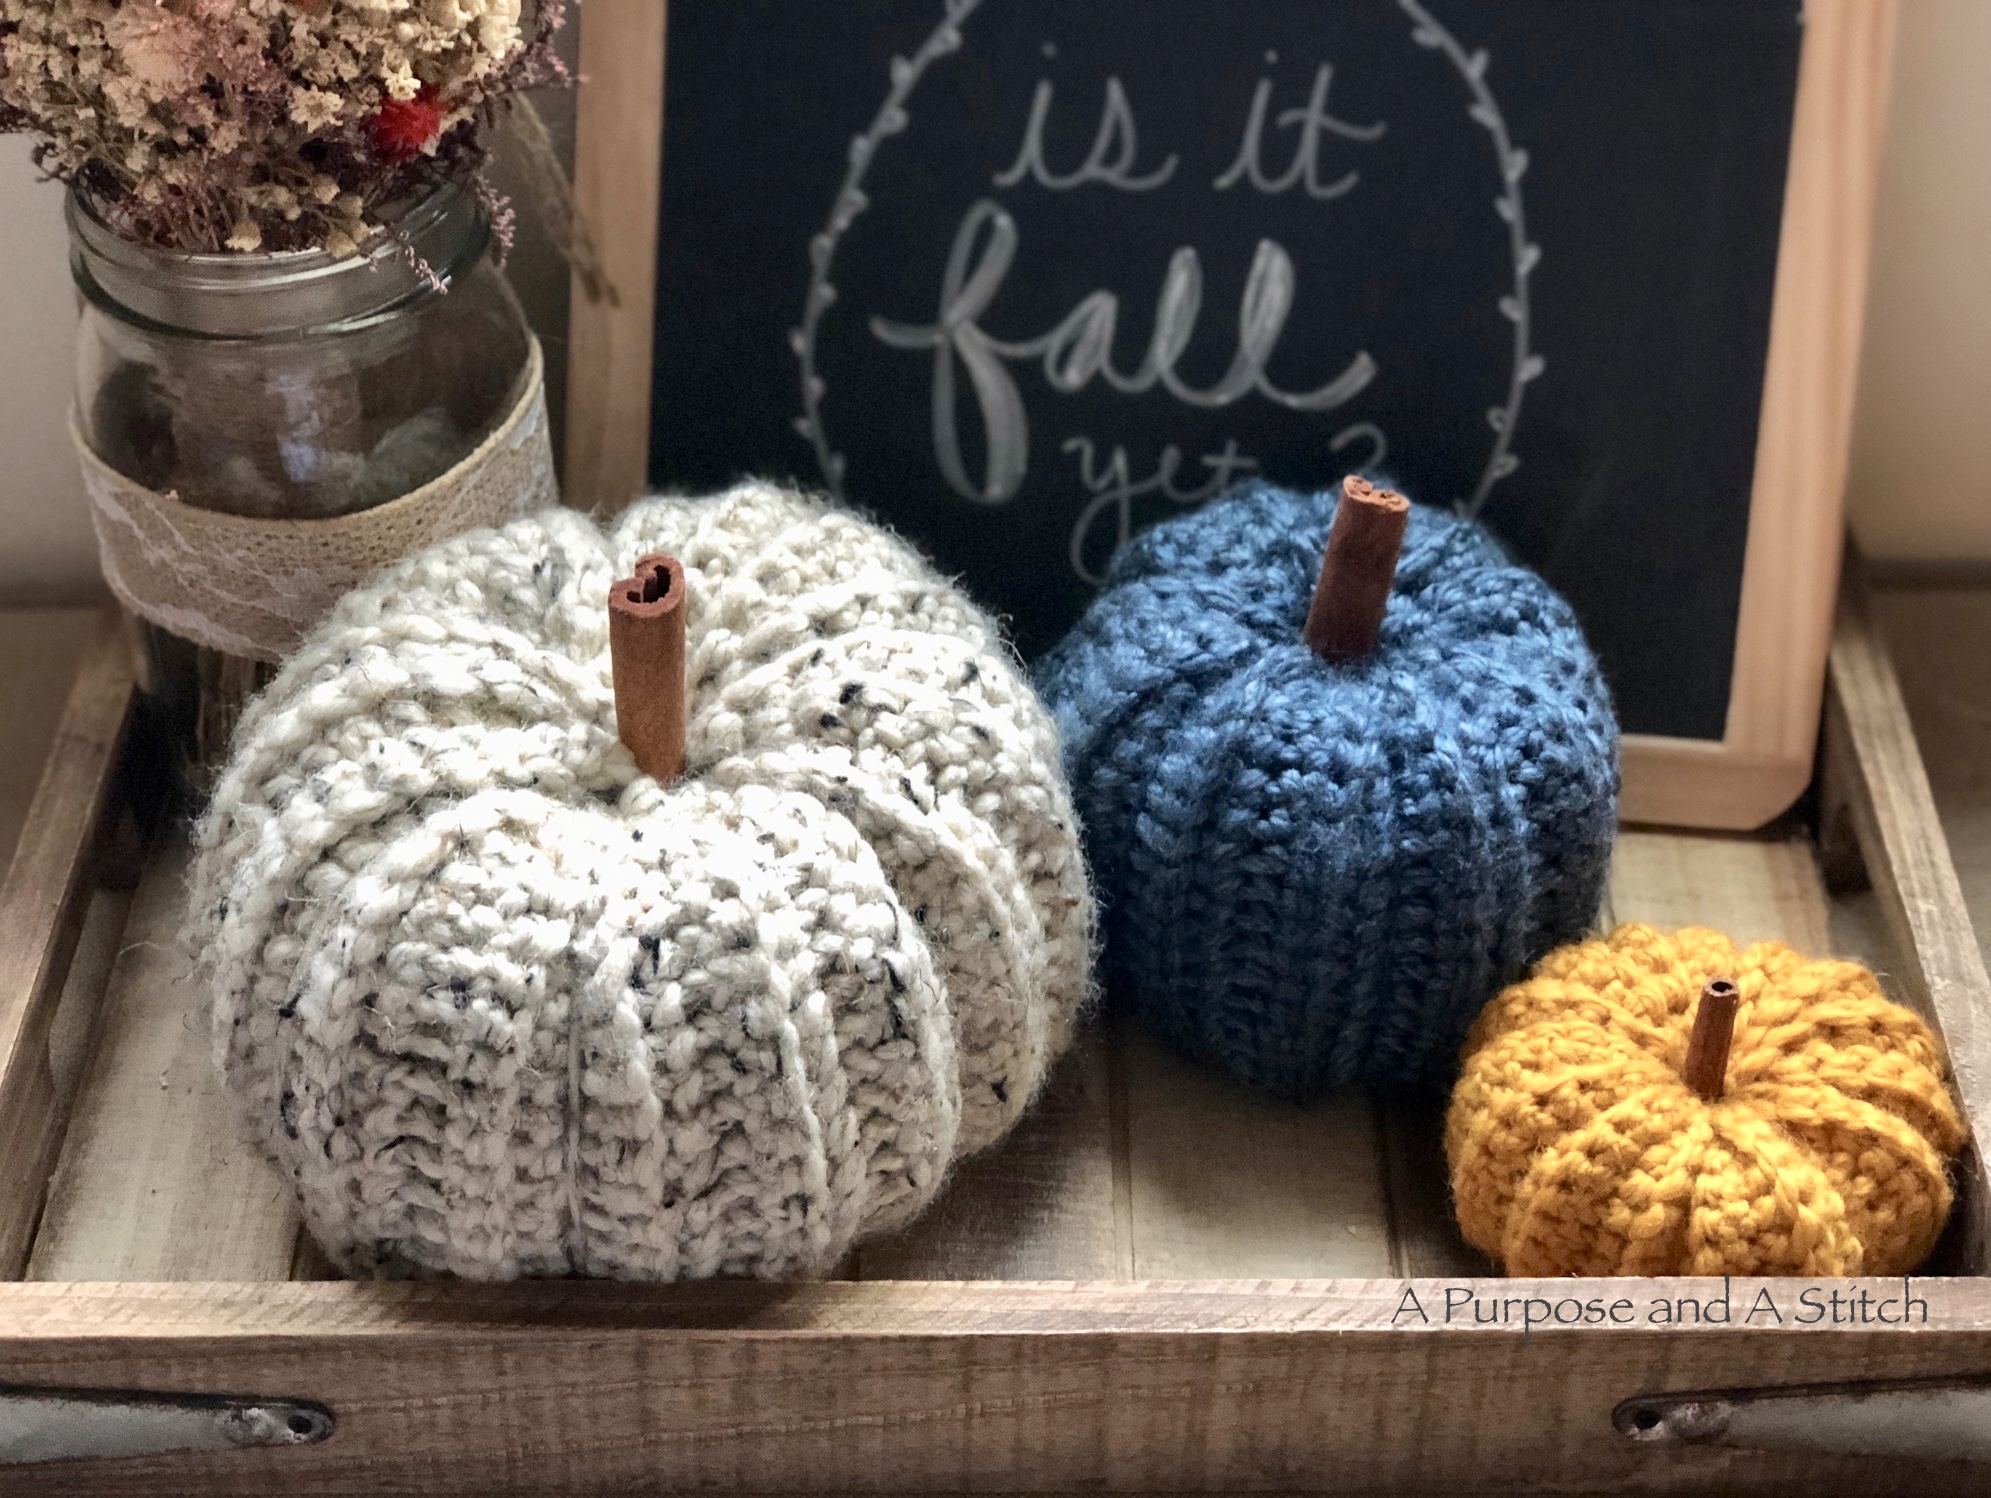
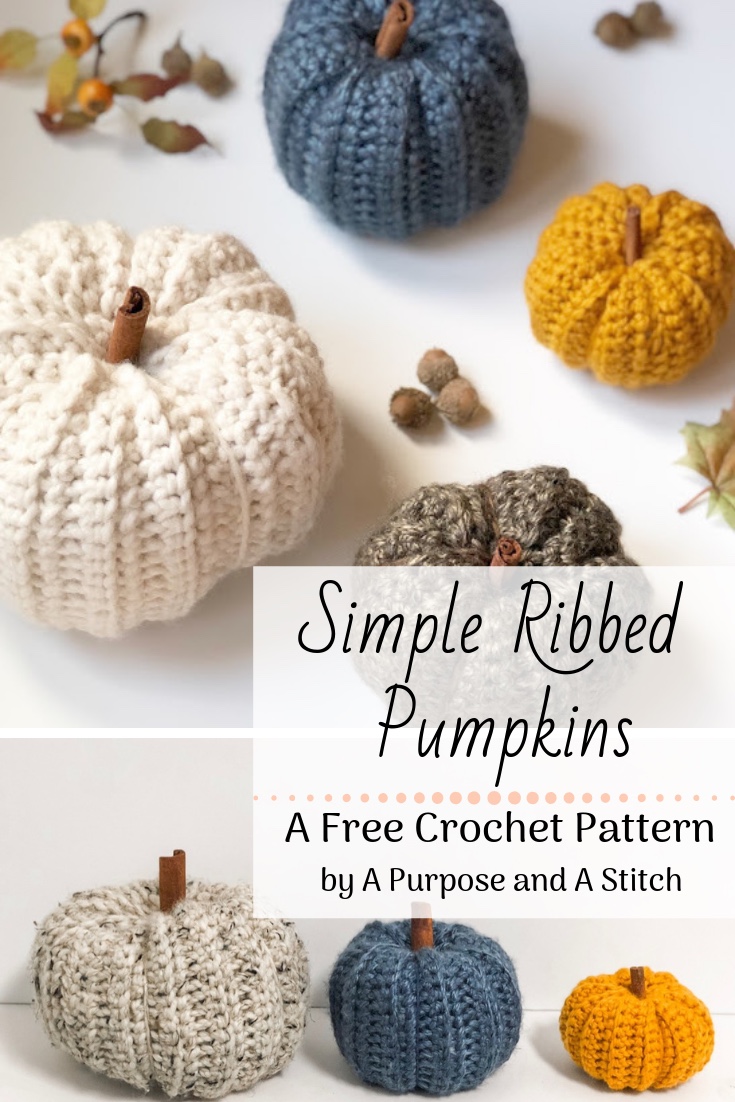
Simple Ribbed Pumpkins

** Below you will find the step-by-step instructions and pictures of making these beautiful pumpkins, as well as the written out pattern. If you love this pattern, but don’t love the ads- you can now purchase the inexpensive PDF from our Etsy shop here. You can also purchase or add to your Ravelry Que here. **
Fall is right up there with spring on my list of favorite seasons! I love the mild temperatures, yummy treats and most of all; the beautiful changes in nature! All the colors of fall give me a warm and cozy feeling inside, paralleled only to the feeling I get right around Christmas time.
I usually jump on putting out the fall decor around my house WAY too early, but it still never seems like I get to leave it up long enough. This year I got it in my head that I wanted…. no, NEEDED to have some crocheted pumpkins to add to my decor.
Thankfully, these guys are INCREDIBLY easy to make so you can quickly flood your house with them.
Each of these pumpkins are made in the same exact manner, regardless of which size pattern you choose to follow. The only difference will be the amount of stitches and rows used. Additionally, you will use a smaller hook for the small pumpkin and a heavier weight yarn for the large pumpkin.
You will start things out with a foundation chain, then starting in the 2nd chain from your hook, you will begin to single crochet in the back loops across.
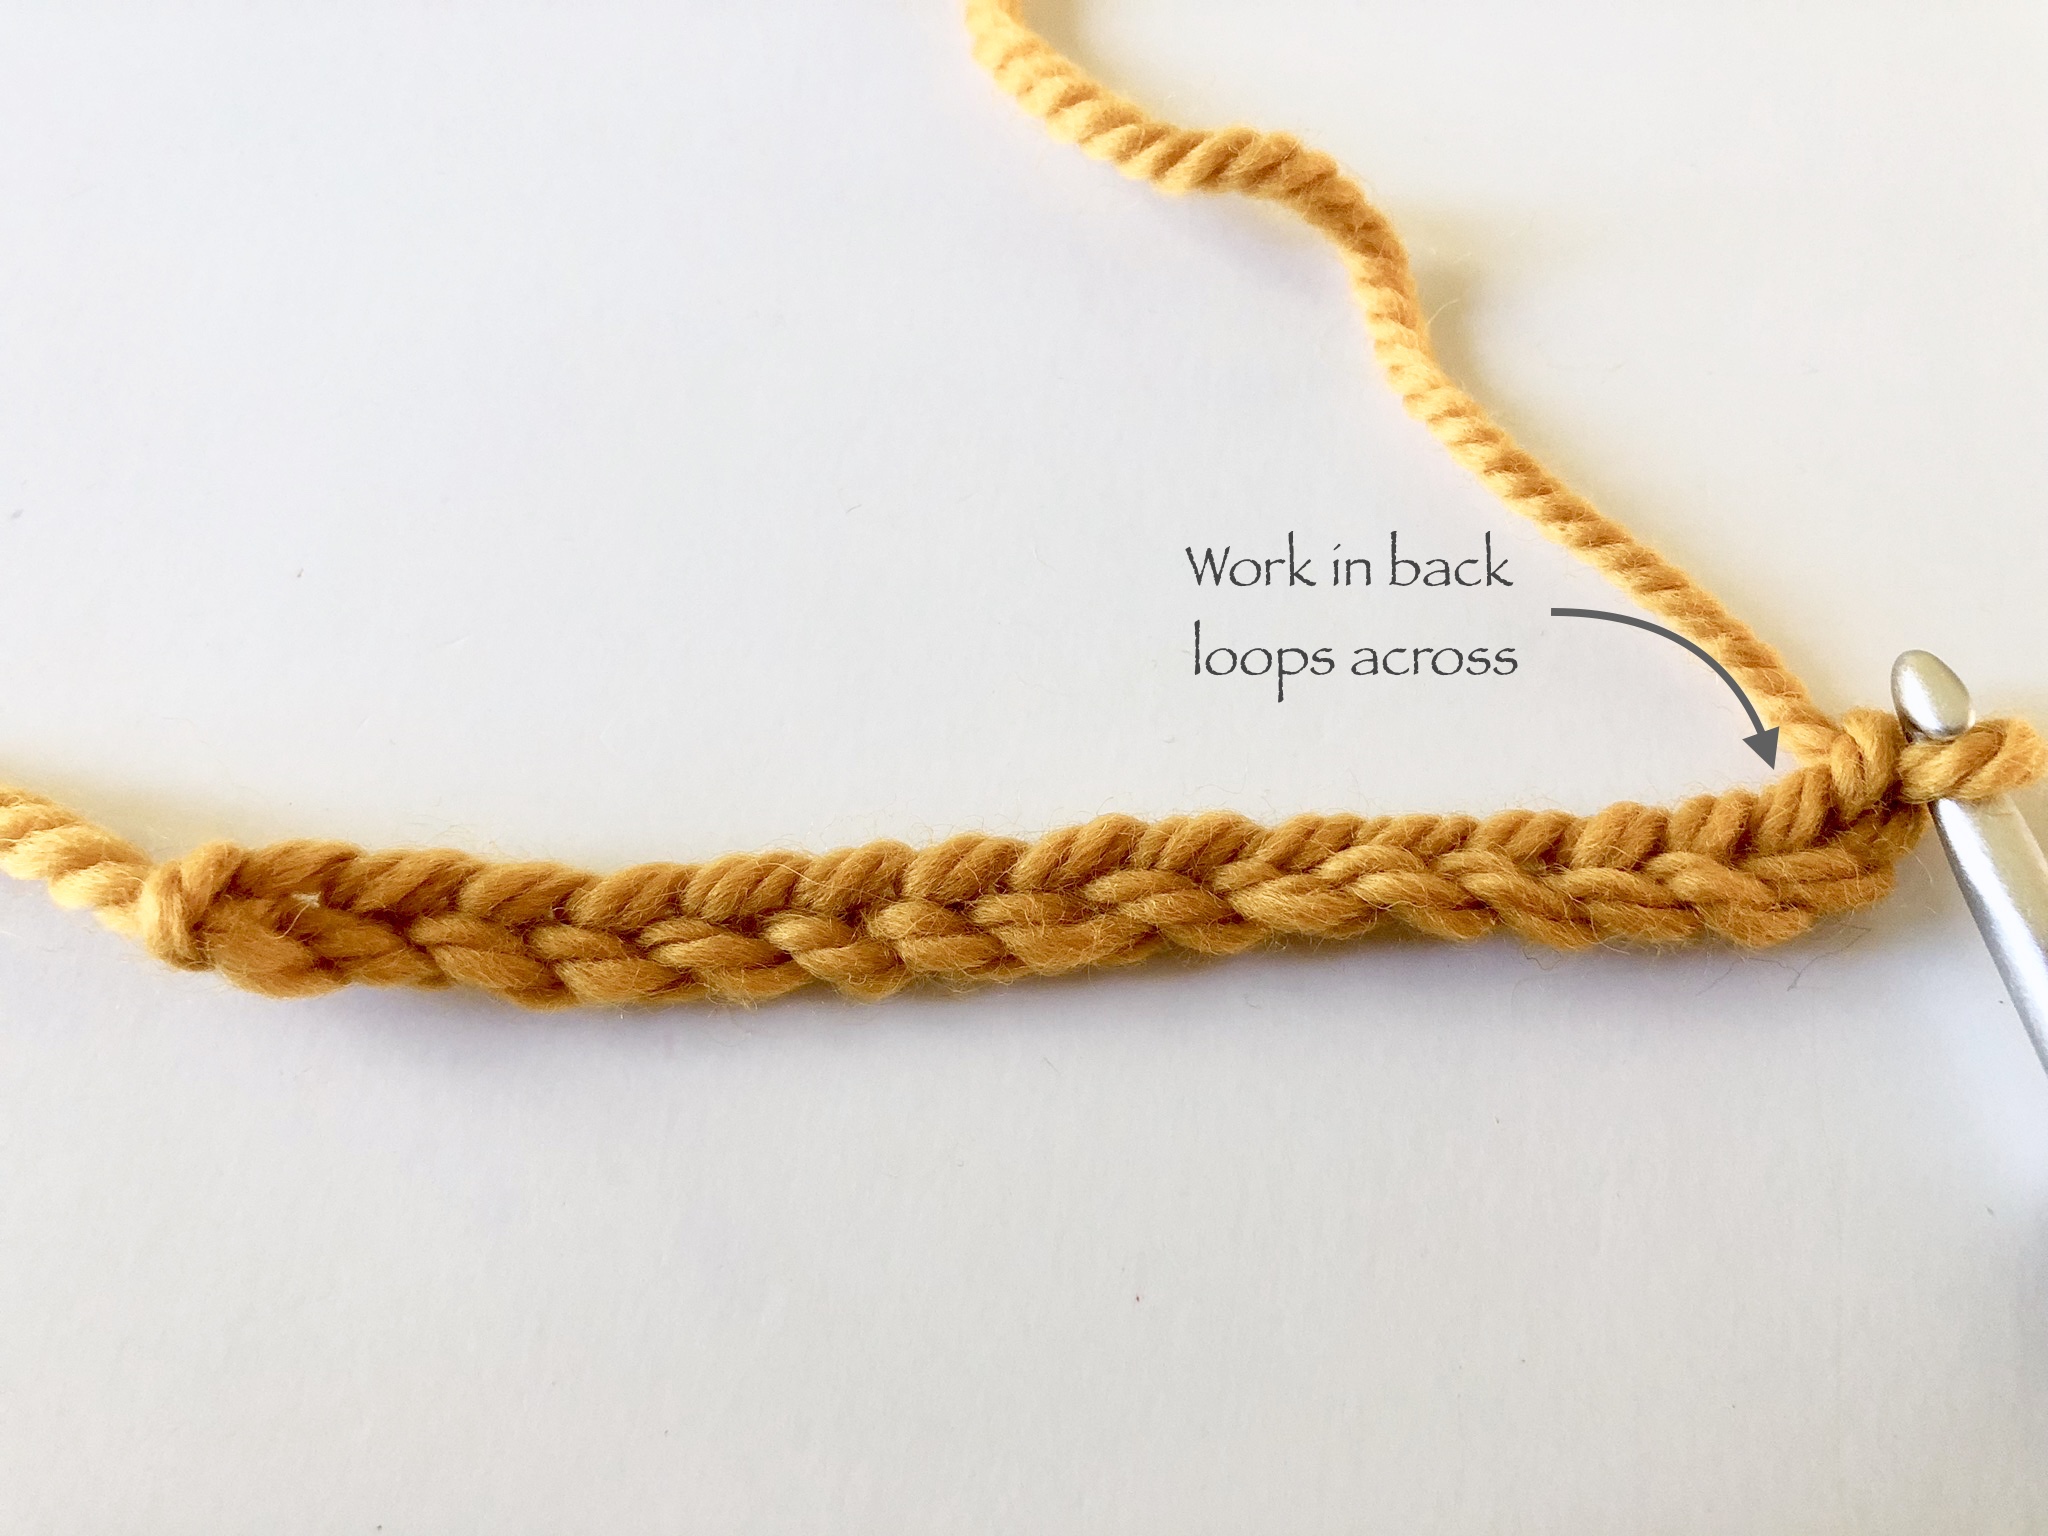
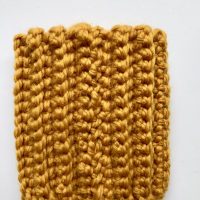
The second and each subsequent row will consist of single crochets worked into the back loops only. This is what gives these pumpkins their ribbed look.


Once you have enough rows needed for your pumpkin size, you will fasten off, leaving a tail at least as long as the rows are wide.


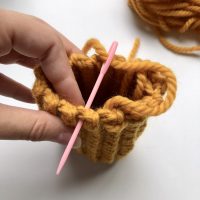
Using the tail, you will mattress stitch your end row to your foundation row creating a cylinder.


Next, you will use a longer piece of yarn to weave in and out of every row around on one end of the cylinder. Once weaved around, you will pull tight and tie secured, closing the bottom up. Leave the strands in tact for later use.


Now you can begin stuffing your pumpkin with fiber fill. The firmer you stuff, the taller and more plush your pumpkin will be and the larger the ribbing will turn out. Using less fiber fill will result in a shorter and more defined pumpkin.


Once the fiber fill is in place you will take another longer strand of yarn and weave in and out of the rows around the top. Pull and tie off, leaving strands in place. You will want to make sure to leave a small gap for the cinnamon stick.


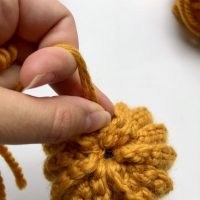
From here, you will use the strands left from the bottom, (and or additional strands of yarn if your bottom strands are not long enough) to pull over the outside of your pumpkin and through the center.


I used a darning needle to pull the yarn strands through the center of the pumpkin and recommend you do the same. Pull each strand as tight as you can and tie off, weaving the ends into the pumpkin.

Repeat this process with the top strands and any additional strands preferred for more ridges. I did 4 around on my small and 6 around on my large pumpkin, but this is completely your preference.

Once all strands are tied around the pumpkin’s body, make sure all ends are weaved in and out of sight.

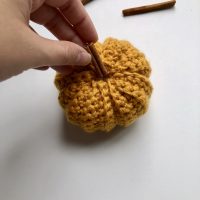
The finishing touch is to add a cinnamon stick to the top center of the pumpkin. I cut the longer cinnamon sticks in half with kitchen shears. If you want a more secure stem, use a hot glue gun to attach.


And thats all there is to it! Told you it was simple 😉

What You’ll Need
6 mm crochet hook (for small)
8 mm crochet hook (for medium & large)
bulky weight (5) wool yarn – approximately 32 yards for small, approximately 56 yards for medium
extra bulky weight (6) wool yarn – approximately 87 yards for large
embroidery/ darning needle
scissors
Fiber fill
Cinnamon sticks
My Amazon Picks
Abbreviations Used
ch= chain
sc= single crochet
blo= back loop only
fo= fasten off
Gauge
Small:
16 rows= 4″
16 sc in blo= 4″
Medium:
12 rows = 4″
12 sc in blo= 4″
Large:
10 rows= 4″
10 sc in blo = 4″
Approximate Completed Measurements
Small- 2 1/2″ tall (without stem) and 12 1/2″ around
Medium- 4″ tall (without stem) and 16″ around
Large- 4 3/4″ tall (without stem) and 22″ around
Pattern for Small Pumpkin
Use 6 mm crochet hook and bulky (weight 5) wool yarn
Foundation: Ch 16
Row 1: starting in 2nd ch from hook, sc in blo across, ch 1 and turn (15)
Row 2-28 : sc in blo across, ch 1 and turn (15)
Row 29: sc in blo across, fo leaving long tail (15)
Pattern for Medium Pumpkin
Use 8 mm crochet hook and bulky (weight 5) wool yarn
Foundation: Chain 21
Row 1: starting in 2nd ch from hook, sc in blo across, ch 1 and turn (20)
Row 2-22: sc in blo across, ch 1 and turn (20)
Row 23: sc in blo across, fo leaving long tail (20)
Pattern for Large Pumpkin
Use 8 mm crochet hook and extra bulky (weight 6) wool yarn
Foundation: Chain 26
Row 1: starting in 2nd ch from hook, sc in blo across, ch 1 and turn (25)
Row 2-32: sc in blo across, ch 1 and turn (25)
Row 33: sc in blo across, fo leaving long tail (25)
Assembly

Using the tail, mattress stitch the edges of the first and last rows together (forming a cylinder) and fasten off. Using a strand of yarn, weave in and out across the top gaping created by each row around the cylinder created.
Pull ends tight to close the end and tie off. Stuff firmly with fiber fill. The more fiber fill you use, the taller and more plush your pumpkin will be. For a shorter and wider pumpkin, use less fiber fill.
Once stuffed, you will take another strand of yarn and weave in and out around the top of the pumpkin, closing tight and tying off as you did with the bottom. The only difference, is that you will want to leave a bit of a hole at the top for the stem later.
You should now have 4 strands hanging off your pumpkin (two on the bottom and 2 on the top). Using a darning needle, take each strand and wrap around the outside of the pumpkin’s body and pull through the center. Tie off as tight as you can and weave in the ends. If you would like more divots, add 2-4 additional strands around.
Once all the ends are tidied up, you can add the cinnamon stick. I cut the longer sticks in half using kitchen shears, but please do this carefully!
You may choose to secure your cinnamon stick with hot glue, or just pop it right into that center hole at the top.
All done! I hope you enjoyed making these pumpkins as much as I did! Don’t forget; if you have a question, or just want to share a picture of your finished product, I love to hear from my readers! Leave a comment below 😉

Could I use this free crochet pumpkin pattern and sell the pumpkins that I make? I can add where I got pattern from and credit you for that. If it’s not going okay I understand. I wanted to ask first though.
Thanks.
Hi Tiffany,
Of course you may use this pattern to make goods to sell. And I always appreciate when credited for the pattern.
Thanks for using the pattern and for confirming!
-Bernadette
I love this pumpkin pattern! It’s the easiest one I’ve found on the internet! I had some black/dark gray yarn that I used to make the medium size to go with my daughter’s Halloween decor, she loved it!
Awe, thanks so much for the kind words Colleen! A black/dark gray pumpkin sounds perfect for Halloween! I might just have to make that color pumpkin next. 😀
Cheers,
Bernadette
I’m a knitter, but decided to give the pumpkins a try. Wow, love this pattern and I think I’ve make 10 so far. Pretty easy for me. Thanks much for this easy pattern. I’ve also passed it along. All agree it’s great and they sure decorate a table or whatever very nicely. Thanks much!!
Awe, thank you so much for the kind words and for sharing the pattern Nancy! Im so happy these little pumpkins are helping bring some fall cheer to your decor! 😍
I followed your pattern and have the same issue that another person commented, it’s a long cylinder and I did weave the yarn through and pull it to gather. However I cannot get the needle through all the fiberfill to define the pumpkin? How did you manage that?
Hi Kimberly, thanks so much for giving this pumpkins a go! I found that using a larger plastic darning needle worked the best. If you can’t get that to work, you could maybe try using a smaller hook to feed through the center and grab the yarn tail through.
Hope this helps and happy crocheting!
Made several of these pumpkins and they were so easy to make. I added the cinnamon sticks and a bay leaf. Cute and they smell nice too.
Thank you so much for taking the time to share such encouraging words! And I love the idea of the bay leaf! ❤️
Another Brit here. We don’t have fall here, just very rainy, grey, autumns (particularly where I am in the North!). I’ve just made a small pumpkin and it’s possibly the most seasonal thing I’ve ever made. I love it, and the cinnamon makes it smells great too! Thanks so much for the pattern – I plan to make lots more
Awww, thanks so much for sharing Brit! Makes my heart so happy 💕. Enjoy!
When I made the medium pumpkin, I used size 5 chunky yarn with a 6 hook. It looks great, but there are holes that make the stuffing visible. Am I doing something wrong?
Hmmm. 🤔 you could try removing some stuffing. I had some visible gapping in mine, but they were small enough that the stuffing doesn’t come through or anything.
If removing some of the stuffing doesn’t help, maybe try going down a hook size to help make the gauge a bit tighter. 😁
How many inches long should the rectangle be for the small and large pumpkin before you sew it and stuff it?
Hi Jazzmine,
My small measured about 7.25″ long and my large was about 13.25″ long, but please do not feel too restrained by those measurements. The completed sizes will depend more on how much stuffing you use, and how tight your stitches are. I hope this helps, and happy crocheting!
– Bernadette
Are the hook sizes US? Im in UK?
Hey there, this pattern just has the mm sizes (as opposed to US or UK sizes) so for the 6mm that should be a 4 in UK and the 8mm should be a 0 in U.K. all abbreviations are US standards though. Hope this helps! 😁
Thank you for the PERFECT tutorial to share with our online facebook crochet group! I made some of these cuties “freestyle” (without a pattern), but everyone was asking for a pattern. So I looked online and the best and most thorough I found was yours. Nice work!
Awww, I’m so pleased to hear the tutorial and pattern worked well for you guys! Thanks so much for the kind words and support! ☺️
The best and easiest pattern I have ever made. Made one in each size with three different colors. Can’t wait to display them on my table this weekend. Thank you sooo much.
Thank you so much for the kind and encouraging words. Just made my day ☺️
What does blo mean?
Hi Glenda, blo is the abbreviation for “Back Loop(s) only”. 🙂
love your pattern nice and easy to follow.They are so cute. Making some now. Thank you for the free pattern
Thank you so much! Glad you enjoy them 😊
I have just gotten the large pumpkin sewn up. I think I have followed your instructions perfectly but my cylinder looks like a turtleneck scarf for a giraffe–tall and narrow. I’ve been adding fiberfill to make it round but I guess I need to know your secret?
You said, “The firmer you stuff, the taller and more plush your pumpkin will be and the larger the ribbing will turn out. Using less fiber fill will result in a shorter and more defined pumpkin.” The picture of your large pumpkin is definitely short, round, and a defined pumpkin shape. Mine is showing the stuffing through if you look closely because I am trying to get it round and squatty and need to use more fiberfill to shape it.
In the directions, it says to make the cylinder by bringing the top row to the bottom row and sew up with the mattress stitch, is that also right for the large pumpkin? Sorry to be so needy. I love the heavy yarn and loved how yours turned out. I got the bulky gold yarn to make the large pumpkin since I thought I would only have time to make one right now. Please advise when you get a chance.
Thanks a bunch!
Hi K! Sorry for any confusion in the pattern!
You are absolutely right that the cylinder will look tall and narrow, but fret not! Once you tie off the top and bottom, and add the yarn around the outside, it will come together. 🙂
From the sounds of it, I would recommend removing a bit of the fiberfill before you proceed. Depending on the exact yarn you used, you may have some fiberfill that shows through the stitches, but you don’t want the holes to be so spread that the filling starts to come out once completed.
From there, if you just make sure to tie the yarn that runs on the outside of the pumpkin tight, you should end up with something very similar to mine. I hope this helps!
Bernadette: Thank you so much for this perfect little pattern. They are simply adorable and I plan to start some tonight during Live PD, lol. Always believe in yourself; if you do not, know that others do. Thank you for sharing. Deb in Tex
Thank you so much for your kind words Deb! I hope you enjoy making these pumpkins 😀
Wonderfully easy and cute! LOVE the idea with the cinnamon stick! YUMMY!
Thank you so much for the kind words! These have already become my favorite fall decor around my house 😉
Easy and fun to make. I’m making them in lots of fall colors. I’ve made some mini ones too. Just using thinner yarn.
That sounds fantastic! I may have to make some mini ones too 😁