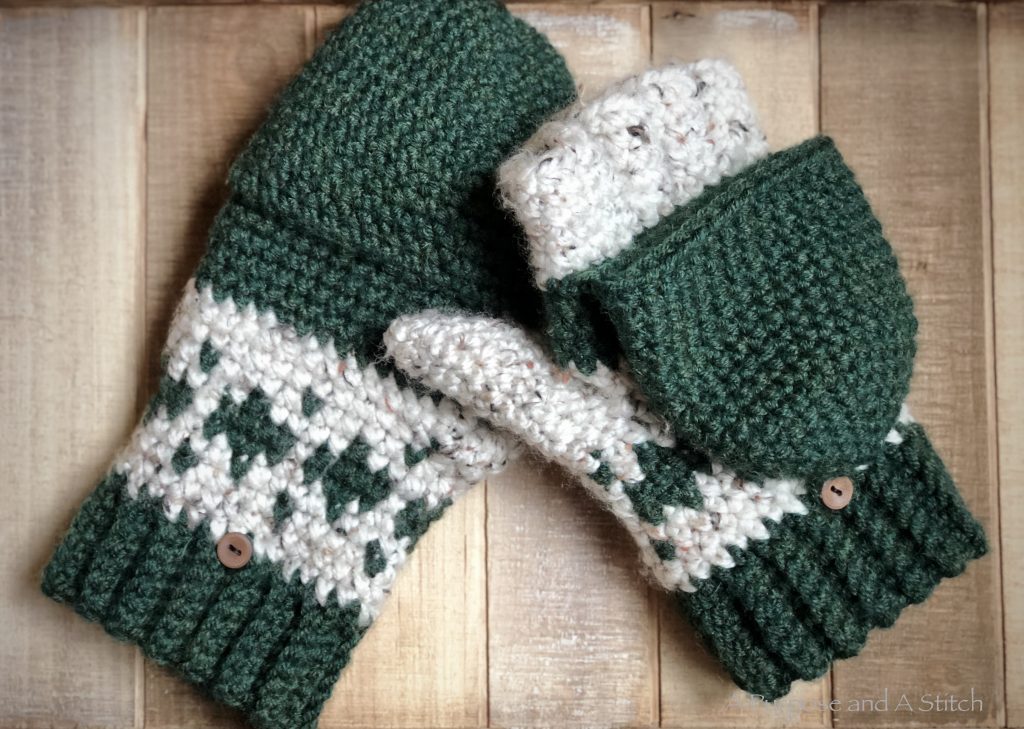
Galway Glittens – Free Pattern
**Below you will find the free pattern for the Galway Girl Glittens. For step-by-step pictures and instructions, check out my blog post here. If you prefer, you can get the large font, ad-free printable PDF from my Etsy shop here. **
This is probably the most complex wearable item on my blog to date, but I promise it is totally doable.

The complexity comes solely from the tapestry section of the palm, and the rest is actually very simple. The entire pattern is made in single crochet stitches with a few increases and decreases for the fingers, so it’s pretty easy to work up once you get past the tapestry part.
I really wish I had time to make video tutorials for y’all, but until that wish comes true I will just keep linking other helpful video tutorials and as many pictures as I possibly can. 🙂 For this pattern, I highly recommend checking out the blog post on how I made these beauties, here.
I hope you enjoy making these amazingly cute and warm glittens as much as I did!
Happy Crocheting!
What you need
2 skeins bulky (size 5) primary color skein of yarn (I used Lion Brand’s Woolspun in Evergreen)- approximately 144 yards or 113 grams
1 skein bulky (size 5) secondary color skein of yarn (I used Loop and Threads Charisma Tweed in Cream)- approximately 106 yards or 83 grams
1 5.50MM crochet hook
2 buttons
My Amazon Picks
Completed Measurements
Height to the Top of Cap: 10″
Height to Fingers: 7.5″
Width: 4″ across
Gauge
15 sc= 4″
15 rows= 4″
Abbreviations Used
ch= Chain
sc= Single Crochet
blo= Back loop only
flo= Front loop only
sl st= Slip Stitch
st(s)= Stitches(s)
sk st(s)= Skip Stitch(s)
p/u= Pick Up
Special Stitches
Increase: single crochet 2 into 1 stitch
Decrease: single crochet 2 stitches together
Ribbing Pattern
Foundation: Ch 8, turn
Row 1: Starting in the 1st ch from your hook , sc 7 in blo, turn
Row 2-30: Ch 1, sc 7 in blo, fasten off. Use tail to join the first and last row together to make a cylinder.
Palm/ Finger Pattern
For this section, you will be following the tapestry design below. All the dark squares are worked in your primary color (I used green), all white squares will be your secondary color (I used cream). I have provided a graph for both right handed crocheters and left handed crocheters because working tapestry crochet in the round will cause a natural lean in the pattern. To compensate for this, each row has been shifted (to the left if you are right handed and to the right if you are left handed).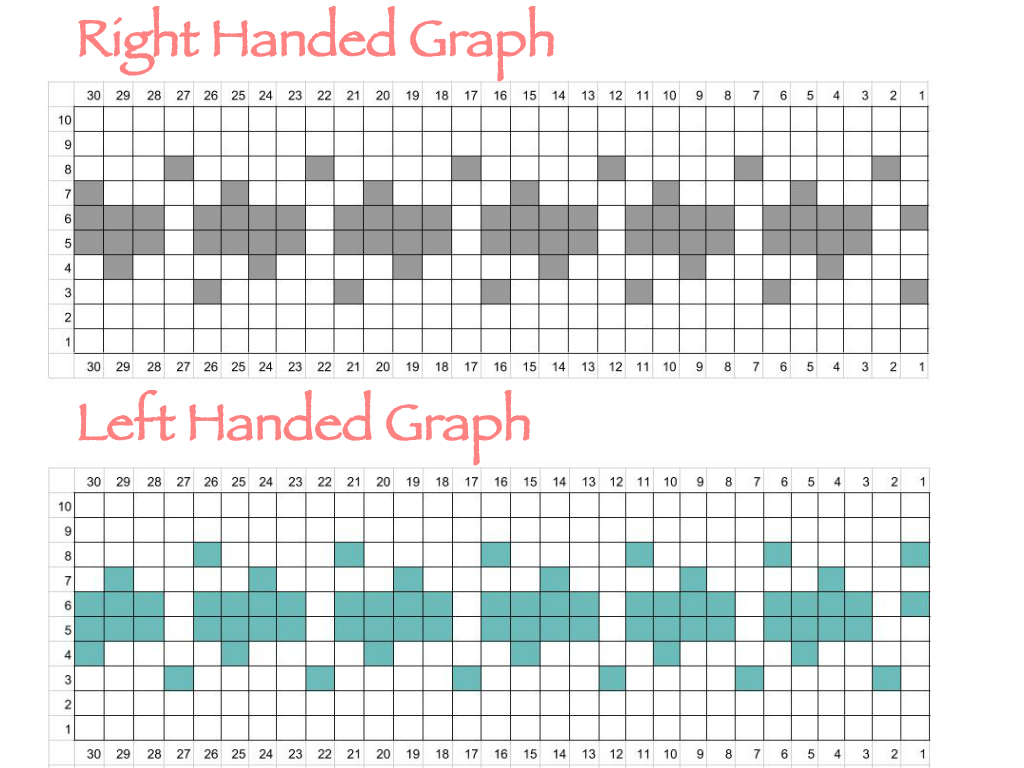 When switching between the colors you will actually begin switching in the stitch proceeding the stitch you want to be a different color. For example, in the Right Handed Graph above for round 4, you will single crochet 2 normally then in your third single crochet you will begin switching to your primary color, and in the next stitch you will begin switching back to your secondary color because only one stitch is completed in your primary. Follow? So to do this, you will start your stitch normally but before your final yarn over and pull up, you will yarn over in your primary color and pull that through the two loops on your hook.
Round 1: attach 2nd color, ch 1, pick up sc 30 around the top of the cuff cylinder


Round 2-8: sl st, ch 1, sc into same st, follow tapestry design.
*For the beginning of round 3 if you’re right handed and round 8 if you’re left handed, your chain 1 will be in your primary color.
**If you want additional help with the tapestry grid, check out my blog post including step-by-step pictures here.
Round 9 (left hand glitten): in secondary color: sl st, ch 1, sc 3, ch 7, sk 7, sc 20
Round 9 (right hand glitten): in secondary color: sl st, ch 1, sc 20, ch 7, sk 7, sc 3
Round 10: in secondary color: sl st, ch 1, sc around
Round 11-14: sl st, p/u primary color yarn and drop secondary. ch 1, sc around
Round 15: p/u secondary yarn and drop primary. sl st, ch 1, sc around, fasten off
From here you will begin working the pattern for your fingers. I recommend adding stitch markers in the starting stitch for each finger before you begin, as to better track your starting point. 
Pattern for Fingers and Thumb- Right Hand
*Please note: each finger is worked in continuous rounds (vs. the joined rounds used in the pattern for the palm)
Pinky Finger
Foundation: sk 4 sts from first sc of palm, pu secondary yarn and sc 8 working around, ch 3 and connect back to first sc created of this finger. (11)
Round 1: sc 2, decrease, sc 2, decrease, sc 3 in blo of the ch 3 from foundation (9)
Round 2-4: sc around, fasten off and weave in ends. (9)
Ring Finger
Foundation: sk 1 st from first sc of palm, pu secondary yarn and sc 3, work 3 in flo of ch sts from pinky finger, sc 3 (working along backside of palm section), ch 3 and connect to first sc created for this finger (12)
Round 1: sc 9, sc 3 in blo of ch sts (12)
Round 2-4: sc around, fasten off and weave in ends. (12)
Middle Finger
Foundation: pu secondary yarn in 2nd sc to the right of the starting st of the palm sc 3, sc 3 in flo of ch sts from ring finger, sc 3 (working along backside of palm section), ch 3 and connect to first sc created for this finger (12)
Round 1: sc 9, sc 3 in blo of ch sts (12)
Round 2-4: sc around, fasten off and weave in ends (12)
Index Finger
Foundation: flip glitten over and begin working along back side of the palm section into the 1st st to the left of where the middle finger ends. Sc 10, sc 3 in flo of ch sts from middle finger. (13)
 Round 1-4: sc around, fasten off and weave in ends (13)
Thumb
Foundation: pu secondary yarn towards middle most st of thumb hole. Work 15 sc around.
Round 1: sc around (15)
Round 2: *sc 3, decrease*, repeat from * around (12)
Round 3-6: sc around (12)
Round 7: *sc 2, decrease*, repeat from * around (9)
Round 8-9: sc around (9)
Round 10: *sc 1, decrease*, repeat from * around (6)
Round 11: decrease 3 times, fasten off and weave in ends (3)
Pattern for Fingers and Thumb- Left Hand
*Please note: each finger is worked in continuous rounds (vs. the joined rounds used in the pattern for the palm)
Index Finger
Foundation: sk 1 st, pu secondary yarn and sc 10 around, ch 3 and connect to first sc of this finger (13)
Round 1: sc 10, sc 3 in blo of ch sts (13)
Round 2-4: sc around, fasten off and weave in ends (13)
Middle Finger
Foundation: pu secondary yarn in 2nd sc to the right of the starting st of palm, sc 3, sc 3 in flo of ch from index finger, sc 3 (working along back side of palm), ch 3 and connect to starting sc of this finger. (12)
Round 1: sc 9, sc 3 in blo of ch sts (12)
Round 2-4: sc around, fasten off and weave in ends (12)
Ring Finger
Foundation: pu secondary yarn in 5th sc to the right of starting st of palm (or 3 sc to the right of where your middle finger ended), sc 3, sc 3 in flo of ch from middle finger, sc (working along back side of palm), ch 3 and connect to starting sc of this finger (12).
Round 1: sc 9, sc 3 in blo of ch sts (12)
Round 2-4: sc around, fasten off and weave in ends. (12)
Pinky Finger
Foundation: flip glitten over and begin working on back side of glitten by pulling up secondary yarn in first sc to the left of where your ring finger ended (worked similar to index finger of right hand), sc 8 around, sc 3 into flo of ch from ring finger. (12)
Round 1: sc 2, decrease, sc 2, decrease, sc 3 (9)
Round 2-4: sc around, fasten off and weave in ends. (9)
Thumb
Foundation: pu secondary yarn towards middle most st of thumb hole. Work 15 sc around.
Round 1: sc around (15)
Round 2: *sc 3, decrease*, repeat from * around (12)
Round 3-6: sc around (12)
Round 7: *sc 2, decrease*, repeat from * around (9)
Round 8-9: sc around (9)
Round 10: *sc 1, decrease*, repeat from * around (6)
Round 11: decrease 3 times, fasten off and weave in ends (3)
Pattern for the Finger Cap (make 2)
*Please note: this portion is worked in continuous rounds (vs. the joined rounds used in the pattern for the palm)
Foundation: work 5 in magic ring (5)
Round 1: increase around (10)
Round 2: *sc, increase*, repeat from * around (15)
Round 3: *sc 2, increase*, repeat from * around (20)
Round 4: *sc 3, increase*, repeat from * around (25)
Round 5: *sc 4, increase*, repeat from * around (30)
Round 6-17: sc around (30)
Once you reach the end of round 17, ch 1 and turn your work, sc 15 and fasten off leaving long tail (1 row created)
For the Buttonhole
Chain 7 and fasten off. Insert ends of chain to either side of the very top of your finger cap and tie together on the inside (button hole created)
Assembly
Using the long tail, whip stitch the row of the finger cap right above round 15 of the palm section of the glitten (directly below the start of the fingers).
Sew button right above wrist ribbing towards the center of the glitten on the back side of the glitten (where the top of your hands will be when wearing them).
And there you have it! Your Galway Girl Glittens are complete!


I enjoyed stitching these up, and even made a matching beanie with a fun, faux fur pom pom! Thanks for the pattern! https://www.instagram.com/p/CavRo–JwMrwsjq17BwSW8BuaOtcOMg1uX3PCo0/?utm_medium=copy_link
Thanks so much for sharing Julie! I’m so pleased that you enjoyed making them!
I really wanted to make these. But I’m super intimidated and unsure of some of these workings. Would you consider making a tutorial vid?
I’m so sorry the process feels intimidating! I do not currently have plans to make a video tutorial- but when I get the time to start making videos again, I’ll be sure to add this one to my list of to-dos ☺️
Yeah I’m having problems too. But I got stuck at the beginning. Why only crochet 8 stitches for 30 rows. Will there be a second side
Hi Ariel, the 8 sts for 30 rows will be the ribbing that goes around the wrist. Once complete, you’ll turn it and work directly into the side of those rows to make the mitten part. Hope this helps!
I’ve tried so hard to follow this pattern. I’ve gone back and forth, read and re-read and cannot for the life of me understand the directions.
I second video tutorials. I’m positive there are some gaps in your pattern.
Hi Becca,
So sorry to hear you’re struggling along with the pattern. Is there a part in particular that you are struggling with so I can do my best to help you along or provide a supplemental video on? I’m struggling to see any errors, but maybe if I know what part you are getting stuck on, I could be of more assistance.
Thanks.
Hi do you have a video tutorial for these?
I would love to make these as my daughter and her friends asked me for some like this but i cant figure it out i need visuals ! Lol
Hi Carole,
Unfortunately, I do not have any video tutorials at this time. I can however recommend this very helpful video tutorial for working tapestry crochet: http://www.mooglyblog.com/tapestry-crochet/ . The tapestry portion of this pattern is the most complex, so I hope this helps. The blog post on this pattern also has a lot of step-by-step pictures and can be found on my homepage. You are welcome to reach back out if you run into any questions along the way. I hope this helps!