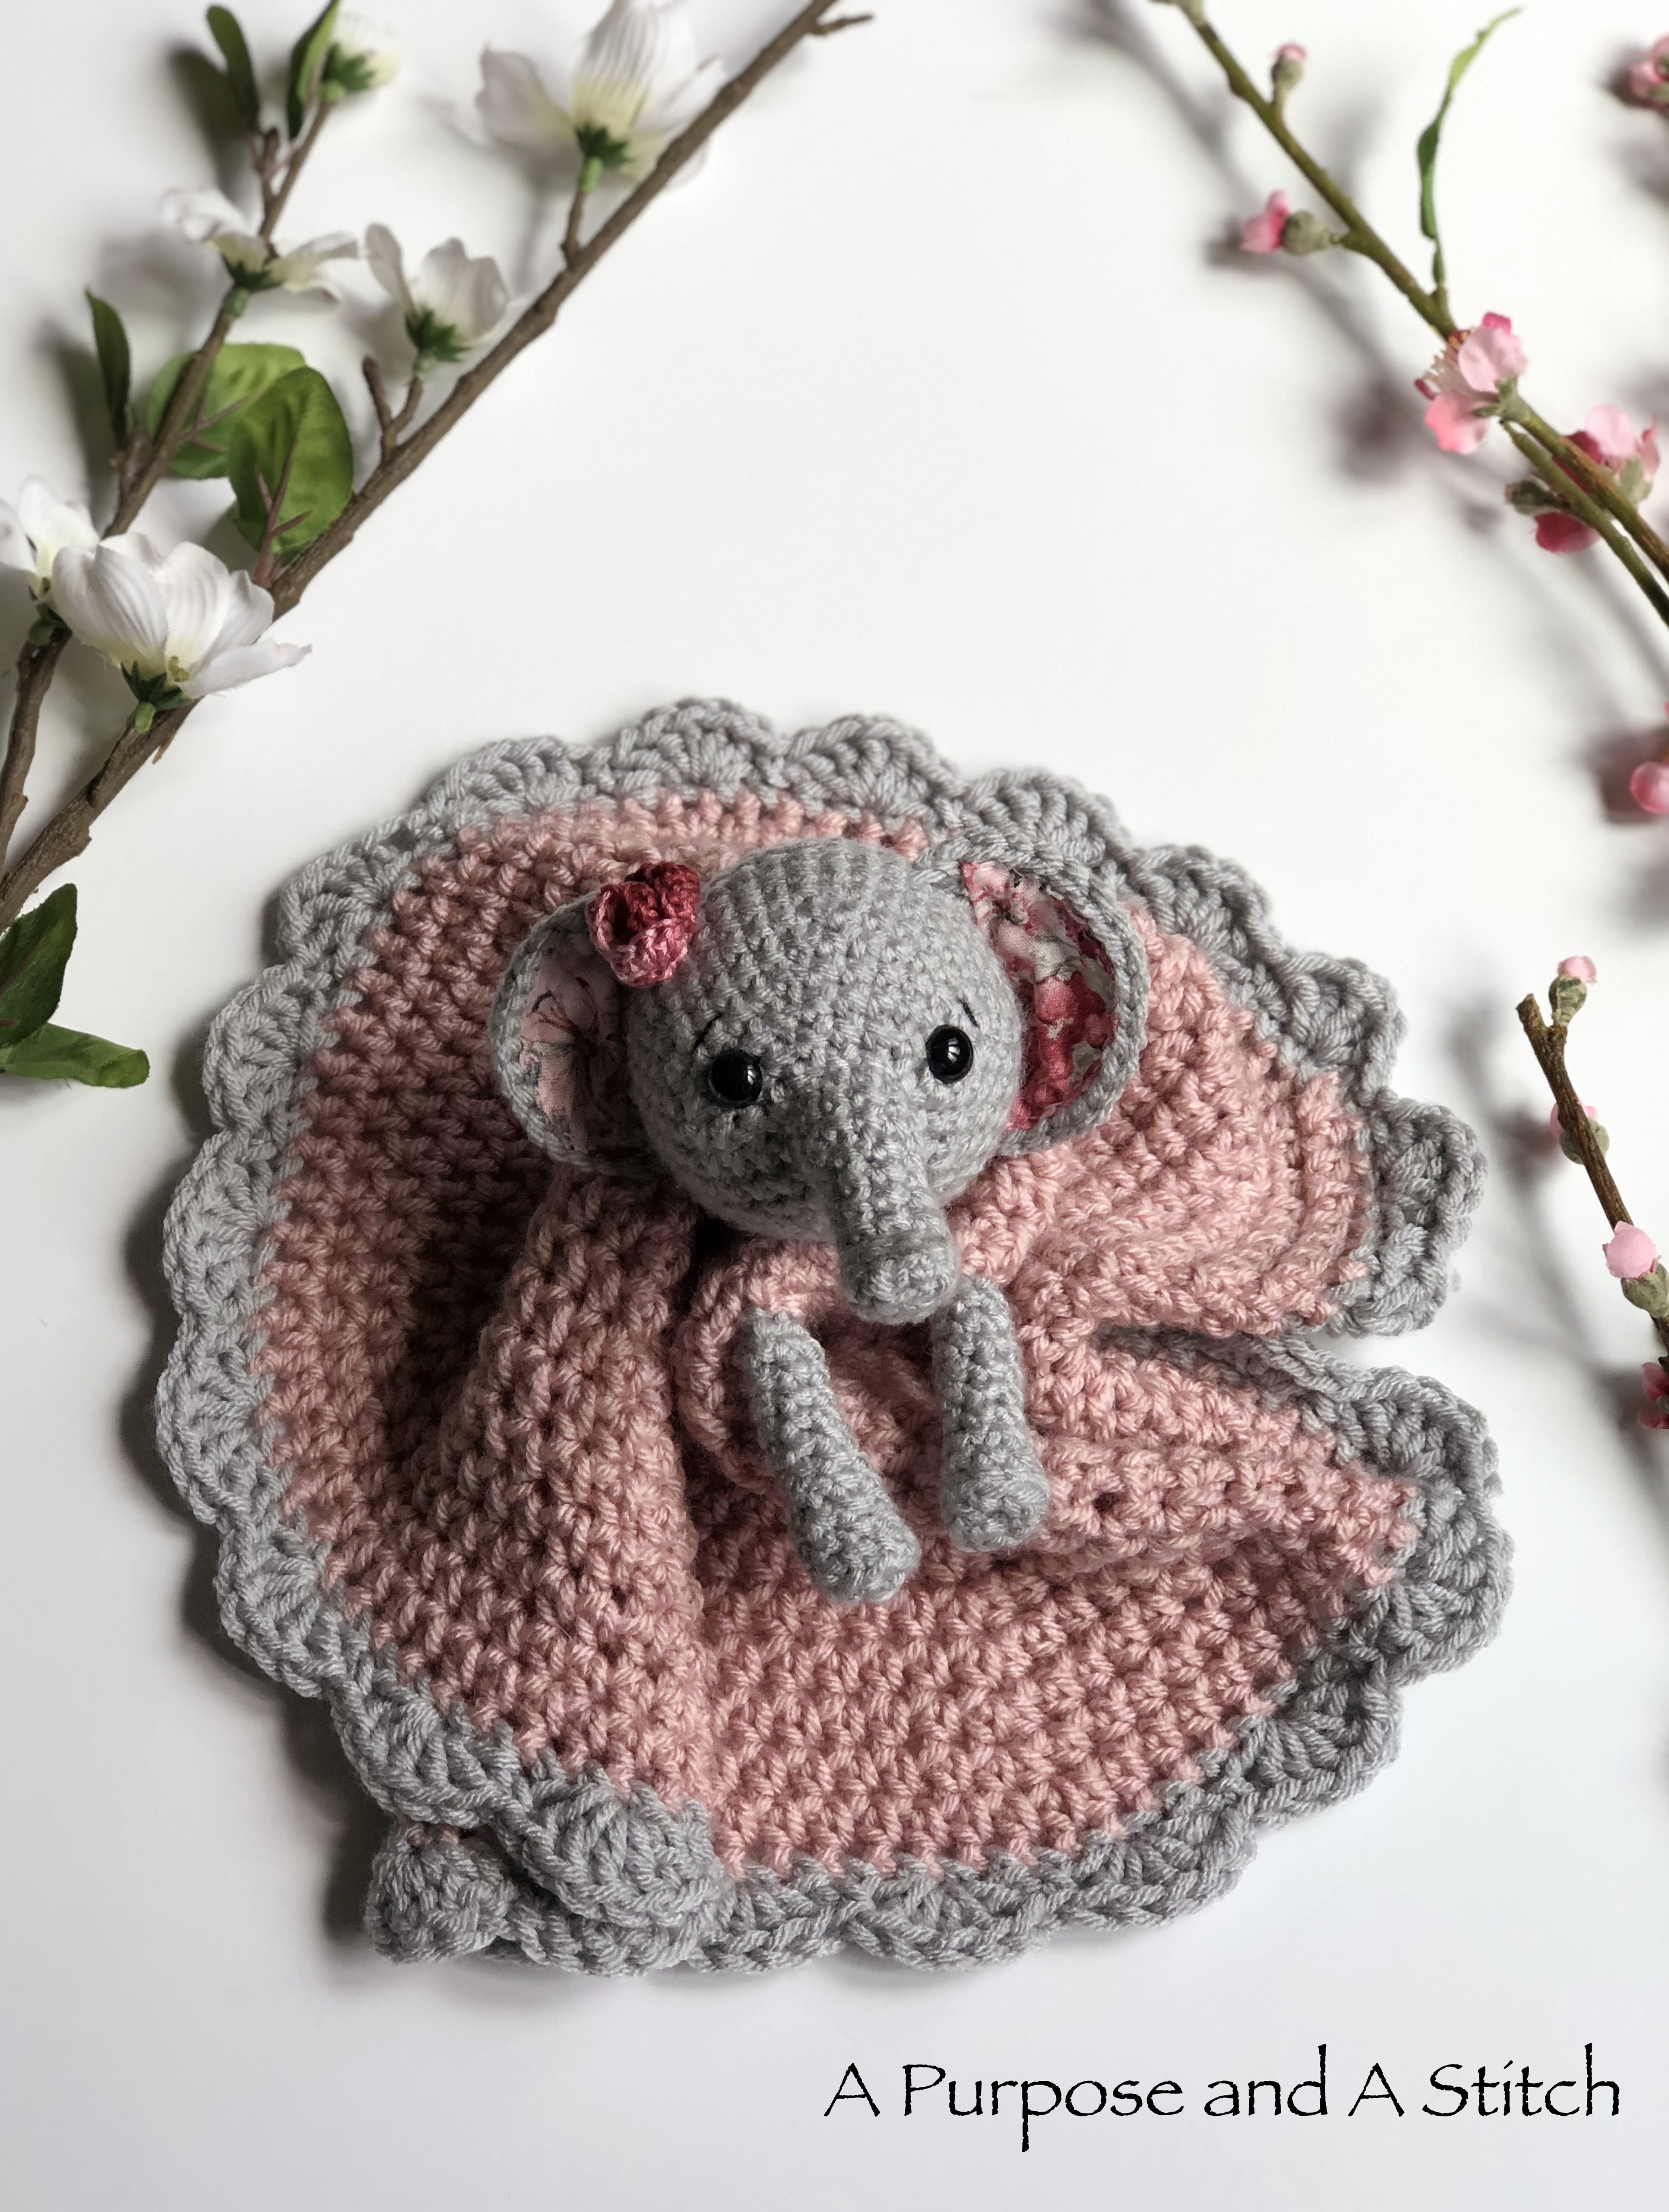
Ellie the Elephant Lovey- Free Pattern

**Below you will find the free pattern for this sweet lovey. If you prefer, you can purchase the inexpensive, large font, ad-free PDF from my Etsy shop here.
You can also add to your Ravelry que here. **
The concise pattern is located a the bottom of this post, located below the tutorial. However, I recommend reading through the tutorial before you begin for some extra help and suggestions not found in the pattern.
A few months ago I posted about the sweet lamb lovey that I had made for some friend’s in our small group (you can get that free pattern here).
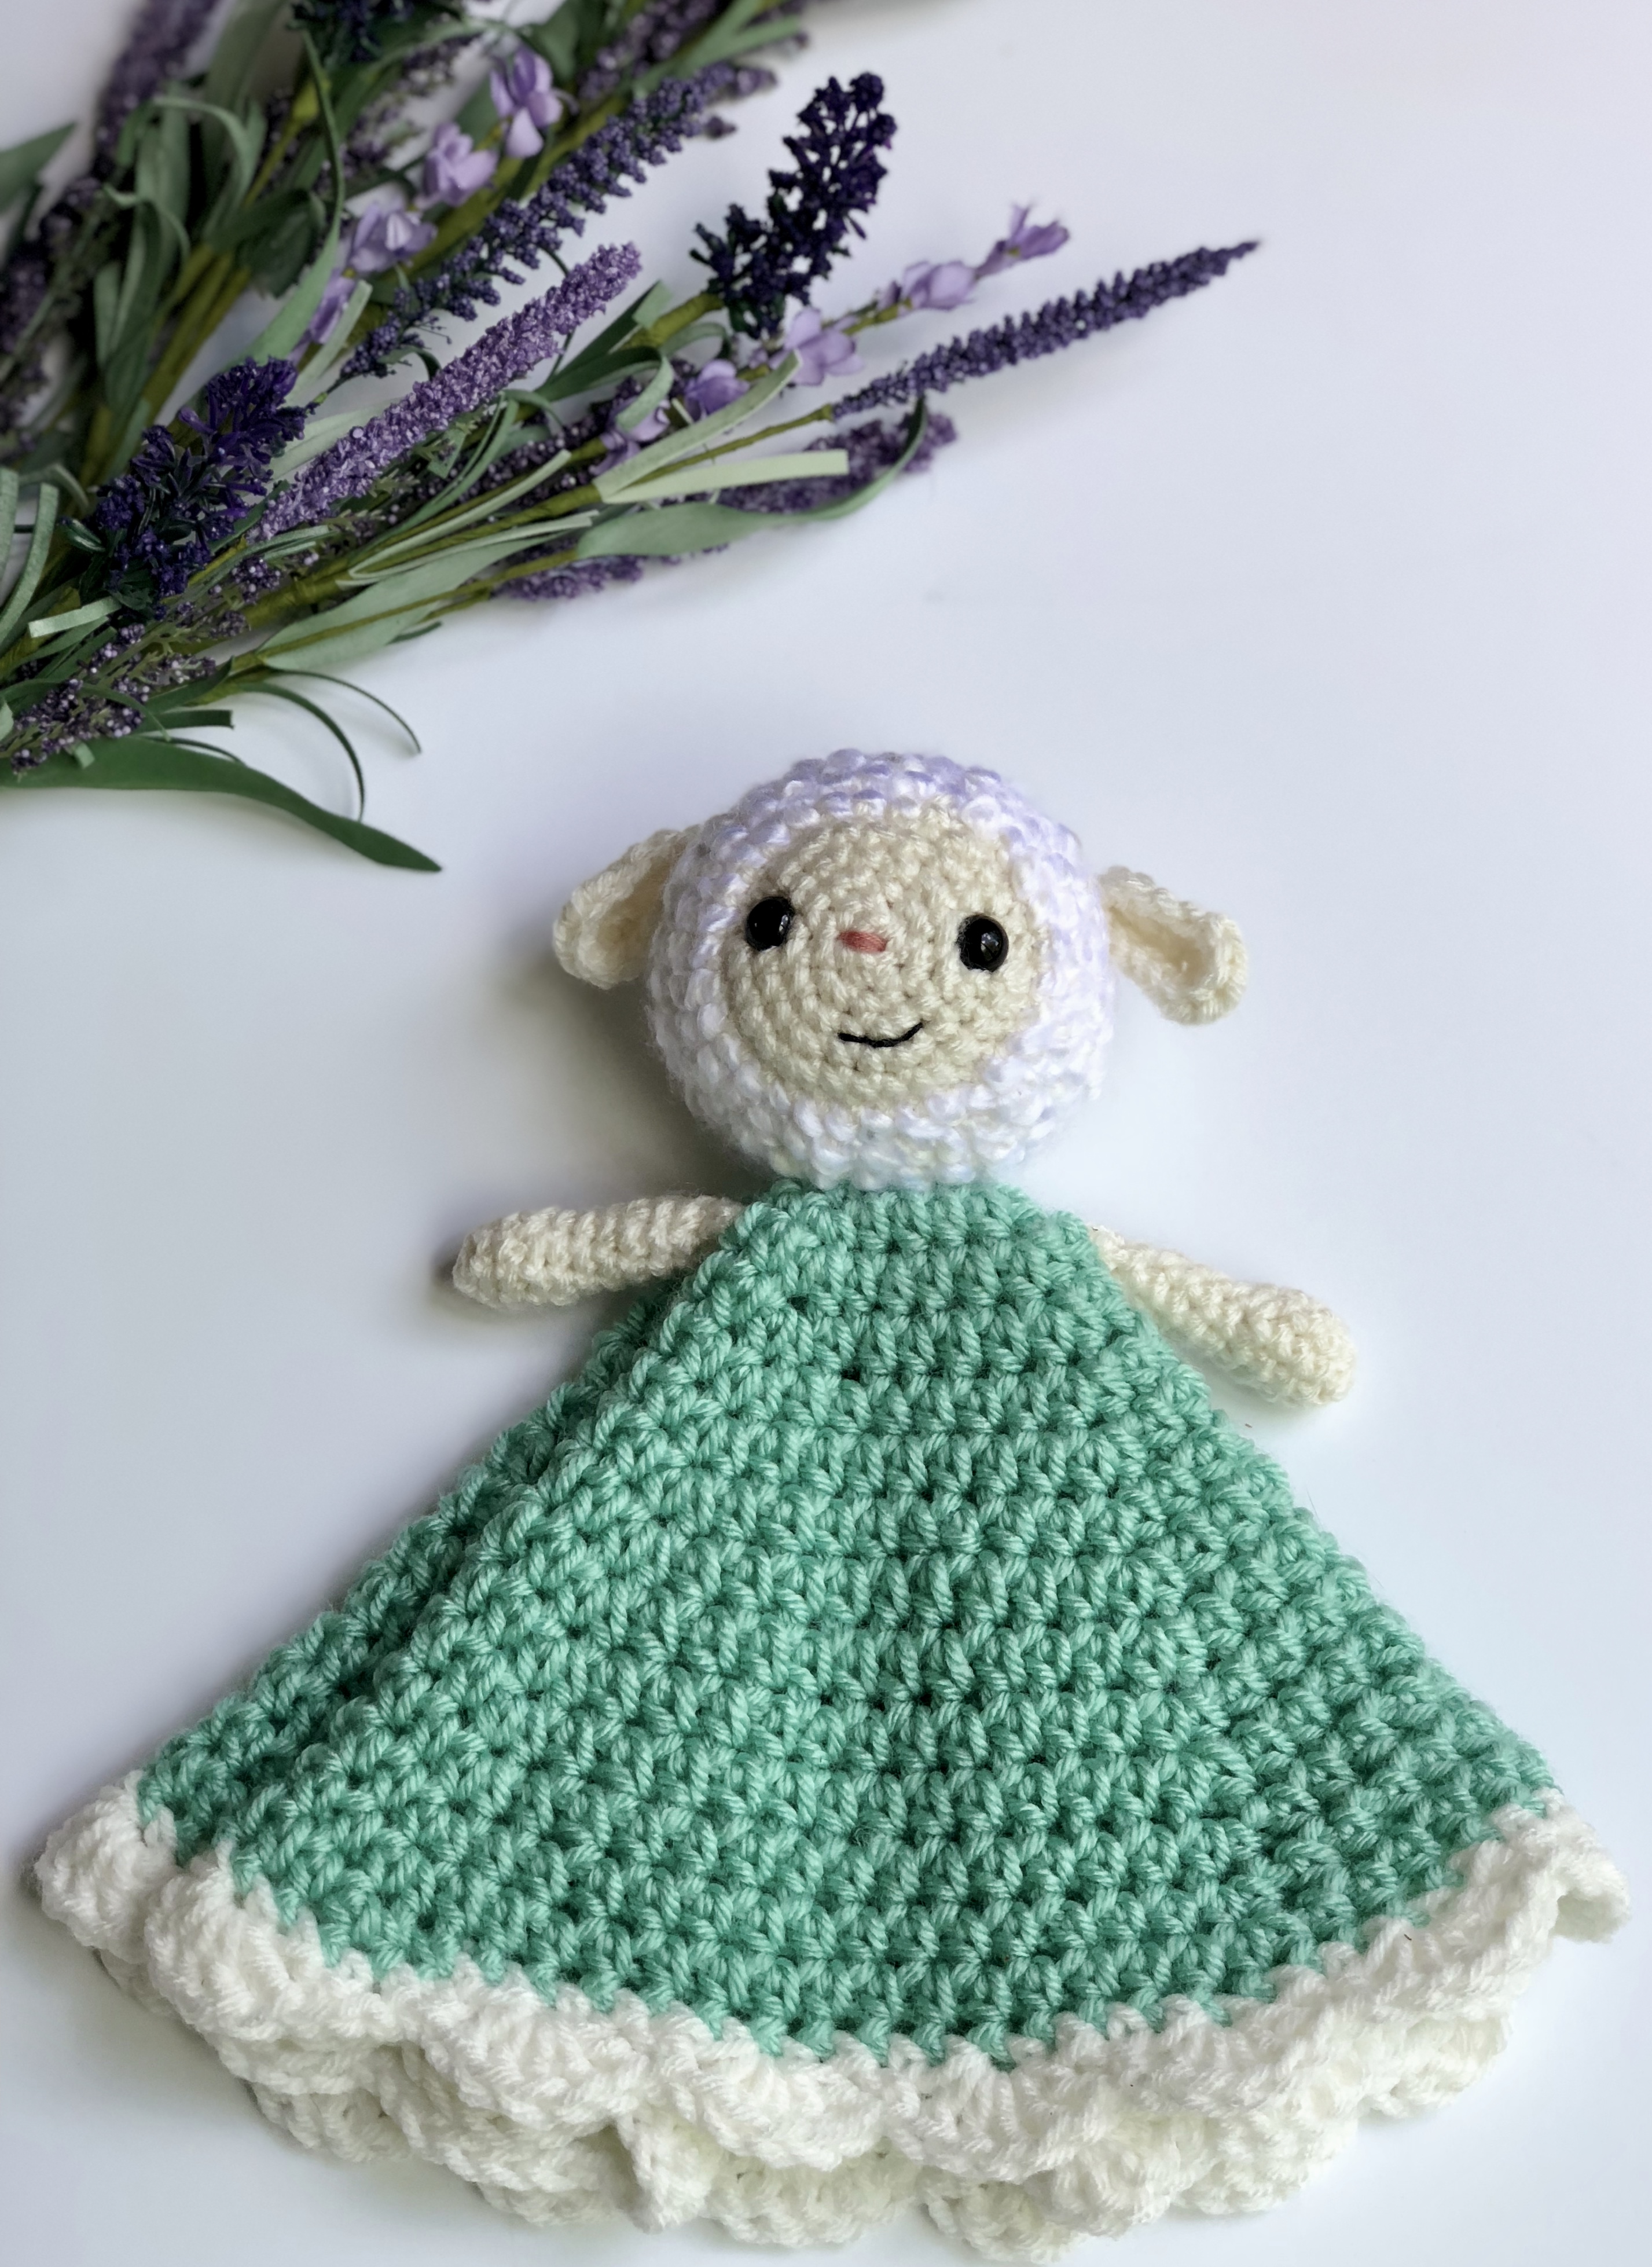 When I shared the link to that pattern on Facebook I was overwhelmed with the love and adoration she received. I was also asked if I had any elephant lovey patterns and was sad to say that I did not. However, I absolutely loved the idea.
So here we are. Another couple from our small group just their first child, sweet baby CeCe. I loved making Lambie The Lovey so much, that I couldn’t wait to make another lovey.

You will love making Ellie, as she is just so sweet and fun to make! And if you’re as much of a fan as cute Elephant Patterns as I am, you may be excited to know that Ellie was recently featured on Crochet-News alongside 9 other amazing elephant patterns. You can find the link for that here.
To get things going, I started out with making her head. The head and trunk are all one piece, which makes assembly later on a cinch!
You will start with a magic ring, if you are unfamiliar with this technique, I always recommend this very helpful video tutorial by June Gilbank found here.
Once you’ve got your magic ring all set, you will start to gradually increase in each round as you go. After a few rounds of gradually increasing, you will start to work a few rounds of single crochets around. This will give you the start of a sphere for your head.


To complete the sphere of the head, you will continue by working a few rounds of gradual decreases.
Before decreasing too much, you will want to add on your elephant’s face. I placed 2 safety eyes on either side of the opening, making sure that my starting stitch was located at the bottom center. This is important for when you begin to work your trunk, so make sure you are using a stitch marker to identify this stitch.
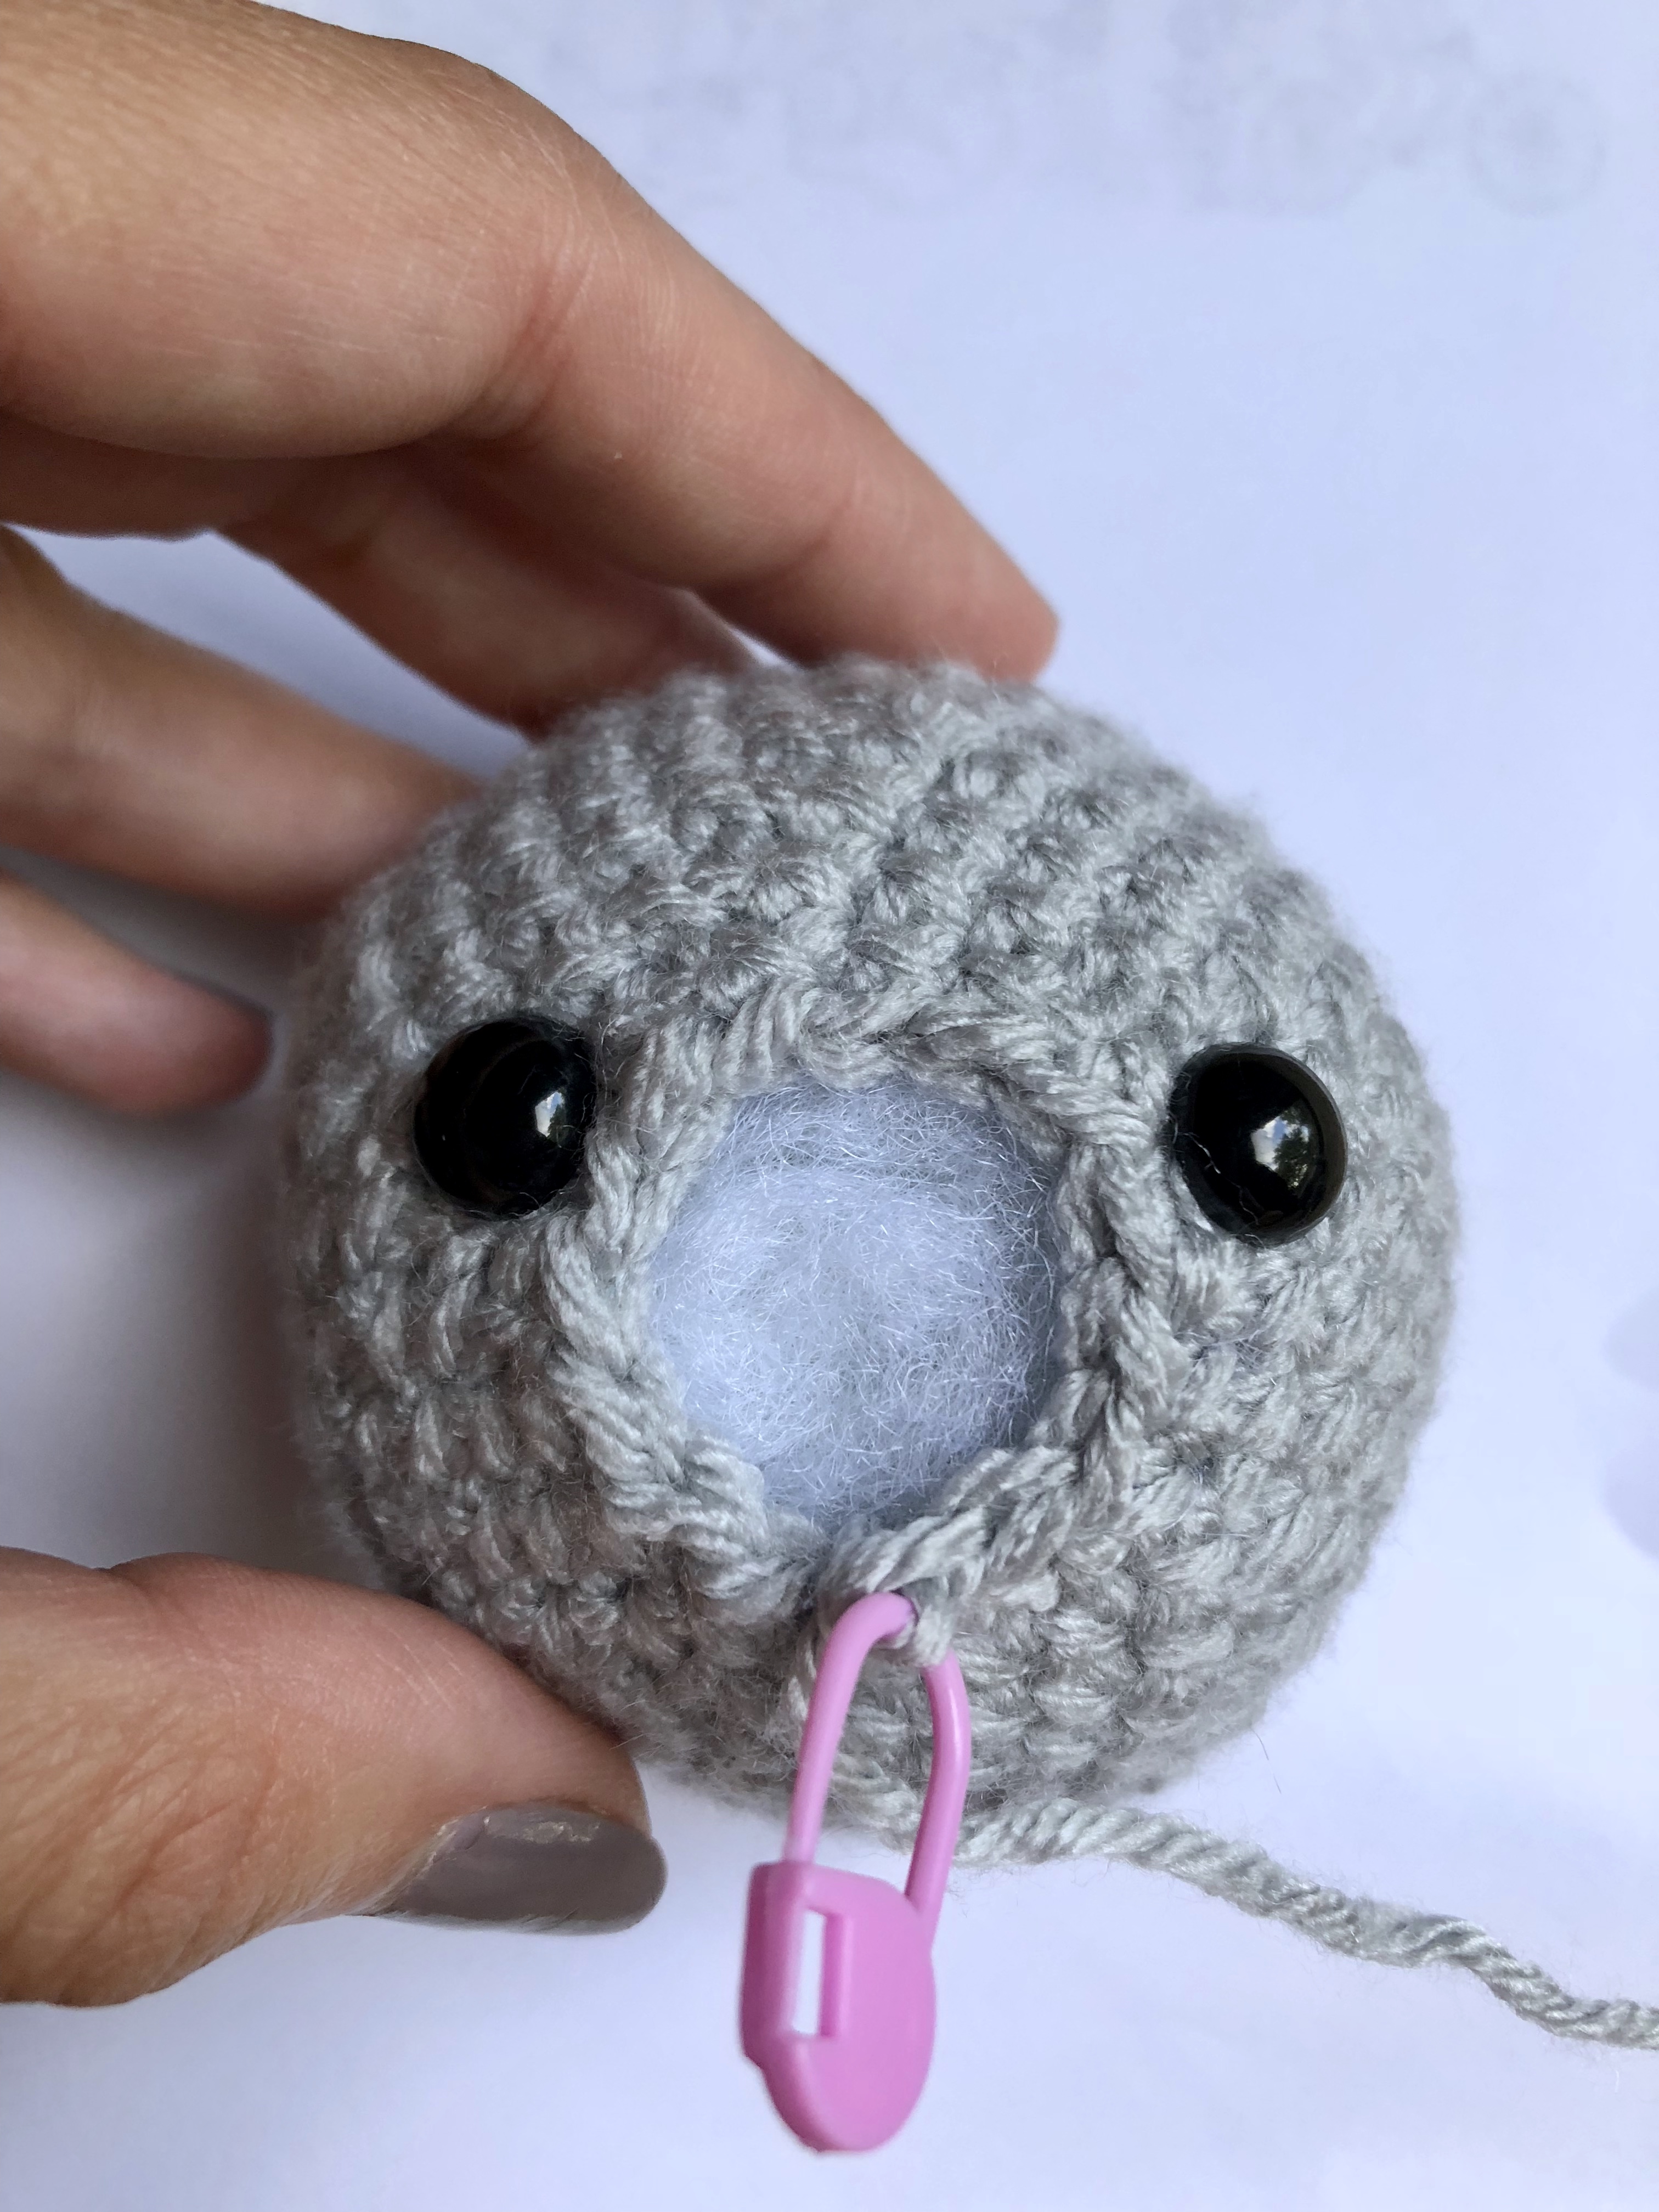
I then embroidered on some eyebrows and a smirking mouth. Once your face is all set, you can begin to stuff the head firmly with fiber fill.

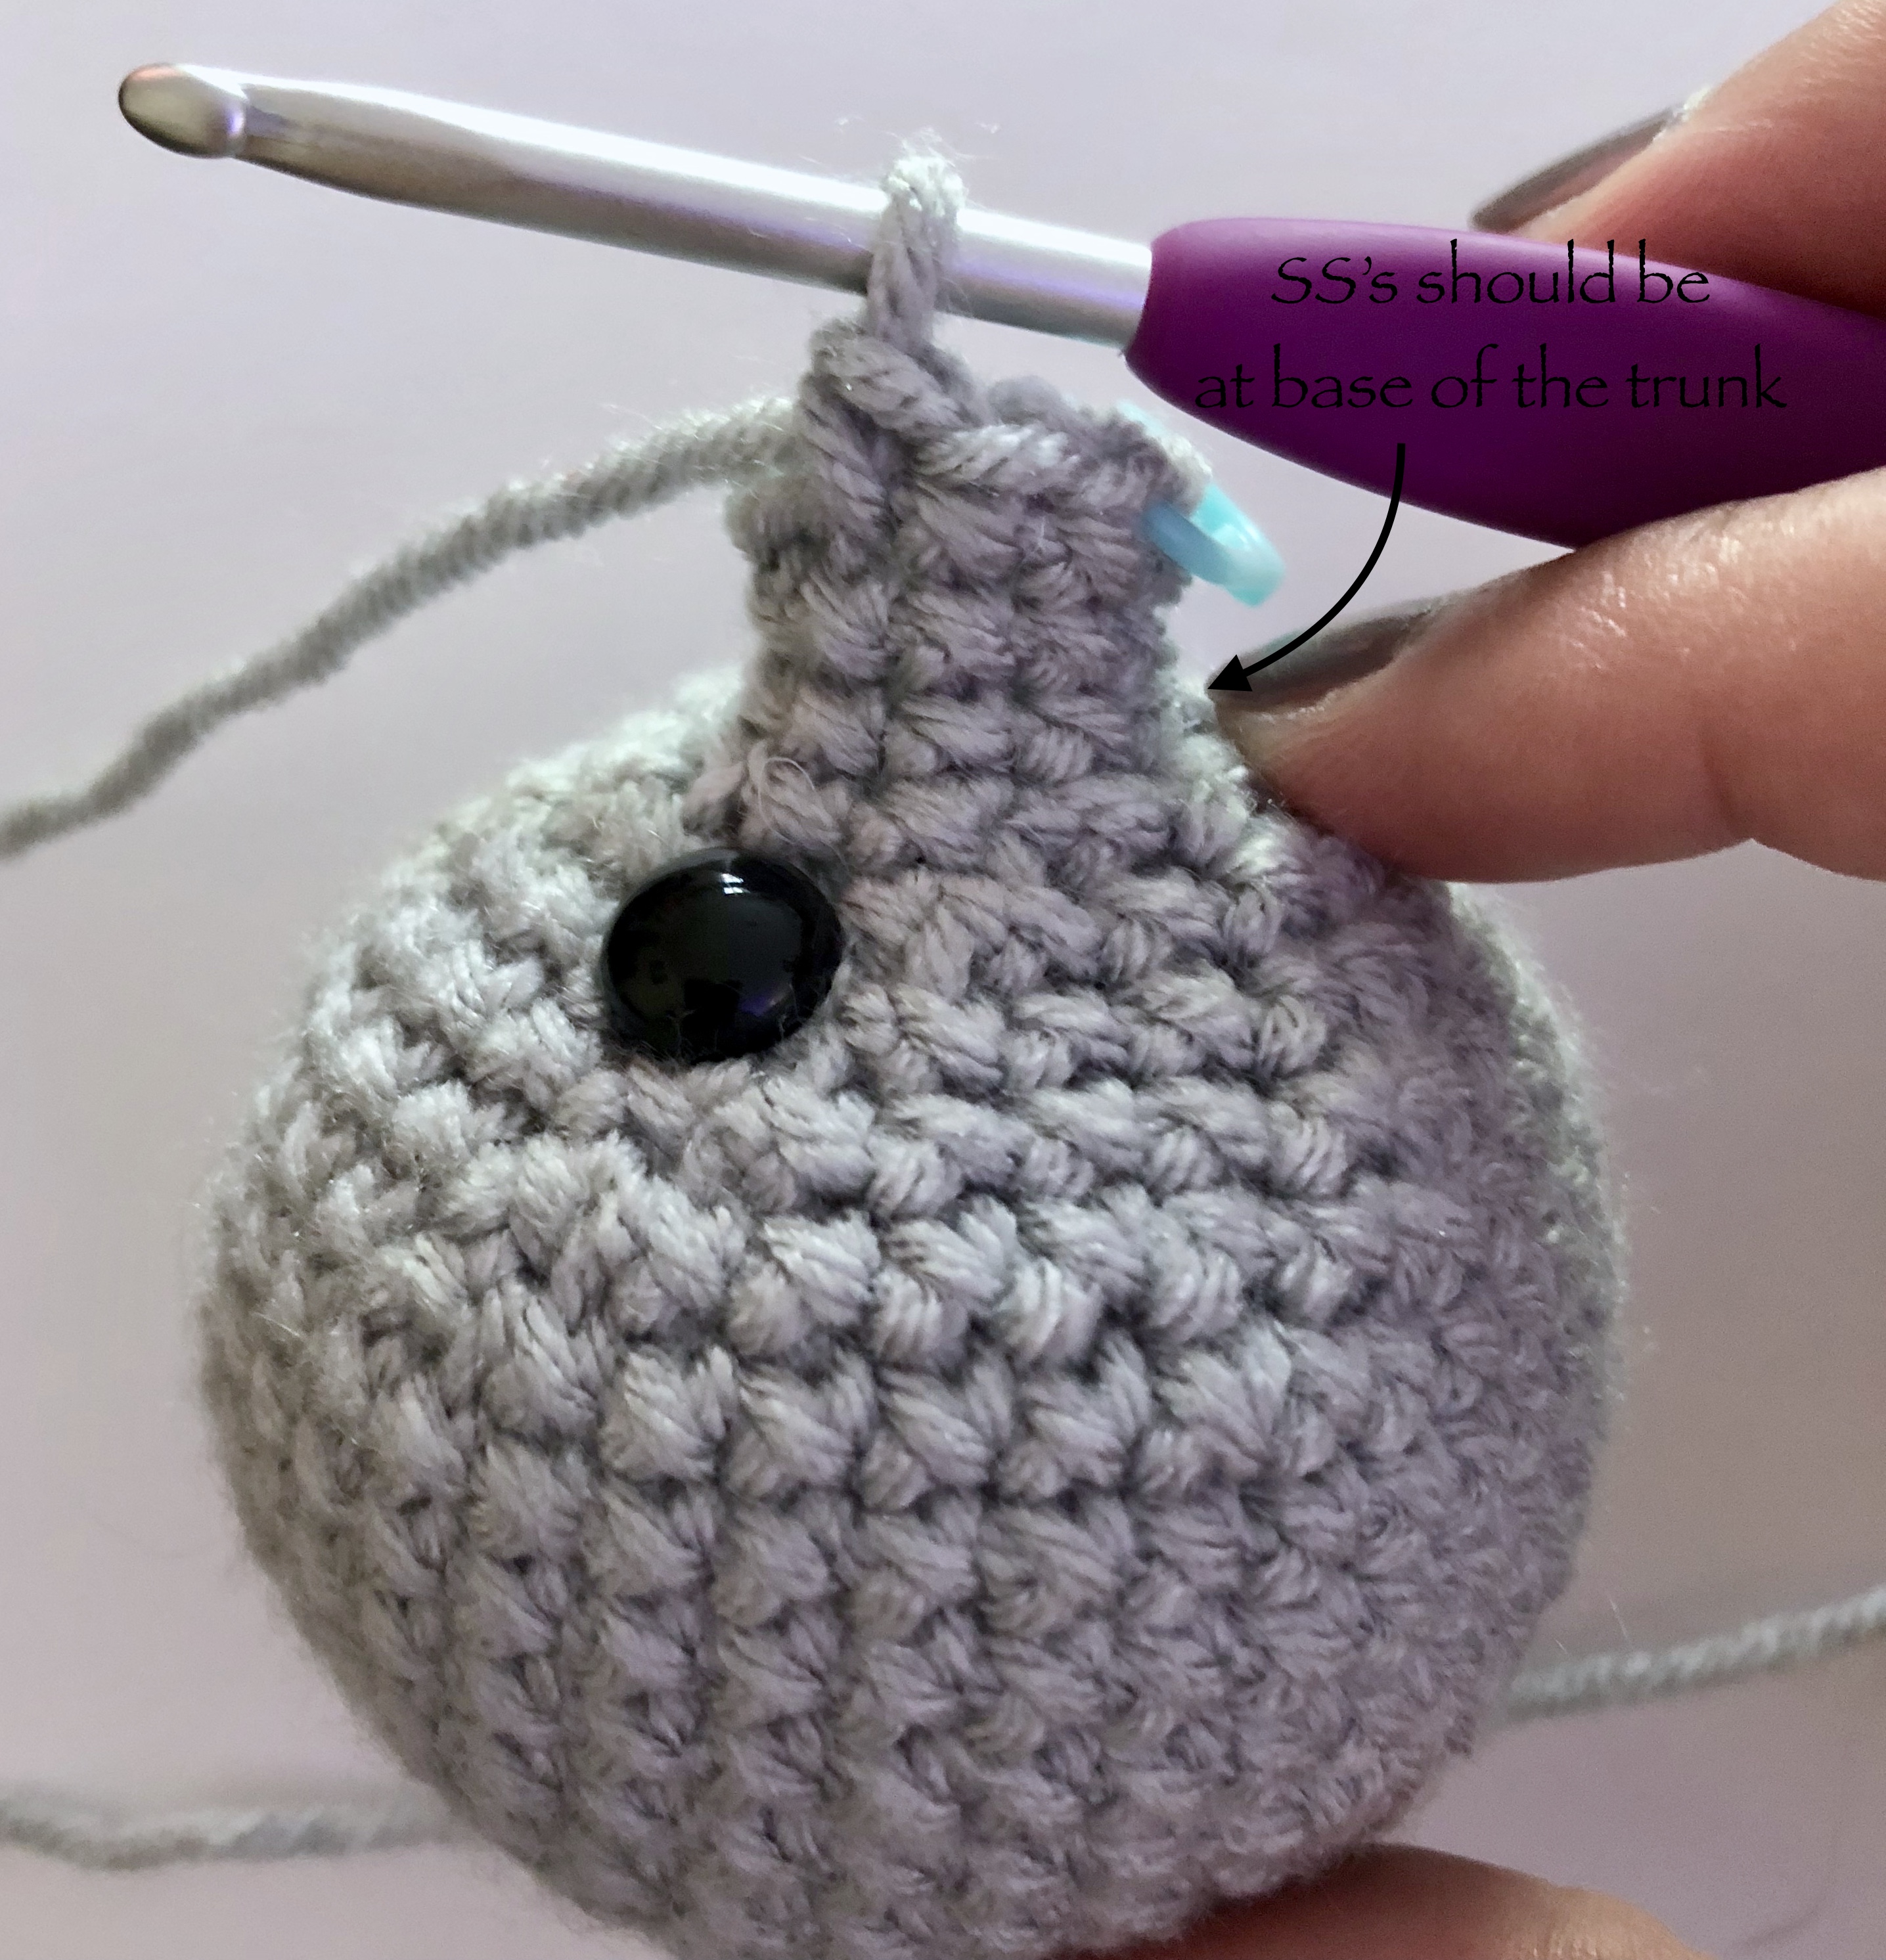
You will decrease in one more round before beginning your trunk. The trunk has a little more work to it then just working some rounds.
I wanted it to have some defined shape, so I threw in 2 rounds that included slip stitches. The first occurring directly under the base of the trunk, so that it was drawn downward ever so slightly. The slip stitches were only worked under the trunk, with normal single crochets occurring across the top.
The next curve will be a few rounds down and this will bring the trunk back up ever so slightly. To achieve this look, you will work a few slip stitches across the top of the trunk.
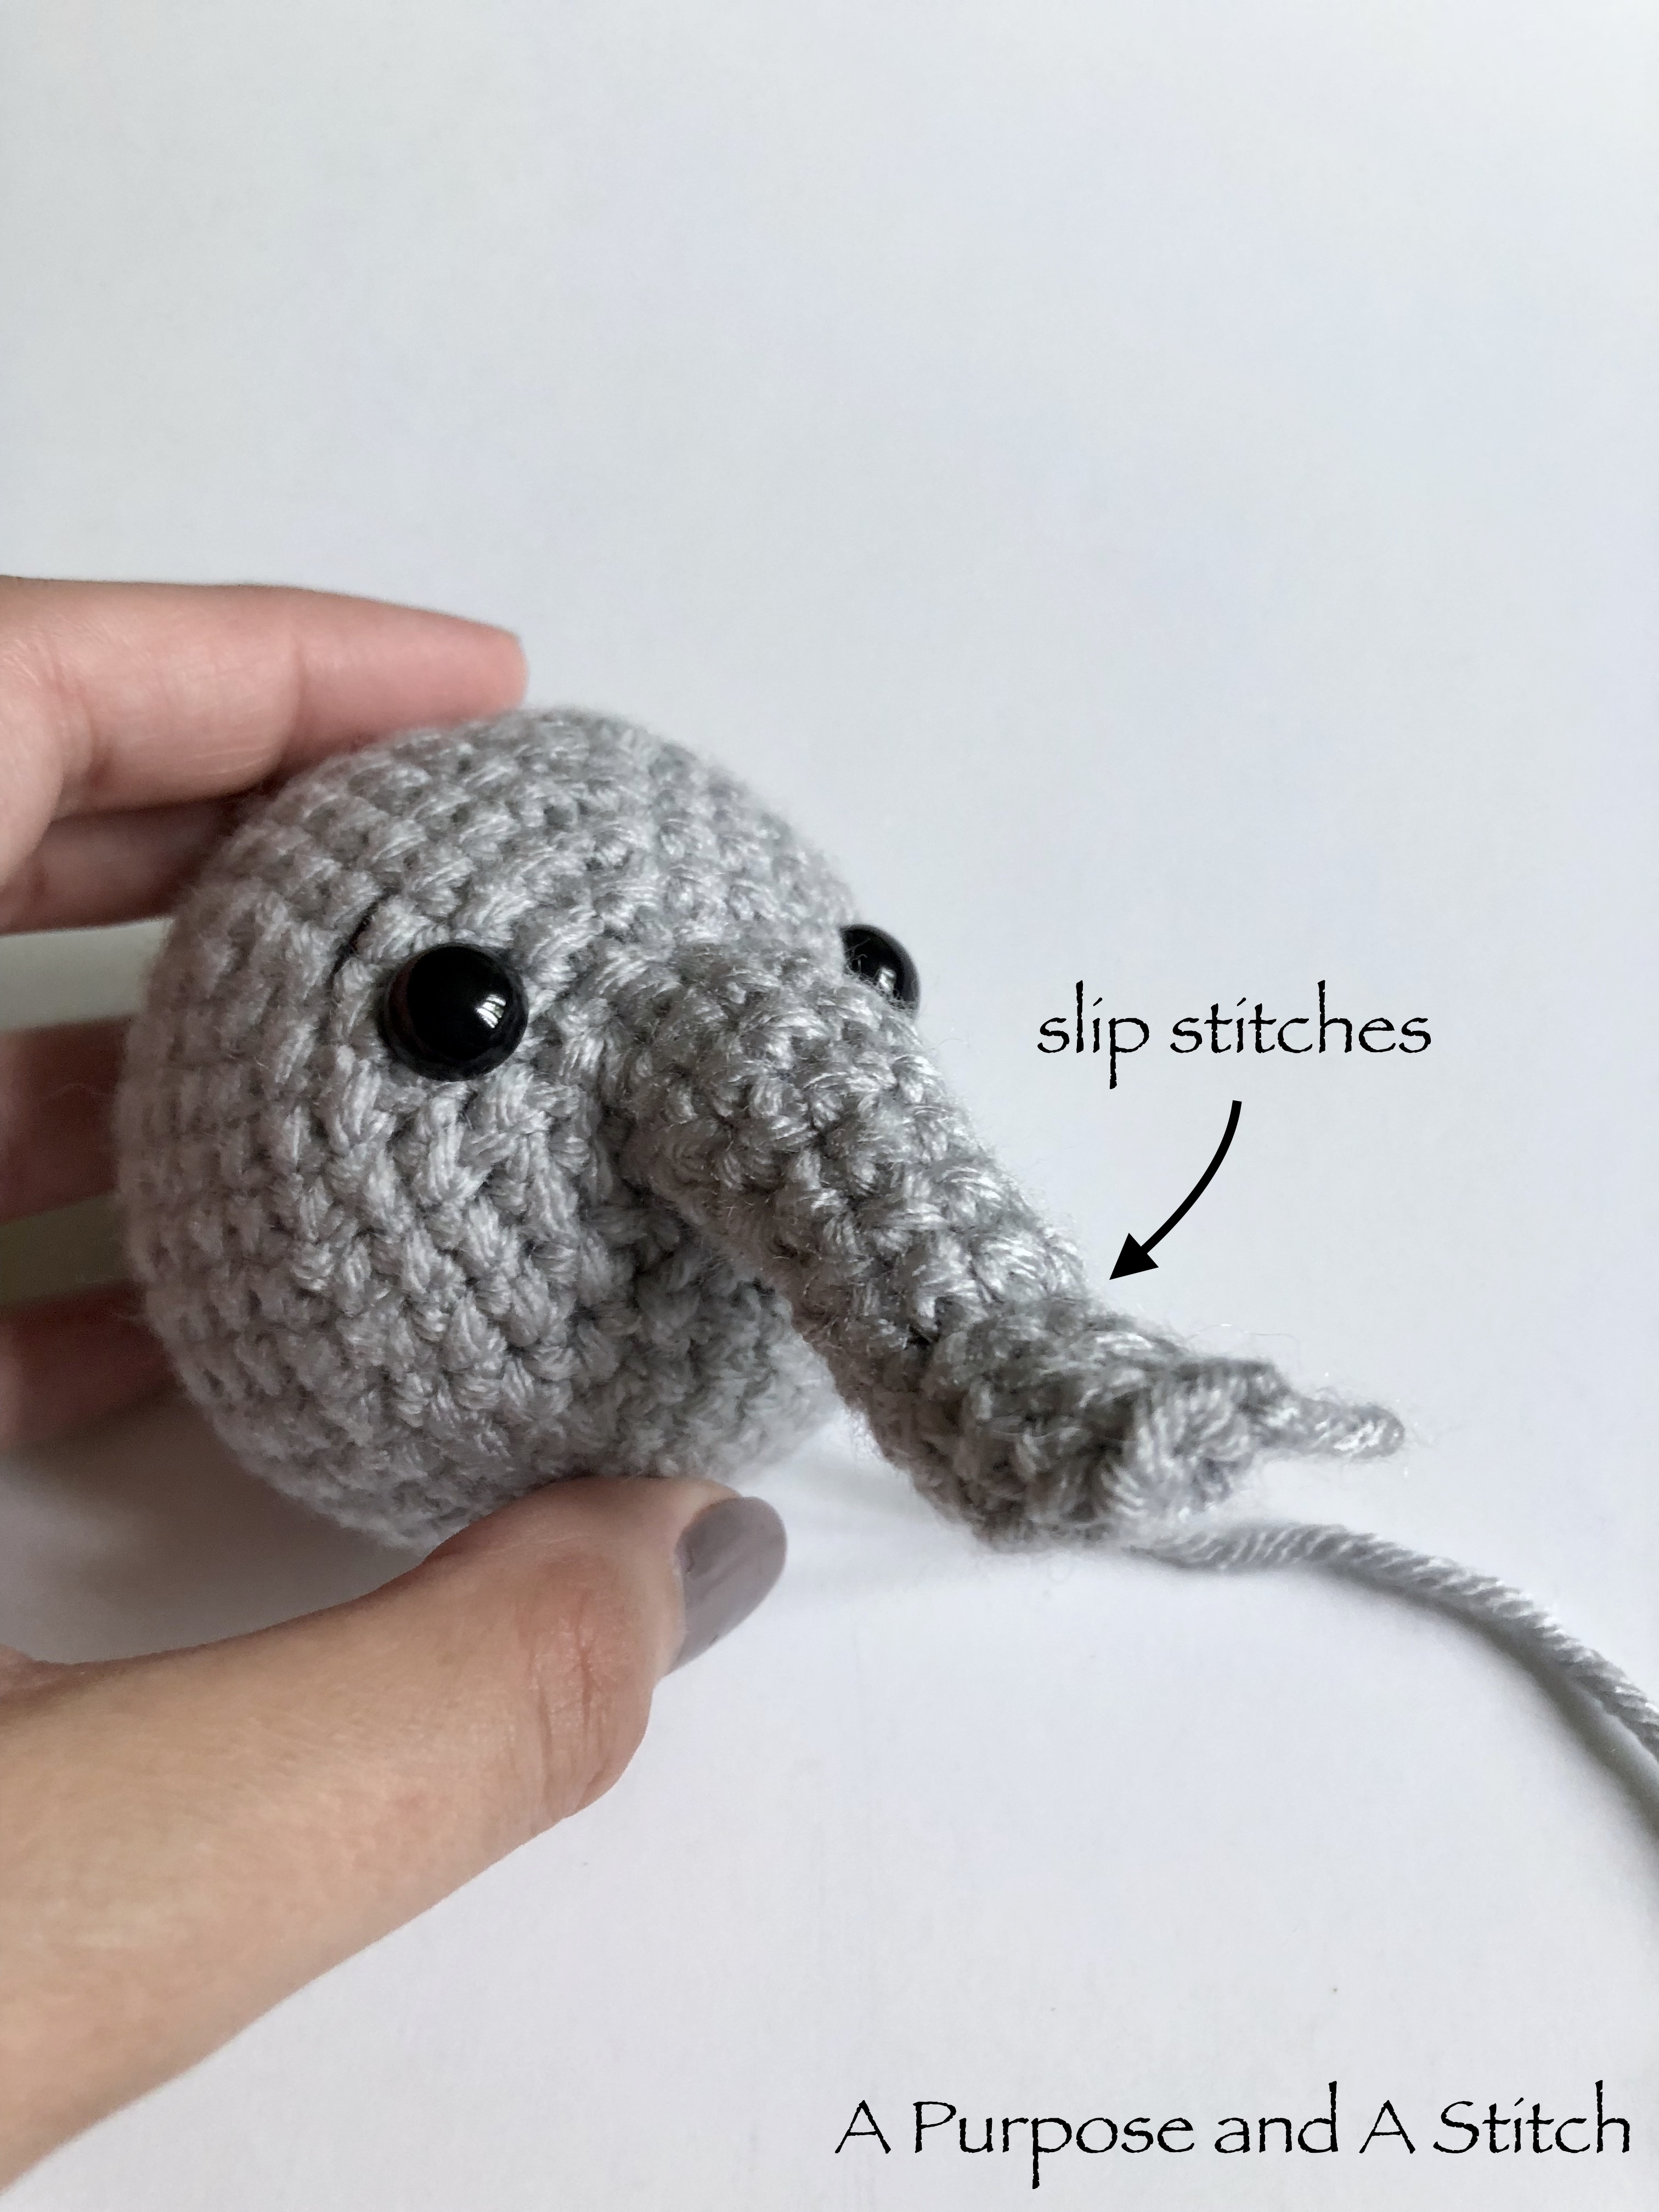
To complete the trunk, you will finish by weaving the tail in and out from top to bottom of the very end. This will help to close up the trunk, as well as make it more oval shaped.

Now that the head is complete, you will move on to making the ears. The ears are just two half circles, and are incredibly easy to work up. You will start out with a short foundation row, and slightly increase in each subsequent row. You will be turning your work as you go, as opposed to working in the round like you did with the head.


After the ears were complete, I added a piece of pretty fabric over the top. This is totally optional, but I love the way it gives an extra layer of detail and pop to Ellie. When sewing fabric onto my amigurumi, I like to make sure the fabric piece is slightly bigger then the article I am attaching it to.
 This allows me to fold the edges in as I go, preventing fraying in the future. It’s a little more work, but I think totally worth it. Make sure not to sew over your foundation row, as you will use this to attach the ears to the head. If you’re looking for a quicker and easier option, feel free to cut the piece of fabric to size and glue it in place using fabric glue.
After the fabric is secured to both ears, you will attach the ears to the head. I used the rounds on the head as a guide. Since the head is round, and the base of the ears are flat, you will want to curve the ears in a bit while attaching to give them a smoother look.


I attached the top of the ears between rounds 9 & 10 of the head. Then brought the middle of the ears back so that they attached between rounds 7 & 8 in the middle. The bottom of the ears should end up back between rounds 9 & 10.
Now that the head is completed, you will move on to making the blanket. This is fairly simple to make, as it’s just one large circle. To make it, you will begin with the magic ring again, and increase for a few rounds using single crochet. After there is a good base created, you will switch to working in half double crochets, continuing to gradually increase in each round as you go. Once completed, you should have a circle that measures roughly 14″ across.
 It may not lay completely flat if your gauge wasn’t loose enough, but blocking would help get it to lay a little flatter if you want. Since the lovey will end up folded the majority of the time, this is really your preference.
To complete the blanket, you will be adding a shell border. I chose to work my shell border in the gray I used for the head, so I worked a round of single crochets in gray before making the shells.

If you have never worked shells before, prepare to fall in love! They are very fun and easy to work up and you’ll be done with this round before you know it! To start, you will slip stitch into the first stitch of your previous round.


You will then double crochet 5 into the next stitch. To finish this first shell, you will skip the next stitch, and single crochet into the stitch after that.
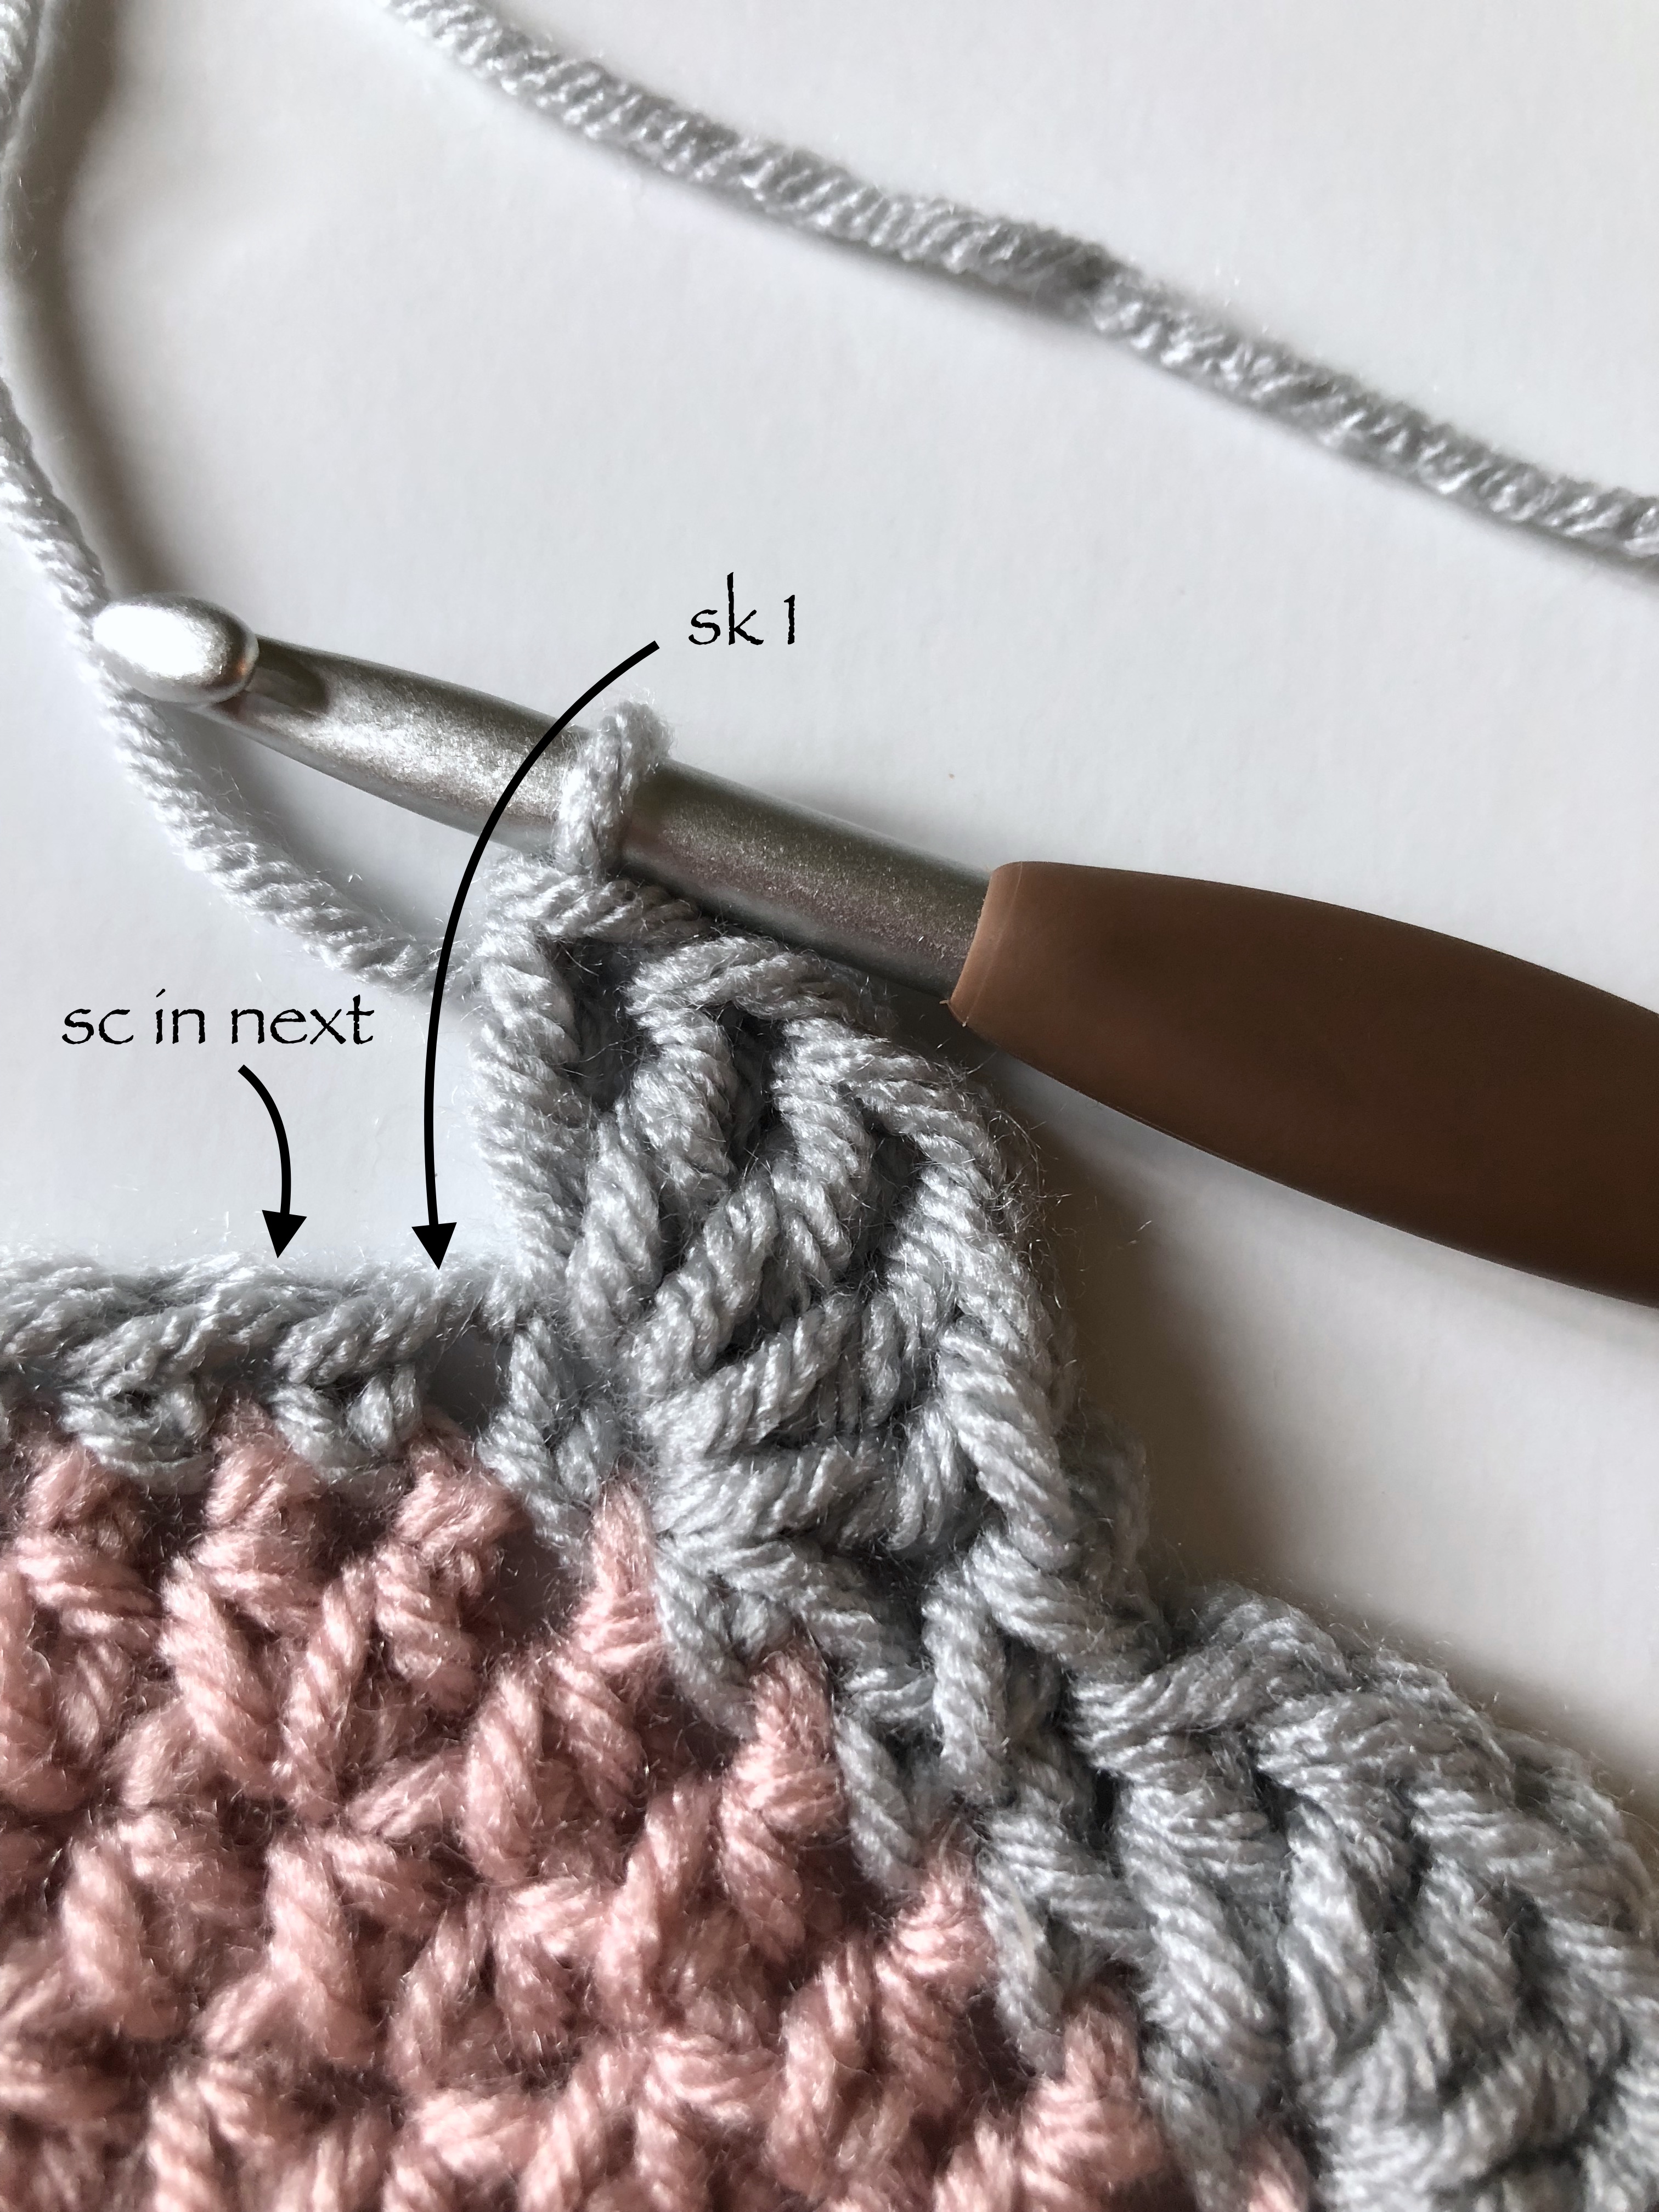 You will skip the next, and double crochet 5 into the following stitch to work the next shell. Each double crochet 5 group should have a skipped stitch on either side of it and a single crochet between each skipped stitch.
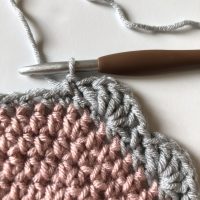

You just follow that process around and that’s all there is to it! Once the blanket is complete, you will attach the head to the most center (single crocheted) rounds trying to keep the join as even as possible.

All that remains now are the arms and the flower. The arms will start out with the magic ring again. After a round of increasing, you will work one round in the back loops only. This will give the bottom of the arms a flatter look, rather than more rounded. From here it’s a simple matter of working the rounds, slightly decreasing as you go, to gain height and shape.

Once your arms are completed, you will attach them to the blanket below the elephant’s head. I folded the blanket under the head so that it was in the shape of a triangle and attached the arms about 2-3 rounds down from the head on the side of the front most fold of the blanket.


Now all that’s left is adding the flower. To get started, I switched to a smaller hook and embroidery floss.
You’ll start out with a foundation chain, then transition to working a row creating the base of each petal of your flower. To do this you will double crochet, chain one and double crochet another all into the same stitch. You will then skip the next stitch, chain one more and repeat the double crochet, chain one, double crochet process. This will result in v-like gaps that you will work your petals into next.

For the last row, you will be double crocheting 5 into each ‘V’ space followed by a slip stitch in the following stitch. If this feels similar to working the shells, it should, it’s a very similar process.
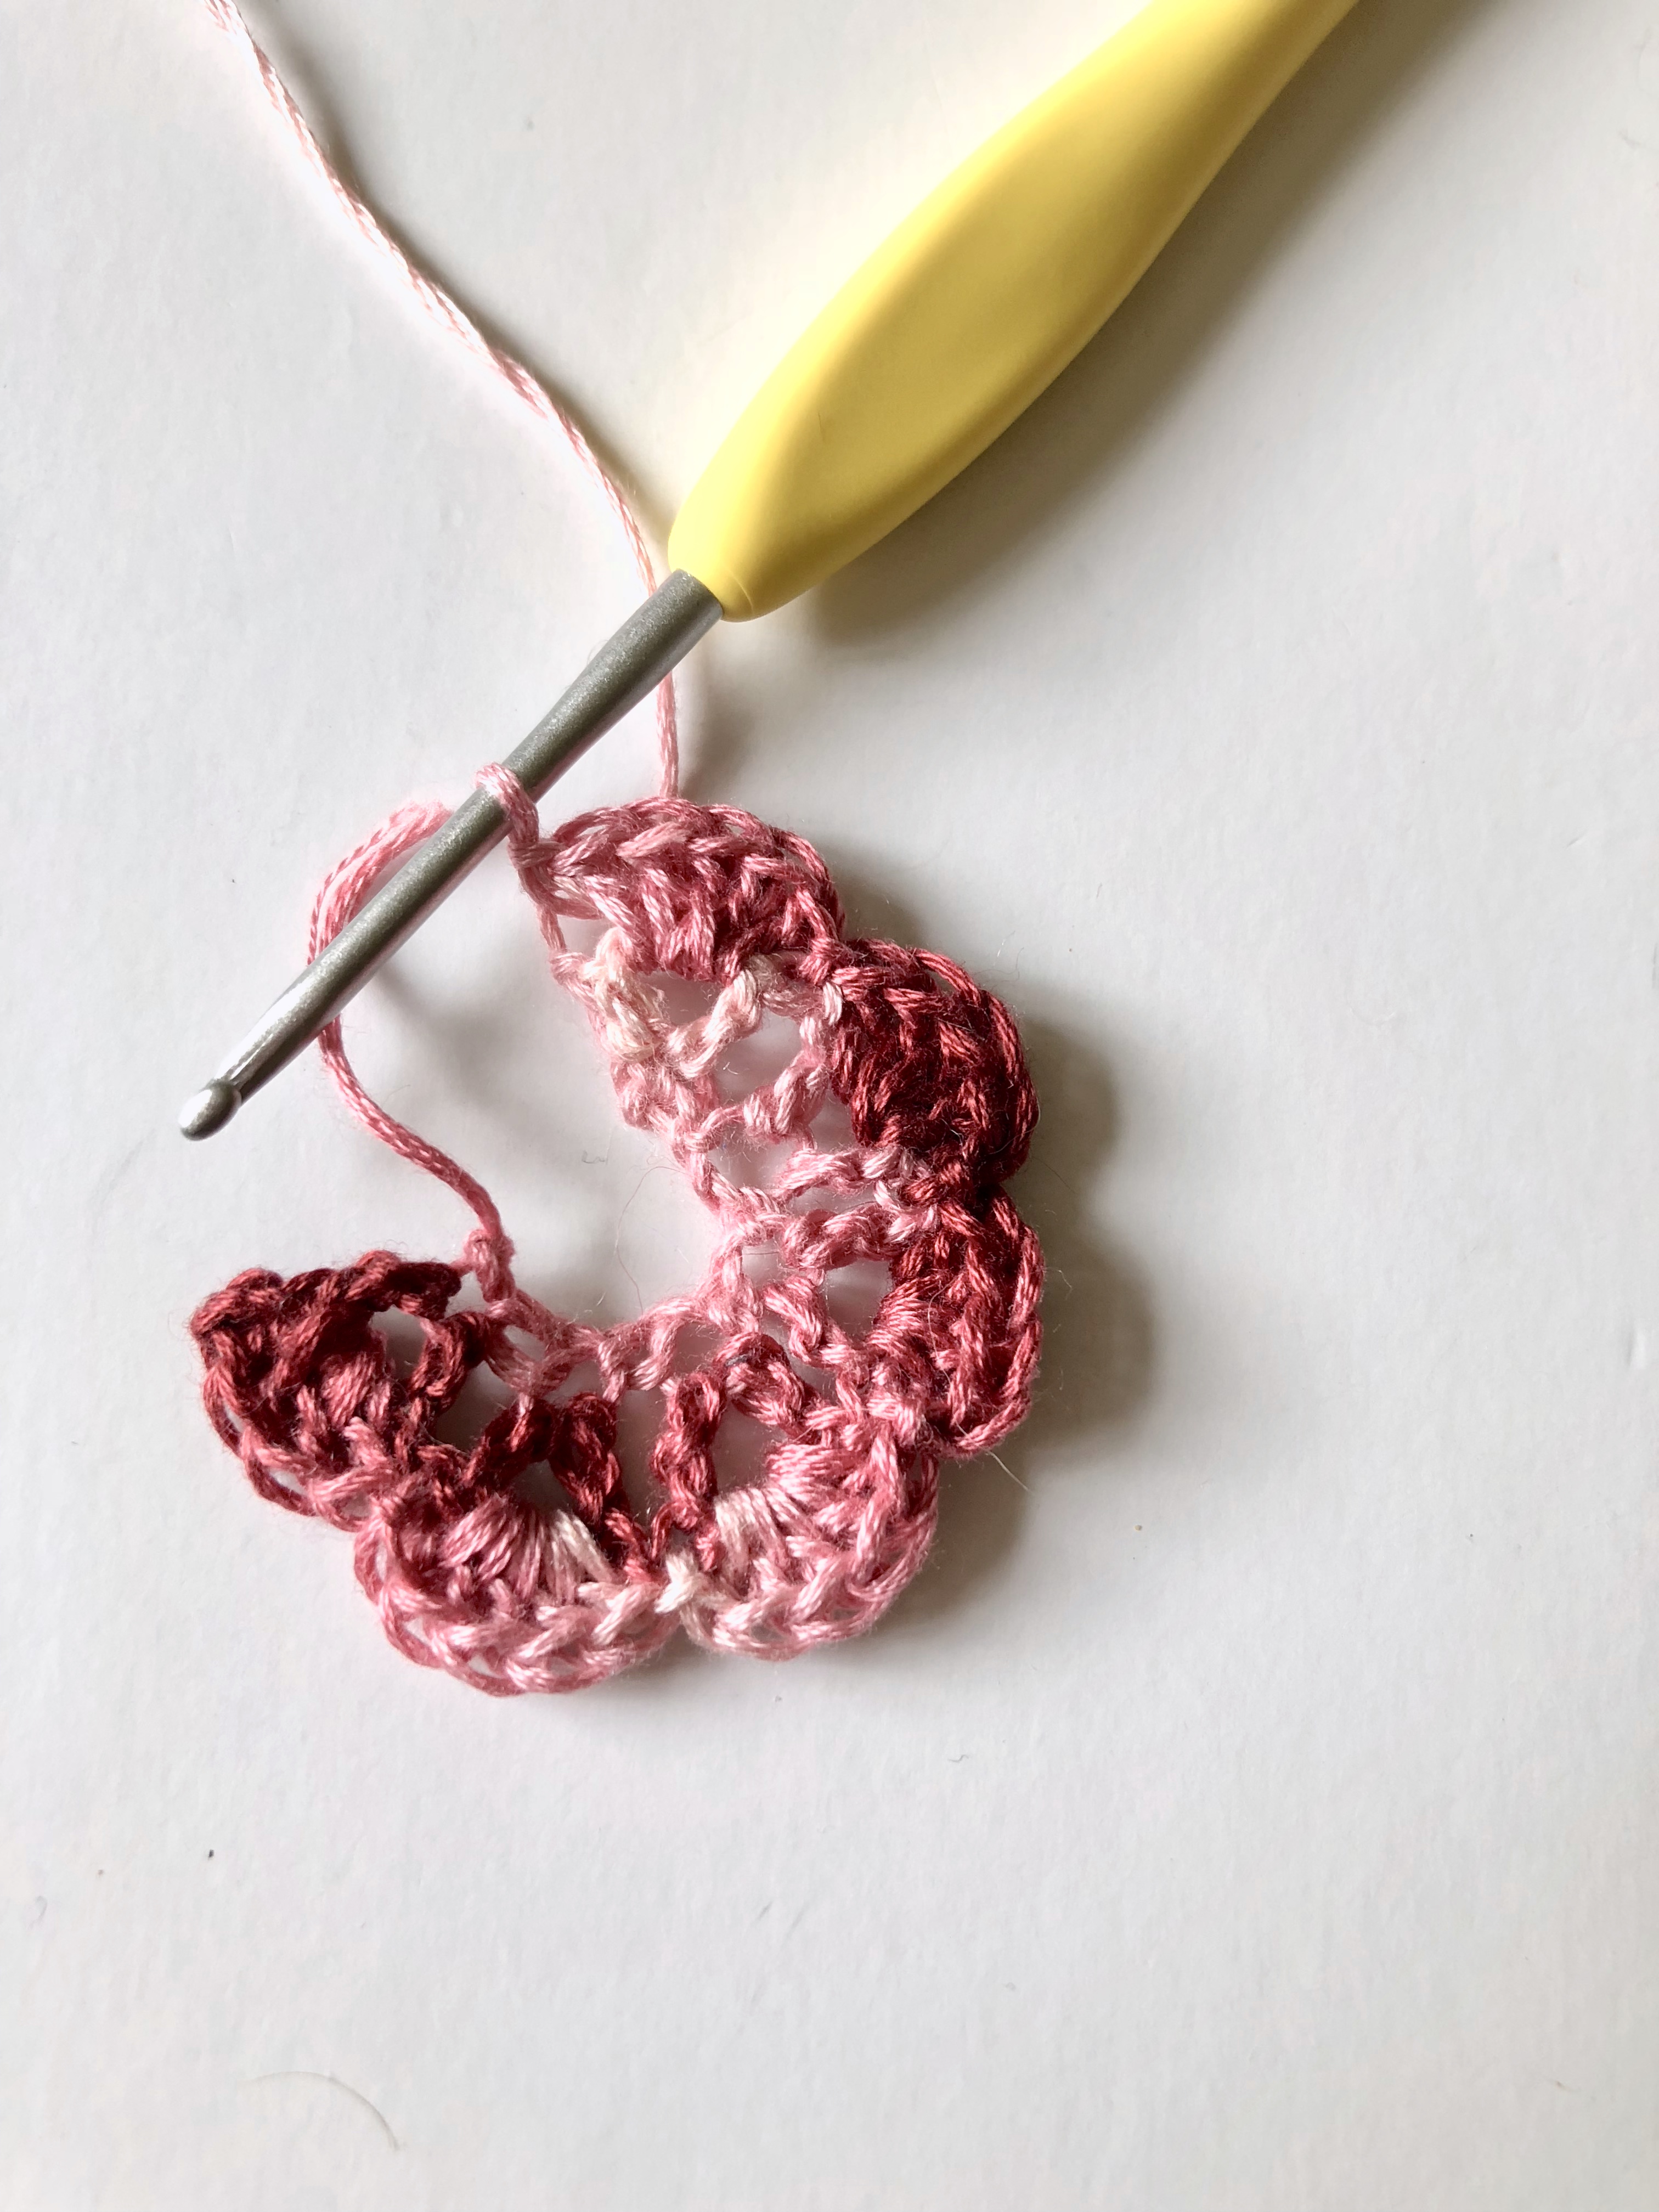
To assemble, you will roll up your row of petals and stitch the base in place onto the elephant’s head right by her ear. The end result should resemble a rose.
And there you have it! Your very own Ellie the Elephant lovey! Scroll down to see the full written pattern.
What You’ll Need
Gray worsted weight (4) yarn – approximately 50 yards
1 skein of soft worsted weight (4) yarn in your color choice (I went with rose)- approximately 140 yards
2 10mm safety eyes
Patterned fabric (optional)
needle and thread or fabric glue (optional)
black embroidery floss
pink embroidery floss (for flower)
fiberfill
4.00 mm crochet hook
6.00 mm crochet hook
2.75 mm crochet hook
My Amazon Picks
Abbreviations Used
sc= single crochet
inc= increase (sc 2 into 1 st)
dec= decrease (I used the invisible decrease, to which you can find a free tutorial here)
ss= slip stitch
fo= fasten off
ch= chain
blo= back loops only
hdc= half double crochet
hdc inc= half double crochet increase (hdc 2 into 1 st)
dc= double crochet
sk= skip
sp= space
Gauge Used for Blanket (gauge not measured for head, arms or ears)
12 hdc= 4″
9 rows= 4″
Completed Measurements
10″ tall from top of head to bottom of blanket
Diameter of Blanket= 14.5″
Width of head= 5″
Width of folded blanket= 9.5″
Elephant Head Pattern
Using 4.00mm crochet hook
Foundation: Work 5 into the magic ring (5)
Round 1: sc 2 into each around (10)
Round 2: *sc, inc*, repeat from * around (15)
Round 3: *sc 2, inc*, repeat from * around (20)
Round 4: *sc 3, inc*, repeat from * around (25)
Round 5: *sc 4, inc*, repeat from * around (30)
Round 6: *sc 5, inc*, repeat from * around (35)
Round 7-9: sc around (35)
Round 10: *sc 5, dec*, repeat from * around (30)
Round 11: *sc 4, dec* repeat from * around (25)
Round 12: *sc 3, dec* repeat from * around (20)
Round 13: *sc 2, dec* repeat from * around (15)
Begin stuffing head with fiberfill, attach safety eyes between rounds 11&12 on either side of the opening so that your starting stitch is located at the bottom between where you place the eyes. Embroider on eyebrows and mouth using black embroidery floss. Finish firmly stuffing the head with fiberfill
Round 14: *sc, dec*, repeat from * around (10)
Round 15: ss 2, sc 6, ss 2 (ss should occur under the trunk) (10)
Round 16-17: sc around (10)
Round 18: sc 2, dec, sc 2, dec, sc 2 (8)
Round 19-21: sc around, lightly stuffing trunk as you go (8)
Round 22: sc 4, ss 4 (ss should occur across the top of the trunk, if you are left handed you may need to ss 4 then sc 4 instead) (8)
Round 23-24: sc around (8)
Round 25: sc 2, dec, sc 2, dec, fo. Use tail to close the trunk by pinching the trunk closed horizontally, and weaving tail up and down across the sts (6)
Pattern for the ears (make 2)
Foundation: ch 4, turn (4)
Row 1: starting in 2nd ch from hook, sc 2 in each st, turn (6)
Row 2: ch 1, *sc, inc*, repeat from * across, turn (9)
Row 3: ch 1, *sc 2, inc*, repeat from * across, turn (12)
Row 4: ch 1, *sc 3, inc*, repeat from * across, turn (15)
Row 5: ch 1, *sc 4, inc*, repeat from * across, fo (18)
Pattern for the Arms (make 2)
Foundation: work 4 into the magic ring (4)
Round 1: sc 2 in each around (8)
Round 2: sc in blo around (8)
Round 3: sc around (8)
begin to lightly stuff with fiberfill
Round 4: sc 2, dec, sc 2, dec (6)
Round 5-10: sc around, stuffing with fiberfill as you go, fo leaving tail for attaching (6)
Pattern for Blanket
Switch to 6.00 mm crochet hook
Foundation: work 6 in magic ring (6)
Round 1: sc 2 in each around (12)
Round 2: *sc, inc*, repeat from * around (18)
Round 3: *sc 2, inc*, repeat from * around (24)
Round 4: *hdc 3, hdc inc*, repeat from * around (30)
Round 5: *hdc 4, hdc inc*, repeat from * around (36)
Round 6: *hdc 5, hdc inc*, repeat from * around (42)
Round 7: *hdc 6, hdc inc*, repeat from * around (48)
Round 8: *hdc 7, hdc inc*, repeat from * around (54)
Round 9: *hdc 8, hdc inc*, repeat from * around (60)
Round 10: *hdc 9, hdc inc*, repeat from * around (66)
Round 11: *hdc 10, hdc inc*, repeat from * around (72)
Round 12: *hdc 11, hdc inc*, repeat from * around (78)
Round 13: *hdc 12, hdc inc*, repeat from * around (84)
Round 14: *hdc 13, hdc inc*, repeat from * around (90)
Round 15: *hdc 14, hdc inc*, repeat from * around (96)
Round 16: *hdc 15, hdc inc*, repeat from * around (102)
Round 17: *hdc 16, hdc inc*, repeat from * around (108)
Round 18: switch to gray yarn, single crochet around (108)
Round 19: ss into 1st st of previous round, dc 5 in next stitch, sk 1 stitch, sc in next (1st shell created, *sk 1, dc 5 in next, sk 1, sc in next*, repeat from * around until you reach the last shell. Begin the last shell the same as the rest, ending with a ss into the very last st (rather then a sc), fo, weave in ends. (27 shells total)
Pattern for the flower
Switch to 2.75 mm crochet hook
Foundation: Ch 15
Row 1: Dc 1, ch1, dc 1 in the 5th ch from your hook. *Sk 1, ch 1. Dc, ch 1, dc in next*, repeat from * across, sc in last. Ch 3 and turn. (You should end up with 6 sets of dc ‘V’s)
Row 2: Starting in the first dc ‘V’ ch 1 sp, dc 4. *Sl st in next ch1 space between the dc V’s. dc 5 into the next “V” *, repeat from *across, sl st in last st. Fo, leaving a long tail. With long end on the right side, roll the flower inwards. Use tail to weave in and out of the base of the petals to secure in place.
Assembly
Sew on the optional fabric to your ears if you so choose. You will want to trace the ears on the backside of the fabric, and cut a little bigger than your traced area.
Fold the edges in, and sew with a needle and thread around the borders (for a quicker and easier option, cut the fabric to size and glue in place). Make sure that you leave the foundation row of your ears free from fabric so you can work into the stitches when attaching to the head.
Using the tails of the ears, or an extra piece of yarn, attach the ears to the head. I attached my elephant’s ears on a curve, so that the top of the ears were between rounds 9 & 10 of the head, the middle between rounds 7 & 8 and the bottoms between 9 & 10 again. Once the ears are secured in place, fasten off and weave in the ends.
Attach the head to the blanket using the line between rounds 2&3 on the blanket as guide of where to attach head to. This is not a perfect science, as the rounds on the head will run perpendicular to the rounds of the blanket, but your goal should be to keep the join as even around as possible.
Attach the arms about 2-3 rounds down from where you attached the head on the blanket. To get a good placement on the lovey, fold the blanket so that it looks like a triangle, and attach the arms on the front most fold. Once secure, weave in the ends.
The final touch is to add the flower. I placed mine right in front of the area where I attached the top of the right ear to the head. Once secured, fasten off and weave in the ends.
Congratulations! Your Ellie the Elephant lovey is now complete, I hope you enjoyed making her as much as I did!
Have a comment, question, or just want to share your finished work? Leave a comment below, I love to hear from my readers!


Hi, I’m making this as a gift and am a self taught/University of YouTube crocheter. I don’t understand the directions for the flower at all. Can you explain it more? I managed to work something that looks pretty enough but I’d love to know how to do it properly. Thanks for the beautiful pattern!
Hi Barbie,
Sorry for the confusion on making the flower. You’re essentially making a shell stitch into a chain 1 space that you create in the first row. The dc, ch 1, dc repeats on row 1 will make a gapping, and in those gapings you will work 5 double crochet stitches on the next round.
Not sure exactly what part you’re having issues with, but if you need more guidance- feel free to shoot me an email and I would be happy to try to clarify more.
Happy Crocheting!
-Bernadette
I love this pattern! I plan to make it for my niece but with these types of projects in the past I can always see the stuffing through the yarn! Any tips here? What yarn did you use for this pattern?
Hi Katie,
So happy to hear you like this pattern enough to want to make one for your niece! I’ve found that the trick with any kind of amigurumi pattern is having a tight tension and not overstuffing with fiber fill to keep the stuffing from peeking through. 😁 If your gauge isn’t as tight as mine with the hook and yarn weight combo, you might have more stuffing peep through, in which case dropping down a hook size will help! This will also result in a more similar sized project to what I ended up with. As far as the yarn goes, I just used a generic worsted weight yarn I had in my stash. Something like Hobby Lobby’s I Love This Yarn, or Red Heart’s Super Saver should be pretty comparable.
Hope this helps and warmest regards,
Bernadette
Hi Bernadette
I’m a begginer and never crocheted. Is the elephant hard task to take on. I would love to do if for my second grandchild. Is there utube video that I can look at.
Thank you
Maria
Hi Maria,
I’m so glad you like this pattern enough to make one for your grandchild! If you have never crocheted before, this pattern might be a little challenging to take on, but amigurumi (crocheted stuffed animals) was where I got my start, so I don’t think it’s impossible! ☺️ I unfortunately do not have a video tutorial for this pattern, but hope the pictures are enough to help you through if you do choose to undertake the challenge!
Best of luck and warmest regards!
-Bernadette
Thank you so much for this pattern. I made this with Just my stripe in strawberry banana for my niece. There are definitely imperfections but it was my 1st time but I hope she lives it just as much as I do.
Awww, that’s so exciting! It’s the best feeling to complete a make for a loved one, imperfections and all! I’m so happy you enjoyed making it 🥰
Just finished making this for a friend who had a baby girl. It turned out so adorable! Will definitely be making more of these… One thing I added was some legs, I made them in the same way as the arms but longer and attached them underneath the “skirt” to the bottom of the head. I wrote out the pattern if anyone else is interested:
Sc 6 into magic circle
1 – 2 sc in each st (12)
2- sc in back loop of each st, (12)
3 – sc in each st (12) stuff.
4 – sc in each st (12)
5- sc in each st (12)
6 – *sc 1, dec* repeat x4 (8) stuff.
7 – sc in each st (8)
8 – sc in each st (8)
9 – sc 3, dec, sc 3, dec (6)
10 – sc 6 (6)
Repeat row 10 until desired length and fasten off.
What a fun idea! Thanks for sharing 😁
Thank you so much for such an easy and cute and fast pattern to make. This will be my go to baby present from now on. I used a super soft yarn that was quite fat so mine turned out a bit bigger but I love her and I especially love the flower. It really added the perfect finishing touch. Now I just need to practice my sewing skills to get the ear fabric perfect! Thank you again!
You are so sweet. Thanks so much for sharing and your Ellie sounds darling! That sewing gets me every time too 😅
Thank you for the gorgeous design. I’ve just finished making it as a gift for a work colleague going on maternity leave soon. I sewed the eyes rather than using safety eyes as I have done this on all my previous crochet loveys. I have a photo on my facebook crafts page at https://www.facebook.com/DP.craftsbysarah/.
Thanks so much for sharing! She turned out beatifically and I love the hand stitched eyes! So glad you enjoyed making her 😁
Just finished this lovey. Super cute, was quick and fun to make too. Thank you for sharing this free pattern!
So pleased to hear you liked it! Thanks so much for sharing 😄
Thank you for sharing your pattern. I get so frustrated when I see something I would love to make and then can’t find it, or the free patterns aren’t really free (and I don’t mind paying, designers deserved to paid.
You are so welcome friend! Glad you like it! 💕
Sorry 😐 Bernadette, I was talking to Ann at another site before finding your pins! My bad!🙄🇺🇸🎶🦋🦋🦋
Haha, no worries, it happens to the best of us ☺️ so glad you’re here, enjoy!
Ann, love this idea and all others I have read on Facebook! Can’t wait to try them all!😘🇺🇸🎶🦋🦋🦋
Dear Bernadette, your baby elephant blanket is the cutest I had seen by far . Will definitely attempt to crochet one. Thank you so much
Aww, thank you so much for the kind words! Made my week ☺️
Hi and congratulations for your patterns. I an working on Ellie’s pattern and I would like to ask if I have to change crochet hook when I will attach the gray colour in the blanket.
Thank you!
Hi Mia! So glad you like her! 🙂 The grey shells will be worked in the same 6.00mm hook as the rest of the blanket. Hope this helps!
Hi Bernadette! I love your Elle pattern! It is so adorable! I made one for my newborn niece. It was fun and easy to make. Thank you so much for sharing your pattern.
Aww, thanks so much Eulalia! I really appreciate the kind words and so happy you enjoyed making her! 😄
Looks adorable, can’t wait to make it!
Thanks so much Nancy! I hope you enjoy making her. 😊
Im new at reading patterns for the blanket part when you say sc in do that means 2 in each one because im have a hard time matching up the number that i should have in each round
Hi Anna, when the pattern reads, “Sc inc” that means to single crochet 2 into that one stitch. The rest of the stitches should be regular single crochets for that round. This portion is worked very similarly to the increases you worked in the elephant’s head. Hope this helps 🙂
Omg thanks for the break down!!! I was omg what’s wrong with me???
You’re so welcome, always happy to help and so happy you like the pattern!
Warmest Regards,
Bernadette
Love this. It’s so cute!!!
Any chance of a flamingo in the future? I’ve been asked for one but when I try they look ao weird lol
Your lamb and elephant are adorable 💕
Thank you LeeAnne! I hadn’t thought of making a flamingo, but love the suggestion! I will definitely keep it in mind while brainstorming my next lovey pattern! 🙂
Beautiful, one of the nicest I have seen. Will make in the near future. Ann
Thank you so much Ann! So glad you like it 🙂
This elephant is so adorable! I have ordered my pattern and yarn and can hardly wait to begin. 🙂 Would you mind sharing what fabric and embroidery floss you used? I love your colors and just can’t seem to find them. Thank you!
Thank you so much Raquel! I hope you enjoy making your very own Ellie 😁
Unfortunately, I purchased my fabric back when I first designed this pattern, so I’m not sure if the same material will still be available, but I can tell you I purchased it from Hobby Lobby. As for the floss, I used DMC floss from Hobby Lobby and believe the flower was made with their variegated carnation colorway.
Hope this helps and best of luck!
Happy Crocheting,
Bernadette